WRITING DESK
ASSEMBLY INSTRUCTIONS - IMPORTANT: Carefully unpack and identify each component before attempting to assemble. Refer to parts list. Please take care when assembling the unit and always set the parts on a clean, soft surface. Do not use power tools to assemble. A Phillips screwdriver may be required for assembly. If you require any assistance with assembly, parts, or information on other products, please call us. Check screws, nuts and bolts periodically (or every 6 months). Tighten if necessary.
PARTS LIST / LISTA DE PARTES / LISTE DES PIÈCES DÈTACHÉES DESCRIPTION / DESCRIPCIÓN / DESCRIPTION QTY / CANT/ QTÉ 1. Desktop Mesa Table 1 2. Rear Panel Panel Trasero Panneau Arrière 1 3. Top Panel Panel Superior Panneau Supérieure 1 4. Left Panel Panel Izquierdo Panneau Gauche 1 5. Right Panel Panel Derecho Panneau Droite 1 6. Divider Dividor Diviseur 2 7. Shelf Estante Étagère 1 8. Leg Frame Armazón de Patas Cadre de Jambes 2 9. Metal Bar Barra de Metal Barre en Metal 1 10.
PARTS LIST / LISTA DE PARTES / LISTE DES PIÈCES DÈTACHÉES DESCRIPTION / DESCRIPCIÓN / DESCRIPTION QTY / CANT/ QTÉ 11. Floor Leveler Nivelador de Piso Niveleur de Plancher 4 12. Cam Bolt Perno de Leva Boulon à Came 8 13. Cam Lock Cerradura de Leva Serrure à Came 8 14. Wood Dowel Clavija de Madera Goujon en Bois 4 15. Shelf Pin Clavia para Estante Goujon pour Étagère 4 16. Allen Bolt - 1/4" x 4-3/4" Perno Allen - 6mm x 123mm Boulon Allen - 6mm x 123mm 4 17.
1 17 Holes face in - see arrows. Agujeros dan hacia adentro - vea las flechas. Trous vers l’intérieure - voir les flèches. 8 8 9 17 p.
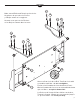
2 11 11 11 10 11 10 19 19 p.
3 Finished side faces the rear. Lado acabado orientado hacia atrás. Le côté fini orienté vers l’arrière. Holes face up. Agujeros hacia arriba. Trous vers le haut. 2 1 20 20 p.
4 Finished side faces the rear. Lado acabado orientado hacia atrás. Le côté fini orienté vers l’arrière. 3 6 6 Holes face down. Agujeros hacia abajo. 16 Trous vers le bas. 16 Bolts go through Panels (6) and attach to Panel (3). Los Pernos pasan a través de Paneles (6) y se fijan al Panel (3). Les boulons traversent les Panneaux (6) et se fixent au Panneau (3). p.
5 Make sure all Bolts and Dowels go into holes. Asegúrese de que todos los Pernos y Clavijas entren en los agujeros. Assurez-vous que tous les Boulons et les Goujons entrent dans les trous. 12 14 14 12 12 14 14 5 12 13 4 13 13 Arrow on Cam Lock faces Bolt. Turn Cam Lock with screwdriver until firm - do not overtighten. 13 Flecha en la Cerradura de Leva da hacia el Perno. Gire la Cerradura de Leva con un destornillador hasta que esté firme - no apriete demasiado.
6 20 CAUTION!: Use two people. ¡PRECAUCIÓN!: Use dos personas. PRÉCAUTION: Utilisez deux personnes. 20 4 ht a Rigrech e De roit D 7 ft Le ierdae u h Izq auc G Shelf (7) can be installed on the left, right, or center. 13 13 El Estante (7) se puede instalar a la izquierda, a la derecha o al centro. L’étagère (7) peut être installée à gauche, à droite ou au centre. 18 18 18 p.
LIMITED WARRANTY The warrants to the original purchaser that this product will be free from defects in its workmanship and materials, under normal residential use and service conditions, as described herein. The Company will repair or replace, at its option, without charge to the original purchaser only, the defective product or parts for a period of ten (10) years (or Thirty (30) days on closeouts and discounted products) from the date of purchase and while owned by the original purchaser.