
User's Manual
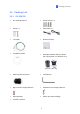
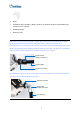
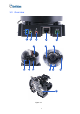
Table Of Contents
- Contents
- Note for Connecting to GV-DVR / NVR / VMS
- Note for Recording
- Note for Installing Camera Outdoor
- Optional Accessories
- Chapter 1 Introduction
- Chapter 2 Getting Started
- Chapter 3 Accessing the Live View
- Chapter 4 Administrator Mode
- Chapter 5 Face Recognition
- 5.1 Features
- 5.2 Installation Flowchart
- 5.3 Ideal Camera Position
- 5.4 Adjusting Illumination
- 5.4.1 Daytime
- 5.4.2 Nighttime
- 5.4.3 Low Illumination (WDR)
- 5.5 Enrolling Face Data
- 5.5.1 Photo Requirements
- 5.6 Face Recognition Basic Settings
- 5.6.1 Settings
- 5.6.2 License
- 5.6.3 Management
- 5.6.4 Events
- 5.6.4.1 Searching for log data
- 5.6.4.2 Enrolling Faces
- 5.6.4.3 Synchronizing Face Databases
- 5.6.5 Trigger Area
- Chapter 6 Recording and Playback
- Chapter 7 Advanced Applications
- Chapter 8 DVR / NVR / VMS Configurations
- Chapter 9 Smart Device Connection
- Appendix

Ruler
8 GB Micro SD Card (MLC, SDHC, Class 10) (The Micro SD Card is preinstalled and
formatted in the camera)
Download Guide
Warranty Card
Note: You can run the wires through a conduit pipe. After you have threaded all the wires,
install the supplied conduit converter and plastic PG21 conduit connector with a
self-prepared 1/2’’ conduit pipe to the camera. Power will have to be supplied through a PoE
adapter, because the power adapter wire does not fit in a 1/2” pipe. You will have to purchase
your own PG21 conduit connector if you want to use a 3/4” or 1” pipe.
Conduit pipe
Conduit converter
Plastic PG21
conduit connector
A metal PG21 conduit connector can be purchased upon request. The metal PG21 conduit
connector can be connected with a 3/4” pipe.
Conduit pipe
Conduit converter
Metal PG21
conduit connector
5