
User's Manual
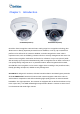
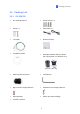
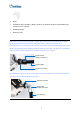
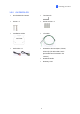
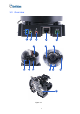
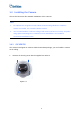
Table Of Contents
- Contents
- Note for Connecting to GV-DVR / NVR / VMS
- Note for Recording
- Note for Installing Camera Outdoor
- Optional Accessories
- Chapter 1 Introduction
- Chapter 2 Getting Started
- Chapter 3 Accessing the Live View
- Chapter 4 Administrator Mode
- Chapter 5 Face Recognition
- 5.1 Features
- 5.2 Installation Flowchart
- 5.3 Ideal Camera Position
- 5.4 Adjusting Illumination
- 5.4.1 Daytime
- 5.4.2 Nighttime
- 5.4.3 Low Illumination (WDR)
- 5.5 Enrolling Face Data
- 5.5.1 Photo Requirements
- 5.6 Face Recognition Basic Settings
- 5.6.1 Settings
- 5.6.2 License
- 5.6.3 Management
- 5.6.4 Events
- 5.6.4.1 Searching for log data
- 5.6.4.2 Enrolling Faces
- 5.6.4.3 Synchronizing Face Databases
- 5.6.5 Trigger Area
- Chapter 6 Recording and Playback
- Chapter 7 Advanced Applications
- Chapter 8 DVR / NVR / VMS Configurations
- Chapter 9 Smart Device Connection
- Appendix

1 e Ca
This section introduces the standard installations of the cameras.
Note:
1. For optimal face recognition results, follow recommended guidelines to install the
camera. For details, see 5.3 Ideal Camera Position.
2. You can also install the camera to ceilings, wall corners (concave or convex), and poles
using optional mounting kits. For details on these installations, see GV-Mount
Accessories Installation Guide.
.4 Installing th mera
1.4.1 GV-VD8700
The camera is designed for outdoors. With the standard package, you can install the camera
on the ceiling.
1. Remove the housing cover with the supplied torx wrench.
Figure 1-2
9