
User Manual
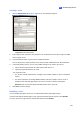


Table Of Contents
- V8.6.0.UserManual(UMV860-A-EN)
- Cards Supported
- Important Notes
- Naming Definition
- Contents
- ManualV860-CH1-Main
- Configuring Main System
- 1.1 Getting Started
- 1.2 System Configuration
- 1.3 Audio and Video Settings
- 1.4 Camera Monitoring
- 1.5 Account and Password
- 1.6 System Idle Protection
- 1.7 System Log
- 1.8 Recording Schedule
- 1.9 Schedule Center
- 1.10 Alert Notification
- 1.11 PTZ Control
- 1.12 Digital PTZ Control
- 1.13 Pop-up Live Video
- 1.14 Video Noise Solutions
- 1.15 Picture-in-Picture View
- 1.16 Picture-and-Picture View
- 1.17 Shortcuts
- 1.18 Touch Screen Support
- 1.19 System Tools
- Configuring Main System
- ManualV860-CH2-Hybrid and NVR Solution
- Hybrid and NVR Solution
- ManualV860-CH3-Analysis
- Video Analysis
- 3.1 Object Tracking and Zooming
- 3.2 Advanced Single Camera Tracking
- 3.3 Digital Object Tracking
- 3.4 Object Counting and Intrusion Alarm
- 3.5 Object Index
- 3.6 Automatic Video Snapshots
- 3.7 Face Detection
- 3.8 Face Count
- 3.9 Unattended and Missing Object Detection
- 3.10 Privacy Mask Protection
- 3.11 Scene Change Detection
- 3.12 Panorama View
- 3.13 Video Defogging
- 3.14 Video Stabilization
- 3.15 Wide Angle Lens Dewarping
- 3.16 Advanced Motion Detection
- 3.17 Crowd Detection
- 3.18 Advanced Scene Change Detection
- 3.19 Advanced Unattended Object Detection
- 3.20 Advanced Missing Object Detection
- 3.21 Video Analysis Schedule
- 3.22 Fisheye View
- 3.23 Specifications
- Video Analysis
- ManualV860-CH4-Playback
- ManualV860-CH5-Backup
- ManualV860-CH6-IO
- I/O Applications
- 6.1 I/O Device Setup
- 6.2 I/O Control Panel
- 6.3 Advanced I/O Applications
- 6.4 Input State Detection
- 6.5 I/O Enable Setting
- 6.6 Advanced I/O Panel
- 6.6.1 The Advanced I/O Panel
- 6.6.2 Creating a Group for Cascade Triggers
- 6.6.3 Configuring the Advanced I/O Panel
- 6.6.4 Setting Up Mode Schedule
- 6.6.5 Quick Link
- 6.6.6 Forcing Output
- 6.6.7 Editing Background Image
- 6.6.8 System-Wide Triggers
- 6.6.9 The “Advanced Logical Input Status in Multicam” Option
- 6.6.10 Managing a Group of I/O Devices
- 6.7 Visual Automation
- 6.8 Virtual I/O Control
- I/O Applications
- ManualV860-CH7-POS
- ManualV860-CH8-Webcam
- Remote Viewing
- 8.1 Remote Viewing Using a Web Browser
- 8.2 WebCam Server Settings
- 8.3 Single View Viewer
- 8.3.1 Control Panel
- 8.3.2 Server List
- 8.3.3 Video Recording
- 8.3.4 Alarm Notification
- 8.3.5 Video and Audio Configuration
- 8.3.6 Hardware-Compressed or Megapixel Stream
- 8.3.7 PTZ Control
- 8.3.8 Visual PTZ Control Panel
- 8.3.9 I/O Control
- 8.3.10 Visual Automation
- 8.3.11 Picture-in-Picture View
- 8.3.12 Picture-and-Picture View
- 8.3.13 Image Enhancement
- 8.3.14 Remote Configuration
- 8.4 2-Window Viewer
- 8.5 Multi-Window Viewer
- 8.6 Multi View Viewer
- 8.6.1 Installation of Multi View
- 8.6.2 Host List
- 8.6.3 Channel Status Information
- 8.6.4 Creation of a Host
- 8.6.5 Combination of Multiple Hosts into a Single Host
- 8.6.6 Video Recording
- 8.6.7 Camera Polling
- 8.6.8 Hardware-Compressed or Megapixel Stream
- 8.6.9 PTZ Control
- 8.6.10 Visual PTZ Control Panel
- 8.6.11 Output Control
- 8.6.12 Remote ViewLog
- 8.6.13 System Configuration
- 8.6.14 Camera Status
- 8.6.15 Host Information
- 8.6.16 Icon Image Change
- 8.7 Multicast and Audio Broadcast
- 8.8 JPEG Image Viewer
- 8.9 Remote Playback
- 8.10 Remote ViewLog
- 8.11 Event List Query
- 8.12 Download Center
- 8.13 Mobile Phone Applications
- 8.14 Web Browsers on Smartphones
- Remote Viewing
- ManualV860-CH9-EMap
- ManualV860-CH10-SMS
- ManualV860-CH11-Utilities-Joystick
- Useful Utilities
- 11.1 Dynamic DNS
- 11.2 Watermark Viewer
- 11.3 Multi-view Display
- 11.4 Windows Lockup
- 11.5 Authentication Server
- 11.5.1 Installing the Server
- 11.5.2 The Server Window
- 11.5.3 Creating a Client DVR
- 11.5.4 Creating a User Account
- 11.5.5 Importing Groups and Users from Active Directory
- 11.5.6 Starting the Server
- 11.5.7 Connecting GV-System to the Server
- 11.5.8 Remote Access from Control Center, Remote E-Map and MultiView
- 11.6 Fast Backup and Restore
- 11.7 Hot-Swap Recording
- 11.8 Backup Server
- 11.9 Backup Viewer
- 11.10 Bandwidth Control Application
- 11.11 Report Generator
- 11.12 Spot Monitor Controller
- 11.13 Quad Spot Monitor Controller
- 11.14 Digital Matrix
- 11.15 GIS Recording
- 11.16 GV-IP Device Utility
- 11.17 MCamCtrl Utility for GV-Joystick V2
- 11.18 GV-Mobile Server
- 11.19 Language Setting
- 11.20 Skype Video Utility
- Useful Utilities
- ManualV860-Appendix
- Appendix
- A. USB Dongle Required for IP Device Applications
- B. Supported PTZ Protocols and Models
- C. Certified PTZ Models for Object Tracking
- D. Certificated PTZ Models for Full Degree Pan and Tilt Control
- E. Supported IP Device Brands and Protocols
- F. Supported GPRS Models
- G. Custom Icon Naming Chart for Multi View
- H. Display Ratio Supported by Panel Resolution
- I. Dual Stream Support List
- Appendix

Short Message Service
10
10.6.2 Setting Mobile Numbers
The Main System allows you to configure three mobile phone numbers for the SMS service. When an
alert condition happens, the SMS messages will be sent out to the three assigned mobile phones
simultaneously.
1. Open the Send Alerts Approach Setup dialog box (Figure 10-12).
2. Click the Account Setting button. The SMS Setup dialog box appears. (Figure 10-13).
3. Click the Mobile Setup tab in the upper of the window. This dialog box appears.
Figure 10-14 SMS Setup- Mobile Setup
4. Click one mobile phone icon, and then check the Add to SMS List item for the mobile phone
setup.
5. Type the Country Code and Mobile Number.
6. Click other mobile phone icons, and follow Steps 4 and 5 to set up the rest of two mobile phone
numbers separately.
7. Click OK to apply above settings.
8. Start monitoring. When the specified events or motion is detected, SMS alerts will be sent out
automatically.
497