
Quick Installation Guide

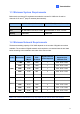

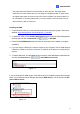
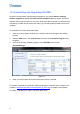
Table Of Contents

Introduction
1
The frame rate limit is based on the resolution of video sources. The higher video
resolutions, the lower frame rates you can assign to a single hard disk. In other words,
the higher frame rates you wish to record, the more hard disks you need to install. For
the information of recording frame rates, you may consult the user’s manual of the IP
camera that you wish to connect to.
Installing GV-VMS
1. To download GV-VMS, go to the Software Download and Upgrading page of GeoVision
Website: http://www.geovision.com.tw/english/5_8_VMS.asp
.
2. To install GV-VMS, find the Primary Applications section under the Video Management
Software tab and click the Download icon
of GV-VMS.
3. Double-click GVVMSInstaller.exe and follow the instructions in the wizard to complete
installation.
4. If you are using a USB dongle, insert the dongle to your computer. The GV-USB dongle is
needed if you want to connect to more than 32 channels of IP devices or to third-party IP
devices.
5. To install USB driver, find the Driver section under the Video Management Software tab,
and click the Download icon
of GV-USB Devices Driver.
Figure 1-1
If you are using the GV-USB dongle, verify that the driver is installed correctly after the steps
above. Go to Windows Device Manager and expand DVR-Devices. You should see the GV-
Series USB Protector.
Figure 1-2
5