
Manual

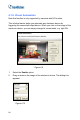
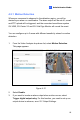
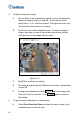
Table Of Contents
- Cover
- Copyright
- Contents
- Preface
- Naming and Definition
- Note for Connecting to GV-System / GV-VMS
- Note for Recording
- Note for GV-BX2600
- Note for GV-EVD5100 / EFD5101
- Chapter 1 Introduction
- Chapter 2 Getting Started
- Chapter 3 Accessing the Camera
- 3.1 Accessing Your Surveillance Images
- 3.2 Functions Featured on the Main Page
- 3.2.1 The Live View Window
- 3.2.2 The Control Panel of the Live View Window
- 3.2.3 Snapshot of Live Video
- 3.2.4 Video Recording
- 3.2.5 Picture-in-Picture and Picture-and-Picture View
- 3.2.6 Alarm Notification
- 3.2.7 Video and Audio Configuration
- 3.2.8 Remote Configuration
- 3.2.9 Camera Name Display
- 3.2.10 Image Enhancement
- 3.2.11 Visual PTZ
- 3.2.12 Digital PTZ
- 3.2.13 I/O Control
- 3.2.14 Visual Automation
- 3.2.15 Network Status
- Chapter 4 Administrator Mode
- Chapter 5 Recording and Playback
- Chapter 6 Advanced Applications
- Chapter 7 DVR Configurations
- Chapter 8 CMS Configurations
- Chapter 9 Smart Device Connection
- Appendix

Administrator Mode
81
4 4
3. Assign the connected module and output device. In the Note field,
type a note to help you manage the device. Click OK to save the
settings.
4. To change the frame color of the set area, click the Set Color button.
5. To emboss the set area, select Float Up; or keep it flat by selecting
Normal.
6. Click the Save Set button to apply the settings.
7. To perform the function, see 3.2.14 Visual Automation.