
Manual

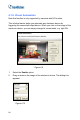
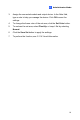
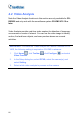
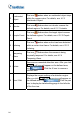
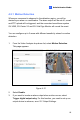
Table Of Contents
- Cover
- Copyright
- Contents
- Preface
- Naming and Definition
- Note for Connecting to GV-System / GV-VMS
- Note for Recording
- Note for GV-BX2600
- Note for GV-EVD5100 / EFD5101
- Chapter 1 Introduction
- Chapter 2 Getting Started
- Chapter 3 Accessing the Camera
- 3.1 Accessing Your Surveillance Images
- 3.2 Functions Featured on the Main Page
- 3.2.1 The Live View Window
- 3.2.2 The Control Panel of the Live View Window
- 3.2.3 Snapshot of Live Video
- 3.2.4 Video Recording
- 3.2.5 Picture-in-Picture and Picture-and-Picture View
- 3.2.6 Alarm Notification
- 3.2.7 Video and Audio Configuration
- 3.2.8 Remote Configuration
- 3.2.9 Camera Name Display
- 3.2.10 Image Enhancement
- 3.2.11 Visual PTZ
- 3.2.12 Digital PTZ
- 3.2.13 I/O Control
- 3.2.14 Visual Automation
- 3.2.15 Network Status
- Chapter 4 Administrator Mode
- Chapter 5 Recording and Playback
- Chapter 6 Advanced Applications
- Chapter 7 DVR Configurations
- Chapter 8 CMS Configurations
- Chapter 9 Smart Device Connection
- Appendix

82
4.2 Video Analysis
Note the Video Analysis functions in this section are only available for GV-
BX2600 and only work with the surveillance system GV-VMS V15.10 or
later.
Video Analysis provides real-time video capture for detection of temporary
occurrences or events of interest. You can use the video image to identify
motion, find and trace objects, and even produce alarms on unusual
activities.
IMPORTANT: To enable the “Video Analysis on Camera” function on GV-
VMS, the following setting is required on GV-VMS in advance:
1. Click Home
, click Toolbar , click Configure , and select
Video Process.
2. In the Setup dialog box, select IPCVA, select the camera(s), and
select Setting.
3. Select which video analysis to process on the camera.