
Manual
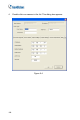
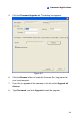
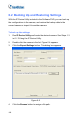
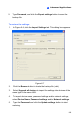
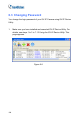
Table Of Contents
- Cover
- Copyright
- Contents
- Preface
- Naming and Definition
- Note for Connecting to GV-System / GV-VMS
- Note for Recording
- Note for GV-BX2600
- Note for GV-EVD5100 / EFD5101
- Chapter 1 Introduction
- Chapter 2 Getting Started
- Chapter 3 Accessing the Camera
- 3.1 Accessing Your Surveillance Images
- 3.2 Functions Featured on the Main Page
- 3.2.1 The Live View Window
- 3.2.2 The Control Panel of the Live View Window
- 3.2.3 Snapshot of Live Video
- 3.2.4 Video Recording
- 3.2.5 Picture-in-Picture and Picture-and-Picture View
- 3.2.6 Alarm Notification
- 3.2.7 Video and Audio Configuration
- 3.2.8 Remote Configuration
- 3.2.9 Camera Name Display
- 3.2.10 Image Enhancement
- 3.2.11 Visual PTZ
- 3.2.12 Digital PTZ
- 3.2.13 I/O Control
- 3.2.14 Visual Automation
- 3.2.15 Network Status
- Chapter 4 Administrator Mode
- Chapter 5 Recording and Playback
- Chapter 6 Advanced Applications
- Chapter 7 DVR Configurations
- Chapter 8 CMS Configurations
- Chapter 9 Smart Device Connection
- Appendix

Advanced Applications
179
6
6.1.2 Using the IP Device Utility
The IP Device Utility provides a direct way to upgrade the firmware to
multiple units of the GV-IPCAM. Note the computer used to upgrade
firmware must be under the same network of the camera.
1. Insert the Software DVD, select GeoVision IP Device Utility, and
follow the onscreen instructions to install the program.
2. Double-click the IP Device Utility icon created on your desktop. This
dialog box appears.
Figure 6-3
3. Click the Search button to locate available cameras on the same LAN.
Or click the New button and assign the IP address to locate the
camera over the Internet. Or highlight one camera in the list and click
the Delete button to remove it.