
Manual
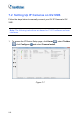
Table Of Contents
- Cover
- Copyright
- Contents
- Preface
- Naming and Definition
- Note for Connecting to GV-System / GV-VMS
- Note for Recording
- Note for GV-BX2600
- Note for GV-EVD5100 / EFD5101
- Chapter 1 Introduction
- Chapter 2 Getting Started
- Chapter 3 Accessing the Camera
- 3.1 Accessing Your Surveillance Images
- 3.2 Functions Featured on the Main Page
- 3.2.1 The Live View Window
- 3.2.2 The Control Panel of the Live View Window
- 3.2.3 Snapshot of Live Video
- 3.2.4 Video Recording
- 3.2.5 Picture-in-Picture and Picture-and-Picture View
- 3.2.6 Alarm Notification
- 3.2.7 Video and Audio Configuration
- 3.2.8 Remote Configuration
- 3.2.9 Camera Name Display
- 3.2.10 Image Enhancement
- 3.2.11 Visual PTZ
- 3.2.12 Digital PTZ
- 3.2.13 I/O Control
- 3.2.14 Visual Automation
- 3.2.15 Network Status
- Chapter 4 Administrator Mode
- Chapter 5 Recording and Playback
- Chapter 6 Advanced Applications
- Chapter 7 DVR Configurations
- Chapter 8 CMS Configurations
- Chapter 9 Smart Device Connection
- Appendix

218
7. Click OK to save the settings.
8. Expand the created host folder. Drag and drop the icons of camera
and I/O devices onto the imported E-Map.
9. Close the E-Map Editor. Click Yes when you are promoted to save
the file.
For details on creating an E-Map file on the E-Map Server, see “E-Map
Applications”, GV-DVR User’s Manual or GV-VMS User’s Manual on the
Surveillance System Software DVD.