
Daim Ntawv Qhia Tus Neeg Siv
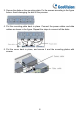

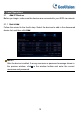
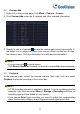


Table Of Contents

11
5.2 Custom Add
1. Right click in the preview page, click Menu > Camera > Camera.
2. Click Custom Add, enter the IP address and other required information.
3. Check the status of camera.
means the camera gets online successfully. If
the status icon is grayed out, place your mouse cursor over the icon to view
the cause of error. Click the edit button to modify device information.
NOTE!
• You can also click
to add a device.
• Click Search Segment to search for devices in a specified network segment.
5.3 Playback
In the preview page, select the desired window, then right click and select
Playback to play the recording of the current day.
NOTE!
• A 7*24 recording schedule is enabled by default. To set a recording schedule
manually, right click and select Menu > Storage > Recording and then set
recording type and time based on your needs.
• If you choose Event type recording, you need to enable the corresponding
alarm function and configure alarm-triggered recording/snapshot first.