
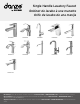
Installation Sheet


Maintenance
Your new faucet is designed for years of trouble-free performance. Keep it looking new by cleaning it periodically with a
soft cloth.Avoid abrasive cleaners, steel wool and harsh chemicals as these will dull the finish and void your warranty.
Warranty Registration:
Please log on to danze.com to register your product today.
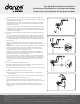
5.
After installing the faucet, remove the aerator and turn on the water to
remove any left over debris. Re-assemble the aerator.
Après avoir terminé l’installation du robinet, enlever le brise-jet, puis
ouvrir le robinet pour que l’eau évacue tout débris pouvant se trouver à
l’intérieur. Réassembler le brise-jet.
Después de instalar el grifo, remueva el aireador y abra el paso del agua
para remover cualquier residuo. Vuelva a armar el aireador.
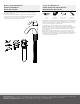
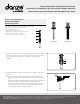
3.
From underneath the sink, install the mounting hardware onto the valve
shank. Use the phillips screwdriver for final tightening after the body is
aligned.
Sous l’évier, installer le matériel de fixation sur la tige de robinet. Employer
un tournevis Phillips pour effectuer le serrage final lorsque le corps est
bien placé.
Instale las piezas de montaje en el vástago de la válvula por la parte de
abajo del fregadero. Utilice un destornillador phillips para apretar al final,
una vez que esté alineado el cuerpo.
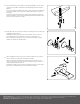
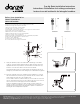
4.
Apply pipe tape to the inlet port. Slip the coupling nut onto the inlet port
and tighten with a wrench.
Appliquez du ruban pour tuyau à l'orifice d'entrée. Glissez l'écrou de
raccordement sur l'orifice d'entrée et serrez-le à l'aide d'une clé.
antes de realizar la instalación, cierre el suministro principal de agua
girando las válvulas en sentido horario
4
5
6