Trim Only Two Handle Roman Tub Faucet Griferia solo para grifo de dos manijas de bañera romana Mélangeur 3 trous pour robinet de baignoire de style roman à double poignée D303656T D300930T D302044T D306957T D300922T D302555T D300933T D300962T D300910T D300915T D305658T D300936T D300926T D308840T D300911T
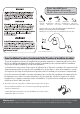
Tools You Will Need Herramientas Necesarias Outils dont vous aurez besoin Adjustable wrench Llave ajustable Clé à molette Pipe tape Cinta selladora para rosca Ruban pour tuyau Phillips screwdriver Silicone sealant Electric drill Taladro eléctrico Destornillador cruciforme Sellador de silicona Foreuses électriques Tournevis Phillips Enduit d'étanchéité au silicone Check to make sure you have the following parts indicated below: Verifique que tenga todas las partes indicadas: Vérifier pour vous assurer qu
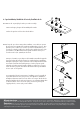
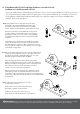
2. Spout Installaation/Installación del vertedor/Installation du bec 2.1 Remove the cap and plug from the spout tube assembly. Remueva la tapa y el tapón del ensamblaje del vertedor. Enlever le capuchon et le bouchon du tube de bec. 2.2 To keep the spout from rotating after installation, screw the brass pin into the spout base (except Opulence, Eastham and Brandywood series). Then place the spout escutcheon on over the spout tube hub.
2.3 Using the supplied Allen Wrench, back out the set screw a few turns. Place the spout over the spout hub and insert the pin into the small hole in the spout escutcheon and then tighten the set screw. Finish installation by inserting the set screw hole cover into the access hole in the back the of the spout. Use la llave hexagonal que se incluye y déle unas vueltas hacia fuera al tornilo de presión.
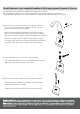
4. For Installaation with Soft Touch Personal Spray/Instalaciones con rociador soft touch/ Installations avec la douchtte personnelle soft touch If your trim included Soft Touch Personal Spray, please refer to step 3.1-3.2 for spray installation. If not, please go to step 3.3. Si los components incluyen rociador Soft Touch, siga los pasos 3.3 a 3.2 para su instalación. Si no, comtinúe con le paso 3.3. Si votre garniture comprend la douchette personnelle Soft Touch, se référer aux étapes 3.1 à 3.
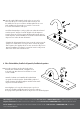
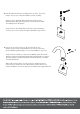
Diverter Replacement/service reemplazo del cambiador de flujo de agua replacement/réparation de l’inverseur Shut off the main water supply before installation by turning the valves clockwise. Antes de realizar la instalación, cierre el suministro principal de agua girando las válvulas en sentido horario. Fermez l'alimentation principale en eau avant l'installation en tournant les valves d'alimentation dans le sens horaire 1. Remove the spout insert (located at base of spout opposite outlet side).
4. Insert the replacement diverter assembly into the spout tube. Press down firmly to assure proper seating. Reinstall the spout hub assembly. Coloque el nuevo cambiador dentro del tubo del vertedor. Presione firmemente hacia abajo para asegurarse que encaja. Vuelva a instalar el ensamblaje interno del vertedor. Insérer l’inverseur de rechange dans le tube du bec. Presser fermement vers le bas pour s’assurer qu’il est bien placé. Réinstaller le moyeu du bec. 5.