
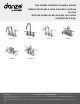
Installation Sheet


Maintenance
Your new faucet is designed for years of trouble-free performance. Keep it looking new by cleaning it periodically with a
soft cloth.Avoid abrasive cleaners, steel wool and harsh chemicals as these will dull the finish and void your warranty.
Warranty Registration:
Please log on to danze.com to register your product today.
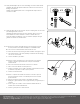
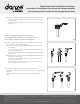
6.
A. Remove the aerator assembly from the spout using the special
wrench provided. Set it aside carefully for re-installation later.
B. Turn on the hot and cold water valves under the sink.
C. Flush out the faucet by running hot and cold water through the spout.
D. Turn off the faucet on the sink; carefully re-install the aerator taking
care not to cross thread.
E. Test for satisfactory operation.
A. Enlever le brise-jet aérateur sur le bec à l’aide de la clé spéciale
fournie. Le mettre soigneusement de côté pour le réinstaller
ultérieurement.
B. Ouvrir les robinets d’eau chaude et froide sous le lavabo.
C. Faire couler l’eau chaude et froide par le bec.
D. Fermer les robinets sous le lavabo; réinstaller soigneusement le brise-
jet aérateur en prenant soin de ne pas le perforer.
E. Vérifier le fonctionnement.
A. Quite el conjunto del aireador del vertedor con la llave especial
provista. Póngalo a un lado con cuidado para volverlo a instalar
posteriormente.
B. Abra las válvulas de agua caliente y fría debajo del lavabo.
C. Enjuague el grifo haciendo correr el agua caliente y el agua fría por el
vertedor.
D. Cierre el grifo en el lavabo; vuelva a instalar cuidadosamente el
aireador enroscándolo debidamente.
E. Pruebe el grifo para ver si funciona bien.
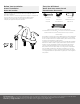
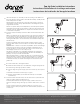
4.
Apply threaded pipe tape to where threading connection will be made.
Appliquer du ruban de tuyauterie filetée à l'endroit où la connexion de
filetage sera effectué.
Aplique cinta selladora para rosca en el lugar donde vaya a hacer la
conexión roscada.
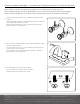
5.
Apply the pipe tape to the inlet port. Slip the coupling nuts onto the inlet
port and tighten with a wrench.
Appliquez du ruban pour tuyau à l'orifice d'entrée. Glissez l'écrou de
raccordement sur l'orifice d'entrée et serrez-le à l'aide d'une clé.
Antes de realizar la instalación, cierre el suministro principal de agua
girando las válvulas en sentido horario.
4
5
6