
Installation Sheet

Grid Strainer Drain Installation Instructions
Instrucciones para la instalación del crépine à grille
Instructions d’installation de rejilla de desagüe con prevención
Danze, Inc. / 2500 Internationale Parkway / Woodridge, IL 60517
www.Danze.com
© 2010 DANZE, INC. All rights reserved.
Pub No. IM-TD Drain/05-15
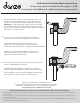
1.
Remove the rubber washer, friction ring and lock nut from the strainer
assembly. Clean all the sink surfaces to remove old putty and dirt before
installing the new drain.
Note: this drain is supplied with a grid strainer w/ overflow, If you choose
gridstrainer w/ overflow for installation, please remove the domed cover
and replace the strainer w/o overflow with it. Do the same steps below.
Remueva la arandela de goma, la arandela de fricción y la contratuerca
del ensamblaje del desagüe. Limpie toda la superficie para remover
suciedad y residuos de materiales antes de instalar el nuevo desagüe.
NOTA: Este desagüe contiene una rejilla con prevención de derrame.
Si prefiere instalar una rejilla con prevención de derrame, remueva la
tapa del desagüe y coloque el desagüe sin el agujero para prevención
de derrames.
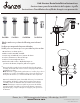
Check to make sure you have the following parts indicated
below:
Verifique que tenga todas las partes indicadas:
Vérifier pour vous assurer que vous possédez les pièces au bas:
1.
2.
3.
4.
5.
Lock nut / Contratuerca / Écrou de blocage
6.
Rubber washer /Arandela / Rondelle
Friction ring / Arandela de cierre / Anneau de friction
1
3
5
2
4
Grid strainer with over flow / Rejilla de desagüe con
prevención de derrame / Crépine à grille avec trop-plein
5
4
3
2
Domed Cover /
Cubierta capuch /
Tail Piece/ Pieza Contrapunta/ about
D495008
D495082 DA505084 DA505928