
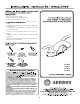
Installation


4
P
R
O
F
E
S
S
I
O
N
A
L
P
E
R
F
O
R
M
A
N
C
E
®
Touch Down Drain Installation Instructions / Instrucciones para la instalación del
desagüe touch down / Instructions d’installation de la bonde de vidange manuelle
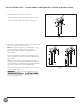
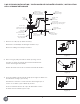
1.
Figure (1)
1.
6.
5.
7.
4.
2.
3.
Check to make sure you have the following parts indicated
below:
Verifique que tenga todas las partes indicadas:
Vérifier pour vous assurer que vous possédez les pièces au
bas :
1. Stopper / Parador / Tampon
2. Cartridge / Cartucho / Cartouche
3. Drain collar / Boca de desagüe / Collet de renvoi
4. Rubber washer / Arandela de goma / Rondelle de caoutchouc
5. Friction ring / Arandela de cierre / Anneau de friction
6. Lock nut / Contratuerca / Écrou de blocage
7. Tail piece / Pieza contrapunta / About
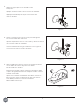
4.
5.
6.
Remove the rubber washer (4), friction ring (5) and lock
nut (6) from the drain assembly.
Quite la arandela de goma (4), el anillo de rozamiento
(5) y la contratuerca (6) del conjunto de desagüe.
Enlever la rondelle de caoutchouc (4), la rondelle à
friction (5) et l’écrou de blocage (6) du renvoi.