
User's Manual


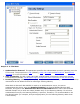

2. On the Profiles list, click Add to open the Create WiFi Profile General Settings.
3. Profile Name: Enter a profile name.
4. WiFi Network Name (SSID): Enter the network identifier.
5. Operating Mode: Click Network (Infrastructure). (This parameter is set to Infrastructure if you
are using the Administrator Tool.)
6. Administrator Profile Type: Select
Persistent or Pre-logon/Common. (This step applies only if you
are using the Administrator Tool.)
7. Click Next to open the Security Settings.
8. Click Enterprise Security.
9. Network Authentication: Select Open, WPA-Enterprise, or WPA2-Enterprise.
10. Data Encryption: Select WEP or CKIP for Open authentication, TKIP or AES-CCMP for
Enterprise authentication.
11. Click Enable 802.1X if it is not already selected.
12. Authentication Type: Select EAP-AKA.
EAP-AKA User (optional)
1. Click Specify user name (identity):
2. At User Name: Enter the user name assigned to the USIM card.
3. Click OK.
Create a Profile with TLS Network Authentication
These settings define the protocol and the credentials used to authenticate a user. Transport Layer
Security (TLS) authentication is a two-way authentication method that exclusively uses digital certificates
to verify the identity of a client and a server.
Profile Mapping
This profile will be exported differently to clients running Windows* XP as compared to Windows Vista*
and Windows* 7. See
TLS Profile Mapping for more information.
To Create a Profile with TLS Authentication
1. Click Profiles on the WiFi connection utility main window. Or if you are acting as the administrator,
open the
Administrator Tool.
2. On the Profiles list, click Add to open the Create WiFi Profile General Settings.
3. Profile Name: Enter a descriptive profile name.
4. WiFi Network Name (SSID): Enter the network identifier.
5. Operating Mode: Click Network (Infrastructure). (This parameter is set to Infrastructure if you
are using the Administrator Tool.)
6. Administrator Profile Type: Select
Persistent or Pre-logon/Common. (This step applies only if you
are using the Administrator Tool.)
7. Click Next to open the Security Settings.
8. Click Enterprise Security.
9. Network Authentication: Select WPA-Enterprise or WPA2-Enterprise (Recommended).
10. Data Encryption: Select AES-CCMP (Recommended).
11. Enable 802.1X: Selected by default.
12. Authentication Type: Select TLS to be used with this connection.