E100-AVL USER’S MANUAL
June 2012 TRADEMARKS All brand and product names are trademarks or registered trademarks of their respective companies.
NOTE The information in this manual is subject to change without notice.
Table of Contents Chapter 1 Getting Started .......................................... 1-1 Getting the Rugged PC Running ..................................... 1-2 Unpacking ............................................................... 1-2 Installing the Battery Pack and Connecting to AC Power . 1-3 Turning On and Off the Rugged PC ............................ 1-6 Taking a Look at the Rugged PC .................................. 1-8 Front Components .....................................................
Using the BT Feature (Optional) ................................. 2-12 Turning On/Off the BT Radio ................................... 2-12 Chapter 3 Managing Power ........................................ 3-1 AC Adapter ................................................................ 3-2 Battery Pack .............................................................. 3-3 Charging the Battery Pack......................................... 3-3 Checking the Battery Level ........................................
Chapter 1 Getting Started Congratulations on purchasing this rugged Rugged PC. This chapter first tells you step by step how to get the Rugged PC up and running. Then, you will find a section briefly introducing the external components of the Rugged PC.
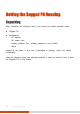
Getting the Rugged PC Running Unpacking After unpacking the shipping carton, you should find these standard items: Rugged PC Accessories: AC adapter AC power cord Screen protector film (already attached to the screen) Stylus Inspect all the items. If any item is damaged or missing, notify your dealer immediately. Keep the shipping carton and packing materials in case you need to ship or store the Rugged PC in the future.
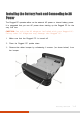
Installing the Battery Pack and Connecting to AC Power The Rugged PC operates either on the external AC power or internal battery power. It is suggested that you use AC power when starting up the Rugged PC for the very first time. CAUTION: Use only the AC adapter included with your Rugged PC. Using other AC adapters may damage the Rugged PC. 1. Make sure that the Rugged PC is turned off. 2. Place the Rugged PC upside down. 3.
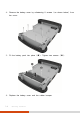
4. Remove the battery cover by unfastening 8 screws (as shown below) from the cover. 5. Fit the battery pack into place (). Tighten two screws (). 6. Replace the battery cover and the rubber bumper.
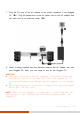
7. Plug the DC cord of the AC adapter to the power connector of the Rugged PC (). Plug the female end of the AC power cord to the AC adapter and the male end to an electrical outlet (). 8. Power is being supplied from the electrical outlet to the AC adapter and onto your Rugged PC. Now, you are ready to turn on the Rugged PC. CAUTION: When you disconnect the AC adapter, disconnect from the electrical outlet first and then from the Rugged PC.
Turning On and Off the Rugged PC Turning On Press the power button ( should start. ). The operating system such as Microsoft Windows Turning Off When you finish a working session, you can stop the system by turning off the power or leaving it in Sleep or Hibernation mode: To... Do this... Power off (Shutdown) Use the Windows Start menu in the lower left and follow the shutdown procedure. Sleep Press the power button* or use the Windows Start menu to put the Rugged PC in Sleep mode.
Press the power button to resume or turn on the system from any of these modes.
Taking a Look at the Rugged PC NOTE: Depending on the model you purchased, the appearance of your Rugged PC may not be exactly the same as those shown in this manual. Front Components Ref Component Description Touchscreen Displays and receives information for the Rugged PC. Power Button Turns the power ON and OFF (Sleep mode by default). The green LED beside the button glows when the power is on and blinks when the system is in Sleep mode.
Ref Component Description Toggles the keypad lock ON and OFF. Menu Toggles the “OSD Control Panel” ON and OFF. Indicators RF (Radio Frequency) Lights green when RF radio is on. Battery Charge Lights green when the battery is fully charged. Lights amber when the battery is being charged. Blinks red (once per second) when the battery’s capacity is below 10%. Blinks red rapidly (once per 0.5 second) when there is a thermal protection problem with the battery.
Rear Components Ref Component Description Battery Pack Inside is the battery pack that supplies power to your Rugged PC when external power is not connected. Docking Connector Connects to the Docking Station (available as an option).
Right-Side Components Ref Component Description Tether Hole Stylus tethered to this hole. Stylus Serves as the input device by tapping on the touchscreen to make selections and enter information.
Left-Side Components Ref 1-12 Component Description RJ-45 Connector Connects the LAN cable. USB Ports Each of the two ports connects a USB device, such as a USB flash disk, printer, digital camera, joystick, and more.
Top Components Ref Component Description ExpressCard Slot Accepts an ExpressCard for additional functions. Headphone Out Connector Connects a set of headphones or external speakers with amplifier Bottom Components Ref Component Power Connector Description Connects the AC adapter.
Chapter 2 Operating Your Rugged PC This chapter provides information about the use of the Rugged PC. If you are new to Rugged PCs, reading this chapter will help you learn the operating basics. If you are already a computer user, you may choose to read only the parts containing information unique to your Rugged PC. CAUTION: The Rugged PC can get uncomfortably warm when you use it in high temperatures.
Using the Touchscreen CAUTION: Do not use a sharp object such as a ballpoint pen or pencil on the touchscreen. Doing so may damage the touchscreen surface. Use your finger or the included stylus. A screen protector film has been attached to the screen before shipment. The film is a consumable, which will be worn out after a period of use (6 months in average). You can purchase a new one when replacement is required. The screen of your Rugged PC is touch-sensitive.
Here are some common terms that you should know when using the touchscreen: Term Action Click/Point Tap gently on the touchscreen. Double-click Tap twice on the touchscreen rapidly. Drag and drop Press lightly on the touchscreen and move your finger until you reach your destination (drag). Finally, release your finger (drop) when you finish dragging your selection to the destination. The object will drop into the new location.
Using the Input Panel Use the Input Panel to enter text and perform various keyboard functions. There are two types of Input Panels for you to use in Windows 7: Touch Keyboard allows you to enter text by tapping the keys with your stylus, like pressing the keys on a standard keyboard. Writing Pad allows you to write on the writing pad, like writing on a piece of paper. Your handwriting will be converted into typed text.
Using the Keypad The keypad of your Rugged PC can be divided into three areas: Control buttons Numeric, Delete (Del), and Enter (Ent) keys Cursor-control keys Control Buttons Located on top of the keypad are three control buttons: Fn button toggles the Fn keylock ON and OFF. When ON (indicated by the icon on the taskbar), you can use the alternative functions of the keypad keys (as described in the next two sections). button toggles the keypad lock ON and OFF.
Numeric Keypad with Alternative Functions Shown below is the 12-key numeric keypad with Delete and Enter keys. When the Fn keylock is ON (indicated by the icon on the taskbar), the keys with orange icons provide alternative functions as described below. rotates the screen display by 90 with each press. switches the keypad backlight ON and OFF. switches the sunlight-readable mode ON and OFF. When ON, the display brightness is set to the highest level. switches the touchscreen OFF and ON.
Cursor-Control Keys with Alternative Functions Cursor-control keys control cursor movement. The word “cursor” refers to the indicator on the screen (except for pointer on screen) that lets you know exactly where on your screen anything you type will appear. It can take the form of a vertical or horizontal line, a block, or one of many other shapes. When the Fn keylock is ON (indicated by the icon on the taskbar), the keys with orange icons provide alternative functions as described below.
Using the Network Features Using the LAN The internal 10/100/1000Base-T LAN (Local Area Network) module allows you to connect your Rugged PC to a network. It supports data transfer rate up to 1000 Mbps. To connect the network cable to the LAN module, connect one end of the LAN cable to the RJ-45 connector ( ) on the Rugged PC and the other end to the network hub.
Using the Wireless LAN (Optional) The WLAN features include: Peer-to-Peer (Ad-Hoc) and Access Point (Infrastructure) modes support (5GHz not support, 2.4GHz CH12 and CH13 not support.) WEP (Wired Equivalent Privacy) 64/128-bit data encryption The frequency range and channel support in Taiwan are as below: frequency range: 2.4GHz portion: 2.412~2.462 GHz; 5.2GHz portion: 5.28~5.825GHz Channel range: 2.4GHz portion: 1~11 5.2 GHz portion 56~165 IEEE 802.
Turning On/Off the WLAN Radio NOTE: The FAA (Federal Aviation Agency) has deemed it unsafe to operate wireless devices in aircraft as this may interfere with flight safety. Turn off wireless LAN when using your Rugged PC in the airplane. 1. Press the Menu button on your Rugged PC to open the OSD Control Panel. 2. Click the RF button to switch the wireless radio on/off. The word ON or OFF on the button indicates the current status. 3. Windows Mobility Center has wireless network turned on by default.
4. Some networks require a network security key or passphrase. To connect to one of those networks, ask your network administrator or Internet service provider (ISP) for the security key or passphrase. For more information on setting a wireless network connection, refer to Windows online help. NOTE: You can use Intel® PROSet Wireless to take full advantage of the WiFi capabilities of your Rugged PC. See the Help of the utility for instructions.
Using the BT Feature (Optional) The BT 4.0+EDR technology allows short-range (about 50 meters) wireless communications between devices without requiring a cable connection. Data can be transmitted through walls, pockets and briefcases as long as two devices are within range. Turning On/Off the BT Radio 1. Press the Menu button on your Rugged PC to open the OSD Control Panel. 2. Click the RF button to switch the wireless radio on/off. The word ON or OFF on the button indicates the current status.
Chapter 3 Managing Power Your Rugged PC operates either on external AC power or on internal battery power. This chapter tells you how you can effectively manage power. To maintain optimal battery performance, it is important that you use the battery in the proper way.
AC Adapter CAUTION: The AC adapter is designed for use with your Rugged PC only. Connecting the AC adapter to another device can damage the adapter. The AC power cord supplied with your Rugged PC is for use in the country where you purchased your Rugged PC. If you plan to go overseas with the Rugged PC, consult your dealer for the appropriate power cord. When you disconnect the AC adapter, disconnect from the electrical outlet first and then from the Rugged PC.
Battery Pack The battery pack is the internal power source for the Rugged PC. It is rechargeable using the AC adapter. The operating time of a fully charged battery pack depends on how you are using the Rugged PC. When your applications often access peripherals, you will experience a shorter operating time.
NOTE: The battery level may automatically lessen due to the self-discharge process (0.21% per day), even when the battery pack is fully charged (100%). This happens no matter if the battery pack is installed in the Rugged PC. Checking the Battery Level NOTE: Any battery level indication is an estimated result. The actual operating time can be different from the estimated time, depending on how you are using the Rugged PC.
Replacing the Battery Pack CAUTION: There is danger of explosion if the battery is incorrectly replaced. Replace the battery only with the Rugged PC manufacturer’s battery packs. Discard used batteries according to the dealer’s instructions. Do not attempt to disassemble the battery pack. If you often rely on battery power for a long period of time while traveling, you may consider the purchase of an additional battery pack from your dealer and keep it with you in a fully charged state as a backup.
4. Remove the two screws (). Pull the ribbon strips to lift the battery pack out of the computer (). 5. Fit another battery pack into place. Tighten two screws. 6. Replace the battery cover and the rubber bumper.
Battery Low Signals and Actions When the battery is low, Windows gives warning messages and the Battery Charge Indicator ( ) blinks red to alert you. NOTE: You can set up your threshold and signals of Battery Low under Windows. Immediately save your data upon Battery Low. The remaining operating time depends on how you are using the Rugged PC. Always respond to Battery Low by placing your Rugged PC on the Sleep or Hibernation mode, turning off the Rugged PC, or connecting the AC adapter.
Power Management Your Rugged PC supports ACPI (Advanced Configuration and Power Interface) for power management. The power management feature allows you to reduce the power consumption for energy saving. With an ACPI-compliant operating system such as Windows, power supply to different Rugged PC components is controlled on an as-needed basis. This allows maximum power conservation and performance at the same time. In general, Windows’ power management works in this way: What... When...
Hibernation Hibernation is a very useful feature. People frequently open many applications when they use computers. It takes some time to get all these applications open and running, and normally they all have to be closed before the computer can be turned off. When you use the hibernation feature, you do not have to close the applications. The Rugged PC stores the state of your Rugged PC to a file on the hard disk and then shuts down.
Power-Saving Tips Aside from enabling your Rugged PC’s power saving mode (see previous section), you can do your part to maximize the battery’s operating time by following these suggestions. Do not disable Power Management. Decrease the LCD brightness to the lowest comfortable level. Shorten the length of time before Windows turn off the display. Many USB devices use power just by being connected.
Appendix A Specifications NOTE: Specifications are subject to change without any prior notice. Parts Specifications CPU Intel® Cedar Trail N2600 1.60 GHz Chipset Intel® Tiger Point NM10 Express BIOS Phoenix, 2MB Flash EEPROM RAM 2GB DDR3-1066 SO-DIMM Video Audio Controller Intel® GMA 3650 (Integrated in Cedar Trial) Display Panel 8.
Parts Specifications BT BT 4.0/2.1+EDR Security TPM 1.2 Power AC adapter Universal 90 W; input: 100240 V, 50/60 Hz; output: 19V Battery Lithium-ion cylindrical battery, 8 cells, 2100mAh Dimension (LxW×D) 280×184×50mm (11×7.2×1.97 inch) (not including rubber bumper and test box) Weight 2.8 kg (6.
Appendix B Regulatory Information This appendix provides regulatory statements and safety notices on your Rugged PC. NOTE: Marking labels located on the exterior of your Rugged PC indicate the regulations that your model complies with. Please check the marking labels and refer to the corresponding statements in this appendix. Some notices apply to specific models only.
USA – FCC Class B Federal Communications Commission Radio Frequency Interference Statement This device complies with Part 15 of the FCC Rules. Operation is subject to the following two conditions: (1) this device may not cause harmful interference, and (2) this device must accept any interference received, including interference that may cause undesired operation. NOTE: This equipment has been tested and found to comply with the limits for a Class B digital device pursuant to Part 15 of the FCC Rules.
This transmitter must not be co-located or operating in conjunction with any other antenna or transmitter. The use of a non-shielded interface cable with this equipment is prohibited. Notes The country code selection is for non-US models only and is not available to all US models. Per FCC regulation, all WiFi products marketed in US must be fixed to US operation channels only. RF Exposure Information (SAR) This device meets the government’s requirements for exposure to radio waves.
information on this device is on file with the FCC and can be found under the Display Grant section of www.fcc.gov/oet/ea/fccid after searching on FCC ID: QYLE100AVL2.
Canada – IC Class B Canadian Department of Communications Radio Interference Regulations Class B Compliance Notice This Class B digital apparatus complies with Canadian ICES-003.Cet appareil numérique de la classe B est conforme à la norme NMB-003 du Canada.This digital apparatus does not exceed the Class B limits for radio noise emissions from digital apparatus set out in the Radio Interference Regulations of the Canadian Department of Communications.
(ii) the maximum antenna gain permitted for devices in the bands 5250-5350 MHz and 5470-5725 MHz shall comply with the e.i.r.p. limit; and (iii) the maximum antenna gain permitted for devices in the band 5725-5825 MHz shall comply with the e.i.r.p. limits specified for point-to-point and non point-to-point operation as appropriate. (iv) Users should also be advised that high-power radars are allocated as primary users (i.e.
(v) Cet appareil et son antenne ne doivent pas être situés ou fonctionner en conjonction avec une autre antenne ou un autre émetteur, exception faites des radios intégrées qui ont été testées. La fonction de sélection de l'indicatif du pays est désactivée pour les produits commercialisés aux États-Unis et au Canada.
Europe – EU Declaration of Conformity This device complies with the essential requirements of the R&TTE Directive 1999/5/EC.
EN 300 328 V1.8.1: 2012 Electromagnetic compatibility and Radio spectrum Matters (ERM); Wideband Transmission systems; Data transmission equipment operating in the 2,4 GHz ISM band and using spread spectrum modulation techniques; Harmonized EN covering essential requirements under article 3.2 of the R&TTE Directive EN 301 893 V1.7.1: 2012 Broadband Radio Access Networks (BRAN); 5 GHz high performance RLAN; Harmonized EN covering essential requirements of article 3.
esenciales y cualesquiera otras disposiciones aplicables o exigibles de la Directiva 1999/5/CE. Ελληνική ΜΕ ΤΗΝ ΠΑΡΟΥΣΑ Getac ΔΗΛΩΝΕΙ ΟΤΙ E100-AVL ΣΥΜΜΟΡΦΩΝΕΤΑΙ ΠΡΟΣ ΤΙΣ ΟΥΣΙΩΔΕΙΣ ΑΠΑΙΤΗΣΕΙΣ ΚΑΙ ΤΙΣ ΛΟΙΠΕΣ ΣΧΕΤΙΚΕΣ ΔΙΑΤΑΞΕΙΣ ΤΗΣ ΟΔΗΓΙΑΣ 1999/5/ΕΚ. Français Par la présente Getac déclare que l'appareil E100-AVL est conforme aux exigences essentielles et aux autres dispositions pertinentes de la directive 1999/5/CE.
Polski Niniejszym Getac oświadcza, że E100-AVL jest zgodny z zasadniczymi wymogami oraz pozostałymi stosownymi postanowieniami Dyrektywy 1999/5/EC. Portuguê Getac declara que este E100-AVL está conforme com os requisitos essenciais e outras disposições da Directiva 1999/5/CE. Slovensko Getac izjavlja, da je ta E100-AVL v skladu z bistvenimi zahtevami in ostalimi relevantnimi določili direktive 1999/5/ES.
B-12 Regulatory Information
Safety Notices About the Battery Caution Texts Concerning Lithium Batteries DANISH ADVARSEL! Lithiumbatteri – Eksplosionsfare ved fejlagtig håndtering. Udskiftning må kun ske med batteri af samme fabrikat og type. Levér det brugte batteri tilbage til leverandøren. NORWEGIAN ADVARSEL: Eksplosjonsfare ved feilaktig skifte av batteri. Benytt samme batteritype eller en tilsvarende type anbefalt av apparatfabrikanten. Brukte batterier kasseres i henhold til fabrikantens instruksjoner.
FRENCH ATTENTION: II y a danger d’explosion s’il y a remplacement incorrect de la batterie. Remplacer uniquement avec une batterie du même type ou d’un type équivalent recommandé par le constructeur. Mettre au rebut les batteries usagées conformément aux instructions du fabricant. Attention (for USA Users) The product that you have purchased contains a rechargeable battery. The battery is recyclable.
Regulatory Information B-15