PS336 USER MANUAL Rugged Mobile Computing Solutions
Sep. 2012 Trademarks Microsoft, Windows, the Windows logo, Windows Media, Outlook and ActiveSync are registered trademarks or trademarks of Microsoft Corporation in the United States and/or other countries. Microsoft products are licensed to OEMs by Microsoft Licensing, Inc., a wholly owned subsidiary of Microsoft Corporation. The Bluetooth word mark and logos are owned by the Bluetooth SIG, Inc. All other brand and product names are trademarks or registered trademarks of their respective companies.
Table of Contents Chapter 1 Getting Started ............................................................. 1-1 Identifying Hardware Components ....................................... 1-1 Front Components .............................................................. 1-1 Back Components ............................................................... 1-6 Top Components ................................................................ 1-7 Bottom Components .......................................................
Using the Keypad ............................................................... 2-3 Home Screen ........................................................................... 2-3 Navigation Bar and Toolbar ................................................... 2-4 Running Programs .................................................................. 2-5 Shortcut Menus ....................................................................... 2-5 Notifications ...........................................................
Managing More Than One Call ....................................... 3-10 Taking a Note during a Call ............................................. 3-11 Using Call History .................................................................. 3-12 Viewing Call History ......................................................... 3-12 Adding an Entry to Contacts Using Call History ............. 3-13 Using Speed Dial ................................................................... 3-13 Creating a Speed Dial Entry .
Contacts: Tracking Friends and Colleagues ........................... 5-4 Creating a Contact .............................................................. 5-4 Assigning a Ringtone and Picture ..................................... 5-5 Using the Contacts Summary Screen ................................. 5-5 Tasks: Keeping a To Do List .................................................... 5-6 Creating a Task ................................................................... 5-6 Using the Tasks Summary Screen .
Viewing Pictures ............................................................... 6-17 Managing Images ............................................................. 6-21 Internet Sharing (Select Models Only) ................................ 6-25 E-Compass .............................................................................. 6-26 Reading and Calibrating the Compass ............................ 6-26 Compass Settings .............................................................. 6-27 TacLink ..........
Chapter 9 vi Regulatory Information ................................................ 9-1 Regulations Statements .......................................................... 9-1 European Notice ................................................................. 9-1 FCC Regulations .................................................................. 9-2 Safety Precautions................................................................... 9-3 About Charging .........................................................
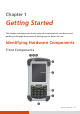
Chapter 1 Getting Started This chapter introduces you to the external components of your device and guides you through the process of setting up your device for use.
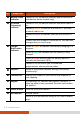
Ref Component Description Mobile Phone Indicator Flashes in blue to indicate that the phone function is switched on (select models only). RF (Radio Frequency) Indicator Flashes in blue to indicate that the Bluetooth radio is on. Flashes in amber to indicate that the Wi-Fi (wireless network) radio is on. Flashes in purple to indicate that the GPS receiver is on. If more than one module is switched on, the indicator changes color in a cyclic way.
Keypad The keypad provides two sets of functions: Default functions as indicated by white icons/text. Alternative functions as indicated by orange icons/text. You can use the alternative functions when Fn lock is on. Fn lock is off by default. When it is switched on, the icon navigation bar. Default Ref Key shows in the Alternative (with Fn Lock) Description Key Dials or answers a call (select models only).
Default Ref Key End Key Fn Lock Key Switches on the alternative functions. Ends or rejects a call (select models only). Key Description OK Key Closes the current displayed menu or program Fn Unlock Switches off the Key alternative functions. Goes to the next input field. F1 Key Starts TacLink. Returns to the Home screen. F2 Key Starts Notes. Home Key Increases the brightness level of the screen. It cycles to the lowest level after reaching the highest level.
Default Ref Alternative (with Fn Lock) Key Description Key Numeric Keys Enter numbers by default. Symbol Keys Enter text without the on-screen keyboard. (See “Entering Text Using the Physical Keypad” in Chapter 2 for information.) Description Enter symbols as indicated by the orange icons. (Not available for the Phone program.) NOTE: The functions of F1 – F7 keys and Scan key described in the above table are default settings.
Back Components Ref Component Description Stylus Serves as the input device by tapping on the touchscreen to make selections and enter information. RFID Antenna Inside is the RFID antenna that reads RFID (Radiofrequency identification) tags. Camera Lens Takes still pictures or records video clips. Flash Provides extra light when taking pictures. Hand Strap Holders The hand strap attaches here.
Ref Component Description Speaker Plays music, sounds and voices. Battery Cover Inside is the battery. Top Components Ref Component Expansion Port Cover Description Inside is the Expansion Port (FlexiConn™ Mini-PCIE type) that allows you to use a Getac proprietary accessory for additional functions. (Contact your sales representative for technical information of FlexiConn™ if needed.) NOTE: The expansion port and the RS232 serial port cannot be used at the same time.
Bottom Components Ref Component Power Connector Serial Port Provides D-sub 9 pins RS232 function. NOTE: The expansion port and the RS232 serial port cannot be used at the same time. When using the port, tap Settings System Serial Port Switch to set up accordingly. Docking Connector Connects to the office dock (an option). 1-8 Description Connects to the AC adapter. USB OTG (Host & Connects to the USB cable.
Getting Your Device Ready for Use Installing the SIM Card and Battery 1. Lift the latch handle of the battery cover and turn it counterclockwise to the unlock (vertical) position. Then, detach the cover from the device. Unlock position 2. If you model has the phone function, you need to install the SIM card provided by your mobile operator. With the SIM card’s chip side facing up and the beveled corner pointing to the slot (the lower one), insert the card all the way into the slot.
NOTE: To remove the SIM card, slightly push in the card to release it and then pull the card out of the slot. 3. If you have a microSD card to insert, insert it into the slot. (See “Using an MicroSD” later for more information.) 4. To install the battery, first attach the connector side of the battery to the connector in the compartment and then lower the other side. 5.
NOTE: The battery cover must be locked for normal operation. Your device supports battery hot swap. Whenever you remove the battery cover with the device power on, the system will automatically enter the suspend mode. As long as you replace the battery and battery cover within180 seconds, you can press the power button to resume operation. If the time exceeds 180 seconds, the system will automatically shut down and any unsaved data might be lost.
CAUTION: For optimal performance of the lithium battery, take note of the following: Use the included AC adapter only. There is no need to fully discharge the battery before charging. You can charge the battery before it is discharged. Do not charge the battery where the temperature is high (e.g. in direct sunlight). As a protection against damage, your device stops charging when the battery’s temperature is extremely high or low.
Quick Help The Home screen provides a getting started item. You can quickly access most-needed settings from here. Tap getting started on the Home screen. Brush left or right to see available items such as ringtone, e-mail, Bluetooth headset, and others. Tap the item you want to set up. To obtain information on using the device, tap View All in the toolbar and Online help & how-to. (Internet connection is required.
Connect your device to the computer AFTER Windows Mobile Device Center or ActiveSync is installed. ActiveSync connection problems may occur in some specific cases. They are likely caused by interoperability with desktop firewall applications or applications that manage network traffic. For troubleshooting information, visit the Microsoft web site. After the software installation, connect your device to your computer with the USB cable and you are ready to synchronize.
Using Options Using the Tether NOTE: Attach the tether for the stylus to the device before attaching the hand strap. A tether is provided for attaching the stylus to your device. 1. Insert one of the tether’s loop ends through the hole of the stylus (as indicated by below). Then, insert the other end through the first loop (as indicated by below) and pull it tight. 2. Insert the other loop end to the holder on the device (as indicated by below).
Using the Hand Strap NOTE: Attach the tether for the stylus to the device before attaching the hand strap. You can attach the hand strap to your device.
Using an MicroSD Your device has a microSD card slot where you can insert a microSD card for removable extra storage. To insert a microSD card: 1. Remove the battery. (Refer to “Installing the SIM Card and Battery” earlier in this chapter.) 2. Insert the card into the slot, with the connector pointing to the slot (the upper one) and its label facing the back of the device. To remove the microSD card, slightly push the card edge to release it and then pull the card out of the slot. 3.
Chapter 2 Basic Skills This chapter familiarizes you with the basic operations of your device. CAUTION: The device can get uncomfortably warm when you use it in high temperatures. In such a circumstance, please take safety measures (such as wearing gloves) to protect yourself. Prolonged body contact can cause discomfort and potentially a burn.
Turning Off If you are not using your device, press and hold the power button for at least 5 seconds until the device plays a notification sound and turns off. Navigating on the Screen Using the Touchscreen CAUTION: Do not use a sharp object such as a ballpoint pen or pencil on the touchscreen. Doing so may damage the touchscreen surface. Use the included stylus or your finger. NOTE: Pull the stylus out of the slot and extend it for ease of use. Store it in the slot when not in use.
Screen-touch gestures make it easier to navigate your device. Gestures you can use are: Scroll Brush up or down on the touchscreen with the stylus, and lift the stylus off when you reach the edge. To stop scrolling, tap the screen. Pan Place the stylus on the screen and move it around for more controlled navigation. To stop panning, tap the screen. NOTE: Not all applications support screen-touch gestures. Using the Keypad You can also use the keypad to navigate on the screen.
You can conveniently perform a task by tapping the active item or the soft button in the toolbar. Home key The Home screen is accessible from anywhere by pressing the on your device or by tapping (at the left-bottom corner of the screen) and then Home. NOTE: Settings Home. You can customize the Home screen by tapping You can use your device in a landscape manner. To change the screen Settings System Screen General Landscape or view, tap Portrait.
Running Programs You can switch from one program to another without closing any program. In addition to running a frequently-used program from the Home screen, you can access any program from the Start menu. To open the Start menu, tap at the left-bottom corner of the screen or press Fn + Start key on your device. The Start menu contains all the program icons. You can brush up or down on the screen to see other program icons. Shortcut Menus With shortcut menus, you can quickly choose an action for an item.
Notifications Your device reminds you in a variety of ways when you have something to do. For example, if you have set up an appointment in Calendar, a task with a due date in Tasks or an alarm in Clock, you will be notified in any of the following ways: A message appears on the screen. A sound, which you can specify, is played. The notification indicator flashes in red. To choose reminder types and sounds for your device, tap Notifications.
This appears only if you have installed the input method. Input panel button. Microsoft Keyboard When you use the Microsoft Input panel, your device anticipates the word you are typing or writing and displays it above the Input panel. When you tap the displayed word, it is inserted into your text at the insertion point. The more you use your device, the more words it learns to anticipate. Tap here if this is the right word. These are large keys (not default settings).
XT9 Keyboard Your device offers XT9 Text Input Software that features large keys and allows you to enter text faster and more easily. You have to install the software before you can use the XP9 input method. Tap XT9 Setup to install it. There are two input modes available: XT9 mode and ABC mode. To use a different mode, tap and hold the @123 or ABC key (at the lower left corner) to display the menu and then tap your selection. Tap to select a mode. Tap and hold to display the menu.
Tap to switch to number/symbol keys. Tap to switch to letter keys. Tap one of the arrow keys to cycle to the previous or next set of number/symbol keys. For detailed information on using and customizing XT9 features, tap and hold the @123 or ABC key (at the lower left corner) to display the menu and then tap Options XT9 Help. Entering Text Using the Physical Keypad The physical keypad on your device works with XT9 Text Input Software to provide text input capability.
* To switch to a different mode, press the key for a prolonged period of time. A small options menu, as shown below, will pop up in the lower right corner of the screen. Press 1, 2, or 3 for the mode you want. Keypad Operation in XT9 Mode XT9 is a smart input mode that allows you to enter words with only one keystroke per letter. Though a key is shared by three to four letters, the XT9 mode can judge from your keystroke combination to predict the word you want to enter.
Key 1 Press as many times as needed to enter one of the below punctuation marks. .?!,-‘@:/ Press as many times as needed to enter the letter you want. * 2~9 Function in ABC Mode Press to switch to the next letter case choice: abc (all small case letters) Abc (capitalized) ABC (all capitals) # Press to enter a space. 0 Press once to enter + and twice to enter 0. Keypad Operation in 12# Mode 12# mode allows you to enter numbers. Key Press to enter the number.
When Pressed Longer * Key Press longer to pop up the options menu as shown here. # Press longer to pop up the symbols selection menu as shown here. Writing or Drawing on the Screen In certain programs, such as Notes, you can write or draw on the screen as you do on paper. NOTE: Not all programs support the drawing mode. 1. Tap Draw to enable drawing mode. A check (√) appears before the command. 2. To create a drawing, cross three ruled lines on your first stroke. A drawing box appears.
Recording a Message You can quickly capture thoughts, reminders and phone numbers by recording a message. In the Notes program, you can either create a stand-alone recording or include a recording in a written note. If you want to include the recording in a note, open the note first. In the Messaging program, you can add a recording to an email message. To create a recording: 1. Tap Notes to switch to the program. 2. Tap View Recording Toolbar to show the Recording toolbar. 3.
Securing Your Device Locking the Screen You can lock the screen at any time by tapping in the toolbar of the Start menu. This will not affect the notification messages and incoming calls. To unlock the screen, drag left or right. Drag left or right to unlock. Tap to lock. Settings Lock. When a To set a password for unlocking, tap password is set, you will be asked to enter your password whenever you want to use the device.
Locking Your SIM Card You can set a PIN (Personal Identification Number) code to protect your SIM card against unauthorized use. (Your mobile phone network operator may have already set a PIN for the SIM card.) By default, your device does not enable PIN security. To enable the security Settings Personal Phone Security. or change the PIN, tap When enabled, you will be asked to enter the SIM card’s PIN code when starting up the device.
Chapter 3 Using the Phone (Select Models Only) This chapter tells you how to use the mobile phone function of your device. About Your Phone Select models are equipped with the HSDPA (High-Speed Downlink Packet Access) module. HSDPA is an enhanced 3G (third generation) mobile telephony communications protocol. It can operate on 850/900/1800/1900/ 2100MHz. To use the phone, you need to first set up an account with a mobile phone network service.
Switching On or Off the Phone When the device is turned on, the phone is switched on by default. When needed (for example, on an airplane), you can switch off the phone without turning off your device. . Then tap 1. Tap the navigation bar and Wireless Manager in the popup window. – or – Settings Connections Tap Wireless Manager. 2. The Wireless Manager screen appears. Tap Phone to switch it from on to off or the other way around. 3. Tap 3-2 .
Starting the Phone Program Start the Phone program by any of the three methods: Press the Send key on the device. Tap Tap the phone item on the Home screen. Tap again if it displays “No New Missed Calls.” Phone. NOTE: If the phone is currently off, you will be asked to turn it on. Whenever you start Phone, the Phone screen displays the onscreen keypad. You can tap to hide it. To show the keypad, tap . You can use other programs during a call.
Making a Call There are several ways you can make a call. Dialing a Call 1. When on the Home screen: Press the numeric keys on your device to start entering the phone number. Your device will automatically switch to the Phone program. While in the Phone program: Enter the phone number using the physical or onscreen keypad. 2. As you enter the phone number, the program searches Contacts, Call History, and Speed Dial to find a matching name and/or number.
Making a Call from the Onscreen List Whenever you start the Phone program, the screen lists all recent calls, speed dials, and contacts. If the list contains the number you want to call, you can conveniently select from the list and press the Send key on your device. NOTE: To view a different list on the Phone View and select one of the screen, tap options. Making a Call from Contacts Microsoft Contacts displays your contact information stored both in your device’s memory and on your SIM card.
Tap and hold on the contact to call, and then tap the number to call in the shortcut menu. Making a Call from the Call History List The Call History list displays the calls you made, received or missed. 1. Tap Call History on the onscreen keypad of the Phone program.
2. Do one of the followings to call a person in the Call History list: Select the number to call and then tap or press the Send key on your device. Tap and hold on the number to call and then tap Call in the shortcut menu. Making a Call from Speed Dial If you have created speed dial entries, you can call a person quickly. (See “Using Speed Dial” in this chapter for information.
Quickly Making a Call to the Last Missed Call The Home screen displays the last missed call in the phone item. Tap phone to view the caller information. To call back, tap again. NOTE: If you do not wish to call back, do not tap the caller information on the Home screen. To cancel the caller information, tap Notification in the toolbar to dismiss it. Responding to a Call When an incoming call is received, your device rings or vibrates according to the options you have set for the phone.
Operations during a Call Adjusting the Phone Volume To adjust the volume during a call, tap the navigation bar and tap Select a volume level before the window disappears. . CAUTION: Never raise the sound volume level too high when using earphones. An excessive sound volume level could cause damage to your hearing. Using the Mute Function During a call, you can mute your microphone so that the person with whom you are speaking cannot hear you, but you can still hear him or her.
Managing More Than One Call NOTE: You may need to register for the “call waiting” service with your mobile phone network service and set your device accordingly. The exact number of people you can talk at the same time depends on your mobile phone network service. During a call, you can make or take a second call while putting the current call on hold. Then, you can choose to swap between the two callers or set up a conference call between all three parties. Holding a Call to Take a Second Call 1.
Setting up a Conference Call NOTE: You may need to consult your mobile phone network service for the availability and subscription of the conference call function. 1. When you have put a call on hold and made or taken another call as described earlier, you can set up conference calling by tapping Conference. 2. To add additional people to your conference, tap Hold. Dial a second number and press the Send key to connect. Wait for it to be picked up. Then tap Menu Conference. 3.
Using Call History Call History provides the time and duration of all incoming, outgoing, and missed calls, and a summary of total calls. Call History also provides easy access to any notes taken during a call. To access Call History while in the Phone program, tap Call History. Viewing Call History You can tap default). Filter to change the Call History view (All Calls by All Calls: Displays all calls made to and from your device in a chronological order.
Adding an Entry to Contacts Using Call History You can add a phone number in the Call History to Outlook Contacts or SIM Contact. 1. Tap and hold the entry you wish to transfer, and tap Save to Contacts in the shortcut menu. 2. Tap and select a contact type. 3. Enter the contact’s name, and select the proper number type. 4. Tap Save to save the entry. Using Speed Dial You can create Speed Dials for frequently-called phone numbers so you can dial a number with a single key press.
6. If Location, accept the current speed dial number or change the number if you want to. 7. Tap OK to save the setting. The new Speed Dial entry is now on the Speed Dial list. The letter on the lower-right corner of the entry indicates the assigned phone number. For example, “m” indicates the mobile phone number. NOTE: The first Speed Dial location is reserved for your voice mail. Editing or Deleting a Speed Dial Entry 1. While in the Phone program, tap Speed Dial. 2. Tap the desired entry and tap Delete.
Additional Phone Operations Using Text Messages Text messages are automatically received when your phone is switched on. The Home screen shows if there are new text messages. You can tap the section to open the message list. To send a text message, you can do one of the followings: First select a phone number from a program such as Phone or Contacts. Then select Send text message. First start the Messaging program. Then select the phone number.
Some mobile phone network services may require that a SIM card be inserted, and in some cases that the PIN be entered. There may be other emergency numbers available. Your mobile phone network service may save additional local emergency numbers in the SIM card. Dialing an International Call When you are manually dialing a number, tap and hold on the number key 0 until the + sign appears. The + sign replaces the international prefix of the country from where you are calling.
Customizing Your Phone To access the Phone settings, use one of the methods: Switch to the Phone program and tap Tap Options. Settings Personal Phone. Changing Sounds Settings Scroll left or right to the Sounds page. You can customize phone settings, such as the ring type and ringtone to be used for incoming calls, and the keypad tone to be used when entering phone numbers. NOTE: To use custom files (MP3, WMA, and WAV formats) as ringtones for incoming calls, copy the files to the \Applica
Changing Security Settings Scroll left or right to the Security page. You can protect your phone from unauthorized use. You might be prompted to enter the PIN2 code for specific functions (such as the pre-paid card’s charging counters). Consult your mobile phone network service to check if your SIM card supports PIN2-related functions and services. NOTE: Emergency calls can be placed at any time without requiring a PIN code. Changing Services Settings Scroll left or right to the Services page.
Changing Network Settings Scroll left or right to the Network page. You can view available wireless networks, determine the order in which your phone accesses another network if the current one is unavailable, and specify whether you want to change networks manually or automatically. The current network will remain active until you change it, lose your signal, or change your SIM card. Changing Band Settings Scroll left or right to the Band page.
Changing Others Settings Scroll left or right to the Others page. The settings will be configured automatically according to the SIM card inserted. You can manually change the settings if needed.
Chapter 4 Managing Your Device This chapter tells you how to effectively manage power, settings, data and programs of your device. Managing Power A fully charged battery should provide power for up to 6 hours of use. The operating time of a fully charged battery depends on how you are using the device. Some functions, such as using multimedia or operating a microSD card, may consume the battery power considerably.
off automatically. You need to connect the device to external AC power for charging before you can use it again. Power-Saving Tips Follow these suggestions to maximize the battery’s operating time, particularly when you are relying solely on the battery power for extended time periods. Suspend frequently. By default, the screen backlight will automatically dim out and the device will also suspend when it has been idle for a period of time.
Customizing Your Device NOTE: Incorrect settings may cause your system to malfunction. Make sure that you fully understand the function of a certain item before any adjustment. You can customize the settings of the device to your own preferences. Tap Settings. The items you can customize are described as follows: Item Description Bluetooth To set up or change the Bluetooth connection. (See “Using the Bluetooth Function” in Chapter 7 for detailed information.
Item Connections USB to PC Personal Description To enable advanced network functionality for USB connection. In some specific cases, there can be connection problems if this item is enabled. Disable this item to resolve the problem. Wi-Fi To search for wireless networks and configure the wireless network module. (See “Using Wireless Network” in Chapter 7 for detailed information.) Wireless Manager To change the Wi-Fi, Bluetooth, and Phone radio status.
Item System Description Customer Feedback To set if you want to send your feedback on using the Windows Mobile software. Encryption To set if you want to encrypt files placed on storage cards. The encrypted files will be readable only on this device. Error Reporting To enable or disable error reporting. Error Reporting sends information needed by technical support groups to diagnose a program error for a device running Windows Mobile software.
Item System Screen Description To set the orientation of the screen to portrait or landscape. To adjust the touchscreen for accurate screen taps. To enable the ClearType feature for easier reading of text in programs that support ClearType. To adjust the text size to see more content or increase the readability in many programs. Serial Port Switch To specify the use of Expansion Port or RS232 serial port. System To display the system information.
Working with Programs and Folders Adding and Removing Programs You can add programs compatible with Windows Mobile 6.5 to your device by downloading or copying. To manage programs you have installed, tap Managed Programs. Settings System To remove programs you have installed, tap Remove Programs. Settings System Searching and Organizing Information The Search feature on your device helps you quickly locate information. To search a file, tap Search Phone.
Chapter 5 Microsoft Pocket Outlook Microsoft Pocket Outlook includes Calendar, Contacts, Tasks, Notes, and Messaging. You can use these programs individually or together. For example, e-mail addresses stored in Contacts can be used to address e-mail messages in Messaging. Calendar: Scheduling Appointments and Meetings Use Calendar to schedule appointments, including meetings and other events.
Tap to go to today. Tap to display or edit the appointment details. Tap to switch to another view. Creating an Appointment 1. Tap calendar and New Appointment on the Home screen. – or – Calendar Tap Appointment. New 2. Enter appointment information. 3. Tap OK to save and return to Calendar.
Viewing Appointments You can quickly check your future appointments on the Home screen. Tap the calendar item on the Home screen to see the next appointment and brush left to see more appointments (if existing). Tap the appointment to view details.
Contacts: Tracking Friends and Colleagues Contacts maintains a list of your friends and colleagues so that you can easily find the information you are looking for, whether you are at home or on the road. Contacts. The Contacts list Tap appears. For models with the phone function, contacts stored in the SIM card also appear in the list (indicated by the icon ). Creating a Contact 1. In Contacts, tap . 2. Select a contact type. 3. Tap the first field for entering the name.
Assigning a Ringtone and Picture NOTE: To use custom files (MP3, WMA, and WAV formats) as ringtones for incoming calls, copy the files to the \Application Data\Sounds folder on your device. You can assign a specific ringtone and picture to an Outlook contact for easy identification when they call. 1. Select the contact you want to edit. 2. Tap Edit. 3. To assign a picture, tap and select an image. 4. To assign a ringtone to the contact, tap Info at the upper right of the screen.
Tasks: Keeping a To Do List Use Tasks to keep track of what you have to do. Tap Tasks. Creating a Task 1. In Tasks, tap New Task. 2. Using the Input panel, enter a description. 3. You can enter a start date and due date or enter other information by first tapping the field. 4. Tap OK to save and return to the task list.
Using the Tasks Summary Screen When you tap a task on the task list, a summary screen is displayed. To change the .
Notes: Capturing Thoughts and Ideas Quickly capture thoughts, reminders, ideas, drawings and phone numbers with Notes. You can create a written note or an audio recording. You can also include a recording in a note. Tap Notes. Creating a Note 1. In Notes, tap . 2. Create your note by writing, drawing, typing, or recording. 3. Tap OK to save and return to the note list.
E-mail and Text Messaging: Sending and Receiving Messages About Accounts E-mail. The account selection screen appears. Tap You can use multiple services to send and receive messages. For different ways of accessing messages, there are different types of account: Text Messages (select models only): This item appears if your model comes with the phone function.
During setup, you can enable Auto Setup to search for and enter the settings of the e-mail account with which you want your device to synchronize. If Auto Setup does not find the settings, you may have to ask your ISP, mobile operator, or system administrator for the correct settings, and then enter them yourself.
2. Tap New. NOTE: You can also send an e-mail message by selecting a contact with an e-mail address from another program such as Contacts or Phone. Then select Send e-mail from the shortcut menu or soft key. 3. Enter the e-mail address of one or more recipients, separating them with a semicolon. To access addresses from Contacts, tap To. 4. Enter your message and subject. 5. If you want to attach a file to the message, tap Insert and select the desired file. when you have finished the 6. Tap message.
Reading and Sending Text Messages (Select Models Only) Reading Text Messages The Home screen shows if there are new text messages. You can tap the item to view the message. You can also tap Text to open the message list. Sending a Text Messages 1. Tap text on the Home screen and tap Compose in the toolbar. – or – Tap Text. Tap New. NOTE: You can also send a text message by selecting a phone number from another program such as Contacts or Phone.
Chapter 6 More Programs In addition to Microsoft Pocket Outlook, there are other programs built into your device. This chapter tells you how to use these programs. ActiveSync ActiveSync on your device works with ActiveSync on a Windows XP computer and with Windows Mobile Device Center on a Windows Vista/Windows 7 computer. When you have established the connection between your device and your computer, you can synchronize the information between the two with ActiveSync.
With ActiveSync, you can also: Copy (rather than synchronize) files between your device and computer. Add and remove programs on your device. Pass through your computer to a network or the Internet. Synchronizing Data Once you have created a synchronization relationship and completed the first synchronization, you can initiate synchronization from your device. 1. Connect your device to your computer. 2. On your device, tap ActiveSync. 3. Tap Sync to begin synchronization.
3. Tap Add Server Source. 4. Follow the on-screen instructions to complete the setup. 5. Connect your device to the Internet for synchronization with Exchange Server. NOTE: If a message pops up asking you to accept security policies for synchronization with Exchange Server, tap OK to proceed. You may be prompted to set the password for device lock. You can set a longer period of time (maximum of 24 hours) before your device prompts you to enter the password again. ActiveSync.
Office Mobile 2010 Microsoft Office Mobile 2010 works with Microsoft Office on your computer to give you easy access to copies of your documents. Tap Office Mobile 2010 and select the program to use. Excel Mobile 2010 OneNote Mobile 2010 PowerPoint Mobile 2010 SharePoint WorkSpace Mobile 2010 Word Mobile 2010 Creating a Document/Workbook/Note NOTE: You cannot create or edit PowerPoint presentations and on your device. 1. Tap Office Mobile 2010 and select the program to use. 2.
Internet Explorer NOTE: When surfing the Internet, your device uses the default Internet connection in Settings Connections Connections My ISP settings. If you want to surf the Internet through Wi-Fi, connect to the wireless network before starting Internet Explorer. (See Chapter 7 for information.) Tap favorites Internet Explorer on the Home screen or tap Internet Explorer to switch to the program. The IE Mobile Home page appears. to display the Favorites list.
Windows Media Use Microsoft Windows Media Player Mobile to play digital audio and video files that are stored on your device or on a network, such as on a web site. You can play files in either Windows Media or MP3 format (including files with the extensions .asf, .wma, .wmv and .mp3). Tap music on the Home screen to directly play music. Or tap Media to switch to the program.
Pictures & Videos With Pictures & Videos, you can: View pictures and video clips. Send pictures and videos to others. Set a picture as the background on the Home screen. Play slide show. Edit your pictures. Viewing Pictures and Videos 1. Tap pictures on the Home screen and All Photos soft button. – or – Tap Pictures & Videos. NOTE: You can quickly view pictures by tapping pictures on the Home screen. Brush left or right to scroll through the pictures.
Camera The Camera program allows you to take pictures and record video clips. NOTE: Your device has two Camera programs. By default, the key on your device starts the Camera (in Picture & Videos) program. You can change the key to start the Getac Camera in Settings. Taking Pictures 1. To start the program, press the key on your device or tap Programs Pictures & Videos Camera. The Camera screen appears. Below the display area are indicators of the current status. Display area Current status 2.
Menu Items Descriptions Mode Three choices: 1. Normal 2. Burst – Continuous shooting of 5 pictures 3. Timer – 5 second countdown before shooting Brightness Seven brightness levels Resolution Six choices from 160x120 to 2592x1944 (1600x1200 by default) Zoom Available choices depend on the resolution. White Balance Five choices from which you can select one that matches the current light source. Flash Flash on or off. Full Screen Full screen on or off.
NOTE: By default, the display area blanks out and shows the word “Standby” when the camera has been idle for one minute. To resume, tap the screen. 3. Aim the camera lens at the subject. Press the automatic focusing. A green frame appears. 4. Press the key halfway down for key fully to take the picture. 5. The result shows on the screen if the picture was taken in Normal or Timer mode. At this time, you can tap Menu to perform a desired task to the current picture.
Menu Items Descriptions Brightness Seven brightness levels Quality 352 x 288 White Balance Five choices from which you can select one that matches the current light source. Full Screen Full screen on and off. Options Overall settings to the Camera program. Flicker Set to the frequency of the local electrical system (60Hz or 50Hz) for flicker free shooting where electrical lights exist. Night Mode On or off. Set to On for shooting in low light situations. BLC On or off.
5. To stop, press the key or tap Stop. Or, the recording will automatically stop when the length reaches the pre-defined maximum value (30 seconds by default). 6. The video clip is saved to the predefined storage location. To view the video clip, tap Thumbnails. Camera Controls and Options While taking pictures or recording video clips, you can tap Menu to use a function that meets your specific need. For one time overall settings to the Camera program, tap Menu Options. Make the necessary changes.
Getac Camera Overview NOTE: Your device has two Camera programs. By default, the key on your device starts the Camera (in Picture & Videos) program. You can change the key to start the Getac Camera in Settings. Getac Camera is a geo-tagging camera program, which allows you to stamp geographical information on photos as watermarks and embed such information into JPEG files as EXIF 2.2 metadata. Getac Camera. The GPS positioning will be To start the program, tap automatically activated.
Screen Elements Status Bar Descriptions Displays the current status. Number of pictures already taken / Total number of pictures allowed. (Maximum number shown is 999 even if the storage capacity allows for more.) Status Bar / Current zooming level. / / / / / Current shooting mode: Normal/Burst/Timer / Current white balance: Automatic/Sunshine/ Cloudy/Fluorescence/Incandescence Live Image Displays the live image.
Taking Pictures 1. Start the Getac Camera program. You will be in Camera Mode. 2. For camera controls such as brightness and zooming, tap Menu. 3. Aim the camera lens at the subject. Press the key halfway down for automatic focusing. A white frame appears. Wait until the color of the frame turns green indicating the subject is in focus. 4. Press the picture. key fully or tap and hold the Live Image area to take the appears on the screen for a few seconds, meaning 5.
Menu Items Mode Zoom Descriptions Three choices for the shooting mode: Normal This is the default setting whenever the program is started. Burst Continuous shooting of 3 pictures. Timer 5 second countdown before shooting. Available choices depend on the current resolution setting. x1 Available for all. x2 Available under 640x480 resolution setting. Brightness Seven brightness levels.
Viewing Pictures There are different ways to view pictures and data. On some occasions, you can drag up/down or left/right on the screen to access the pictures and data more easily. Instant View While in Camera Mode, the picture taken is immediately shown in the Instant View area with properties information. In this view, you can: Tap the image twice to switch to Standard View. Tap the properties list twice to switch to Properties View.
Browser Mode While in Camera Mode, tapping Thumbnail brings you to Browser Mode. To switch back to Camera Mode, tap Camera. Browser Mode has three views (Thumbnail, Standard, and Properties) as described below. Thumbnail View Thumbnail is the default view of Brower Mode, showing 12 preview images at one time. In this view, you can: Scroll down or up by dragging down or up on the screen. Go up/down/left/right one picture by pressing the arrow key.
Go to the previous or next picture by any of the three methods: − Tap the left or right picture in the Strip area. − Press the left or right arrow key for the previous or next picture. − Tap the left or right edge of the image and, when and icons appear on both sides, tap the left or right arrow to scroll to the previous or next picture. Switch to Thumbnail View by tapping Switch to Properties View of the selected . picture by tapping Delete the current picture by tapping . and then Yes.
View all properties of the current picture by drag down or up within the properties list on the screen. Go to the properties of the previous or next picture by any of the three methods: − Tap the left or right picture in the Strip area. − Press the left or right arrow key for the previous or next picture. − Tap the left or right edge of the and icons properties list, and, when appear on both sides, tap the left or right arrow to scroll to the previous or next picture.
Sorting Order By default, the pictures are sorted by name in Browser Mode. You can change the sorting order to Size, Date, or Name. To change the sorting order, tap Menu while in any of the three views. Tap the down arrow and, in the pull-down menu, tap your choice. Tap Back and then Yes when finished. Managing Images Deleting All Images If you want, you can delete all images by in any of the three views, check tapping the “Delete All Images” item, and tap Yes. CAUTION: Deleted images cannot be restored.
Options To select options for the camera, tap Menu and then tap four pages as described below. . There are 畫面出現PS535F 字眼 * 6-22 More Programs The above screens show the default settings.
Page Image Option Data Option Setting Items Descriptions Still Image Compression Level Three choices: High Quality, Normal Quality, and Low Quality. A higher setting means a larger file size. Altitude Option Displays altitude according to one of the two choices: 只剩一項還需要選嗎? GPS Time Option The altitude is based on GPS altitude information. Displays the time throughout the program according to one of the two choices: UTC The time is based on Coordinated Universal Time.
Page Setting Items Sound Effect About Descriptions Sets if the program will play sounds for screen tapping and photo shooting. (This setting is independent of the “Sound and Notifications” settings of Windows Mobile.) Provides copyright and licensing information of the program. Tap Back and then Yes when finished. The changes remain effective until you change them again.
Internet Sharing (Select Models Only) Using Internet Sharing, you can use your device as an external modem for the computer via the USB or Bluetooth connection. NOTE: The Internet Sharing function does not support Windows 98. 1. Make sure that your device is not connected to another device, and that you have installed proper GPRS settings. 2. To use USB connection, connect your device to the computer with the USB cable.
E-Compass The E-Compass program shows directions of movement including heading, pitch angle, roll angle, and altitude. Reading and Calibrating the Compass To run the program, tap E-Compass. Each time you start the program, you’ll be requested to calibrate the compass. Hold the device in your palm and swing it in the way as shown in the small popup window on the screen. Do this several times until the popup window disappears.
Avoid playing the MP3 music with the internal speaker or connecting the AC adapter. This will cause the magnetic interference to the compass. Regularly set the reference altitude for an accurate output. (See the next section.) Compass Settings The value of altitude is adjusted according to the change in the ambient pressure. It is important that you regularly set the reference altitude because the compass needs an appropriate starting point (altitude versus ambient pressure) for future adjustments.
TacLink The TacLink program receives GPS satellite signals to calculate the location of your device. You can also record a NMEA log file for the use of other applications. NOTE: TacLink only supports NMEA format. TacLink will not start if you Settings have set the GPS output format to Binary Mode in System GPS Mode for the need of third party programs. Running TacLink To run the program, tap TacLink. A red X indicates logging is not activated. No X indicates logging is activated.
NMEA Log To start logging, tap Setting Log Start. To stop, tap Setting Log Stop. For each logging section, new data is added to the end of the existing data in the same file. By default, the log file is named “GeTACGPSLog” and saved to “My Documents” folder on your device. To specify a different name and location for file, tap Setting Log File. SBAS Settings SBAS (WAAS, MSAS, ENGOS) provides additional accuracy and reliability for the GPS devices.
RFID Demo RFID Demo is a demo program that can read UID numbers from RFID tags and write data to RFID tags. The tag types supported are ISO15693, ISO14443A, ISO14443B and Mifare S50/S70. NOTE: For enhanced applications and customization of the RFID module, contact your authorized Getac dealer. To run the program, press the Scan key on your device or tap Demo. RFID Reading Tags 1. Start RFID Demo. The first page is UID. 2. Select a COM port to open and a tag type to read (15693, 14443A, or 14443B). 3.
Writing Data to 15693 Tags 1. Start RFID Demo. Tap the 15693 tab. 2. Tap SetProtocol to specify 15693 as the target. 3. Bring the tag near the RFID antenna. Tap CheckUID to obtain the UID of the tag. 4. Enter the block number you want to read data from. Tap Read Block. The data of the block is displayed in the data area. 5. Enter the block number and the data you want to write to the block. Tap Write Block. 6. You can tap Clear to clear the data area. Writing Data to Mifare Tags 1. Start RFID Demo.
Chapter 7 Getting Connected This chapter tells you how you can get your device connected through a variety of ways. Types of Connections Your device can connect to the Internet, to your computer, and to other devices and services. Your device has two groups of connection settings: My ISP and My Work Network. My ISP settings connect your device to the Internet, and My Work Network settings connect to any private network, such as an intranet that you use at work.
Using Cellular Connection (Select Models Only) Models supporting mobile phone functions allow you to access the Internet using the mobile network. Setting up a Cellular (GPRS) Connection NOTE: You must subscribe to GPRS service with your mobile operator. In most cases, your cellular (GPRS) connection will be preconfigured by your cellular service provider. You will not have to set up a GPRS connection or change your GPRS settings.
Setting up a Dial-up Connection NOTE: Depending on your wireless service provider, dial-up connections may not be supported on your device. With dial-up, your service provider gives you a phone number that you dial in order to connect your device to the Internet. 1. Tap Settings Connections Connections. 2. In either group, tap Add a new modem connection. 3. In the Enter a name for the connection field, enter a name for the connection. 4.
Using Wireless Network Your device has a built-in wireless network module. As long as you are in a wireless LAN (WLAN) environment, you can connect to the network without physical cables. Switching On or Off the Wi-Fi Radio By default, the Wi-Fi radio is switched off. To switch on or off the Wi-Fi radio: Settings Connections 1. Tap Wireless Manager. 2. In the Wireless Manager screen, tap Wi-Fi to change the Wi-Fi radio status.
Connecting to a Wireless Network 1. Switch on the Wi-Fi radio. (See “Switching On or Off the Wi-Fi Radio” previously.) 2. Your device will detect available Wi-Fi networks. When detected, the Notification soft button appears in the toolbar. Tap Notification to see the network list. 3. Select the network you want to connect to, and tap OK. 4. Select to connect to the Internet or the private network, and then tap Connect. 5. If the selected network requires a network key, enter the key and tap Connect.
Using the Bluetooth Function NOTE: Getac does not guarantee the product’s compatibilities with the Bluetooth headsets/devices from all manufacturers. To know the Bluetooth profiles that your device supports, tap Settings Bluetooth About Profiles. Your device incorporates the Bluetooth capability. Bluetooth technology is a short-range wireless communications technology.
3. For other devices to detect your device, tap Menu Bluetooth Settings Mode Make this device visible to other devices. 4. Tap OK. NOTE: When not using the Bluetooth function, switch off the Bluetooth radio. Leaving the radio on will consume more power. Sending Files via the Bluetooth Function 1. Switch on the Bluetooth radio. (See “Switching On or Off the Bluetooth Radio” previously.) 2.
Creating a Bluetooth Partnership A partnership is a relationship that you create between your device and another device with Bluetooth capabilities to help exchange information in a secure manner. Creating a partnership involves entering the same Bluetooth passcode on both devices. Once a partnership is created, your devices need only have the Bluetooth function switched on to exchange information; they do not need to be visible. 1.
Chapter 8 Troubleshooting and Maintenance This chapter gives solutions to common device problems you may encounter. It also provides guidelines on taking care of your device. Resetting Your Device Occasionally, you may need to reset your device. For example, you should reset your device when it stops responding; or appears to be “frozen” or “locked up.” To reset your device, press the power button for at least 10 seconds. Your device should restart.
have installed, will be erased. (Programs installed to ROM at the factory are not affected.) CAUTION: To ensure the integrity of your data should it be necessary to clear the memory, you are advised to regularly back up your data. Follow this procedure to clear the memory from your device: 1. Remove the battery and then replace it. 2. Press the up arrow key and the Action key, and while keeping the two keys down, press the power button. 3. Release all the keys when you see the “Clean boot now” message.
Troubleshooting NOTE: If you encounter a problem you cannot solve, contact your dealer for assistance. Problem Solution Power does not switch on when using battery power. The remaining battery power may be too low to run your device. Charge the battery. Screen responds slowly. Make sure that your device is not running out of battery power. If the problem still persists, restart your device. Screen freezes. Restart your device. Cannot establish a connection with a computer via USB.
Problem A warning message of not enough memory appears. Solution Delete files you no longer need. Remove programs you no longer need. Delete all files and clear history in Internet Explorer. Stop programs you are not currently using. To check the state of your active programs, tap Settings System Task Manager. Restart your device. Caring for Your Device Taking good care of your device will ensure trouble-free operation and reduce the risk of damage to your device.
Never clean your device with it powered on. Use a soft, lint-free cloth to wipe the screen and the exterior of your device. Do not use paper towels to clean the screen. Never attempt to disassemble, repair or make any modifications to your device. Disassembly, modification or any attempt at repair could cause damage to your device and even bodily injury or property damage and will void the warranty.
Chapter 9 Regulatory Information This chapter provides regulatory statements and safety notices on your device. NOTE: Marking labels located on the exterior of your device indicate the regulations that your model complies with. Please check the marking labels on your device and refer to the corresponding statements in this chapter. Some notices apply to specific models only.
ElectroMagnetic Compatibility (EMC) standard for radio equipment and services; Part 17: Specific conditions for 2.
Changes or modifications not expressly approved by the party responsible for compliance could void the user‘s authority to operate the equipment. The antenna(s) used for this transmitter must not be co-located or operating in conjunction with any other antenna or transmitter. Safety Precautions Prolonged listening of music in maximum volume can damage the ears. The use of headphones other than those recommended/supplied can cause hearing impairment due to excessive sound pressure.
Connect the charger to a proper power source. The voltage and grounding requirements are found on the product case and/or packaging. Do not use the charger if the cord becomes damaged. Do not attempt to service the unit. There are no serviceable parts inside. Replace the unit if it is damaged or exposed to excess moisture. About the Battery Use a specified charger approved by the manufacturer. Do not mutilate, puncture, or dispose of battery in fire.
required to reach the network. In general, the closer you are to a wireless base station antenna, the lower the power output. The highest SAR value for the model device as reported to the FCC when tested for use at the ear is 0.374 W/kg and when worn on the body, as described in this user guide, is 0.366 W/kg (Body-worn measurements differ among device models, depending upon available accessories and FCC requirements.