ENGLISH G3 Drum-Module Model Document Version Release Date G3 Owner’s Manual 1.0 2022-10-24 Manufacturer Please read this owner´s manual carefully before operating GEWA music GmbH Lesen Sie diese Bedienungsanleitung vo 58 the device and take note of the safety information! Keep this nahme und Oelsnitzer beachtenStraße Sie die Sicherhe 08626 Adorf document available for immediate reference. Bewahren Sie die Anleitung zum Nachschl GERMANY Download the complete owner´s manual at gewadrums.
INDEX 1 Safety Information .................................................................................... VI 1.1 Symbols used in the Manual ................................................................................. VI 1.2 Safety Precautions ................................................................................................ VI 1.3 Proper Handling ................................................................................................... VII 1.
7 8 9 User Interface - Basics ............................................................................... 31 7.1 General functions .................................................................................................31 7.2 Loading and saving from presets ..........................................................................32 7.2.1 Load ........................................................................................................................32 7.2.2 Save ..........
10.1.2 X-Talk ..................................................................................................................... 59 10.1.3 Preset ..................................................................................................................... 60 10.2 Setup ..................................................................................................................... 61 10.2.1 Selecting & Changing individual triggers/ Bank ......................................................
11.5.4 Master & Headphone Equalizer / Compressor .....................................................107 11.6 MIDI .................................................................................................................... 108 11.6.1 MIDI Pad Settings .................................................................................................110 11.6.2 MIDI Control .........................................................................................................114 11.6.
Dear Valued Customer, Thank you for purchasing our top-quality GEWA G3 Module! The G3 is an E-Drum that gives you a highly impressive sound and playing experience, while offering a huge extra set of additional and easy-to-use sounds and features. Your safety is very important to us! Please read the safety information carefully and take good note of the given information. We suggest you keep this user manual in a safe and known place, and to pass it on to a new owner or user of your G3 Module.
WARNING Electrical Hazard Do not expose the apparatus to dripping or splashing liquids. Do not place objects filled with liquids, such as vases or glasses, on or near the apparatus. The mains plug shall remain readily operable. Never use damaged power supplies/cables. Install power supplies/cables firmly to avoid the risk of damage. Even low electric currents can lead to serious injuries and even death! Never open the drum console. Never insert water or liquids into the drum console.
1.4 Please keep your digital drum console in a dry environment. Audio accessories for audio playback (connected to the in- or output of the console) or for data communication can be connected. Accessories must match the relevant technical specifications (see “Technical Data” section). Only and always use GEWA certified power adapters, and make sure that they are properly attached and connected.
1.5 CE LABEL Is in conformity with the relevant Union harmonisation legislation: Directive 2014/53/EU Standards to which conformity is declared: EN55032:2015 EN55035:2017+A11:2020 EN61000-3-2:2014 EN61000-3-3:2013 EN301489-17:V3.2.4 EN62368-1:2014+A11:2017 Compliance with the above directives is confirmed by the CE label on the device.
1.6 FCC LABEL/FCC MARK This product is certified by the Federal Communications Commission (FCC) and is identifiable by its FCC-ID: 2APTV-GEWAG3. It contains a modular approved transmitter module with FCC-ID: A8TBM64S2. This information is also shown on the permanent label at the bottom side of each device. RF Exposure Statement This equipment complies with FCC radiation exposure limits set forth for an uncontrolled environment and meets the FCC radio frequency (RF) Exposure Guidelines.
1.7 REGULATORY INFORMATION - CANADA ENGLISH This product is certified by Innovation, Science and Economic Development (ISED) and is identifiable by IC: 23946-GEWAG3. It contains a modular approved transmitter module with IC: 12246A-BM64S2 as well as license-exempt transmitter(s)/receiver(s) that comply with Innovation, Science and Economic Development Canada’s license-exempt RSS(s). ICES-003 Class B Notice This Class B digital device complies with Canadian CAN ICES-003.
FRANÇAIS Ce produit est certifié par Innovation, Sciences et Développement Économique (ISDE) et est identifiable par IC: 23946-GEWAG3. Il contient un module d’émetteur approuvé avec IC: 12246A-BM64S2 ainsi que des émetteur(s)/récepteurs(s) exempts de licence qui sont conformes aux CNRs applicables de Innovation, Sciences et Développement économique Canada. Avis NMB-003, Classe B Le présent appareil numérique de la classe B est conforme à la norme NMB-003 d'Industrie Canada.
1.8 RECYCLING In case your digital drum console needs to be disposed, take it to your local community waste management service location e.g. disposal companies, recycling centers). The displayed symbol requires that devices labeled with this symbol must be disposed of separately from household waste. Under the Electrical and Electronic Equipment Act, owners of devices marked with this symbol are required by federal law to deposit Electrical waste and electronic equipment in a separate waste collection.
2 SCOPE OF SUPPLY GEWA G3 The GEWA G3 Drum Set is made up of the following parts. Please check the package contents is complete: G3 Drum Module 10.5 – 12.7 mm module bracket Product ID card 1x 1x 1x USB Stick Quick start guide (multilingual) 1x 1x Power cable 1.8 m (IEC C8) Type C (CEE 7/16) Type A Type G (EU | CH | CU | IL | IN) (US | CA | CU | JP | TW) (UK) 1x 1x 1x Type I (AU | AR | NZ) 1x * The number of power cables included varies depending on the country.
3 MOUNTING INSTRUCTIONS 3.
3.1 CONNECTING EXTERNAL EQUIPMENT TO THE G3 MODULE 3.1.
3.1.1 REAR PANEL Make sure that the unit is switched off before connecting the equipment.
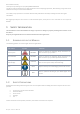
3.1.2 3.1.2.1 CYMBALS GEWA C YMBALS GEWA cymbals are equipped with two stereo jacks (6.35 mm - 1/4" TRS standard). In operation with GEWA modules, only the jack that is closer to the center hole of the cymbal is relevant. 3.1.2.2 O THER MANUFACTURERS Connect analog sensors from other manufacturers as shown in the diagram below.
Cymbal Type Trigger Type (Trigger Settings) Components Components 1 2 1-Zone cymbals Edge None Single/Dual 2-Zone cymbals Bow |Edge None Dual 3-Zone cymbals without separate bell output Bow|Edge|Bell None Dual 3-Zone cymbals with separate bell output Bow|Edge Bell 3-Way For the correct operation of cymbals from other manufacturers, select the appropriate trigger type in the module (Look at “Trigger Settings“ in the owners manual) NOTE 3.1.2.
4 USER INTERFACE The function of the dials and keys may vary depending on the active level based on the software. This section describes the default assignment when the unit is started.
No Name Description P Action Power button Switch device on and off. F1 Function key 1 [Variable application] The function is shown in the upper left field of the display. F2 Function key 2 [Variable application] The function is shown in the upper middle field of the display. F3 Function key 3 [Variable application] The function is shown in the upper right field of the display. 4 OLED Display 5 Dial 1 [Variable application] The function is shown in the lower left field of the display.
5 SWITCHIG THE DEVICE ON AND OFF 1 Connect the supplied mains cable to the AC IN socket on the back of the unit. Follow the safety instructions ( Safety Information) 2 Insert the mains plug into the socket. 3 When the mains cable is connected, the [Power] key lights up red. The unit is in stand-by mode. Press the [Power] key to start the unit. 4 Wait while the unit starts up. To save energy, the unit has the "AUTO OFF" function.
5.
G3 Symbols Hi Hat Trigger Sensor Active Zone Settings Trigger Bank 6 Trigger Bank - Kick Category Trigger Bank - Pad Category Trigger Bank – Cymbal Category Trigger Bank – Hi-Hat Category BEFORE YOU START … This section gives a brief introduction to important global settings of your GEWA G3 Module. 6.1 WELCOME WIZARD / START -ASSISTANT At the first start - and after every factory reset - you are offered configuration help so you can quickly and easily set your G3 module to the basics.
Now select your trigger setup with the navigation keys [8] and confirm the selection with [F2]. 3 [F2] NEXT Press the Hi-Hat together with your foot and press [F2] “NEXT”. 4 [F2] NEXT Open the Hi-Hat completely and press [F2] “NEXT”. 5 [F2] NEXT Test the Hi-Hat and press [F2] “SAVE”. 6 [F2] SAVE Setup completed. Press [F3] “DONE”.
6.2 TRIGGER SETUP Your GEWA Drum Console provides trigger presets for different available pad configurations.
Press [F2] “SETUP“. 2 [F2] Setup Press [F1] “PRESET“ [F1] Preset 3 Use the dial [5] or the navigation keys [8] to select your GEWA set from the list and confirm via [F1]. The process is now complete and your GEWA drum set is optimally tuned to the G3 module.
6.3 HI-HAT CALIBRATION The Hi-Hat is the most complex instrument of a drum kit. It requires a particularly good tuning between hardware and software to produce the best playing results. Proceed as follows to calibrate the Hi-Hat. Press [12] [TRIGGER SET]. 1 [Trigger Set] Press [F3] “HH-CALIB“. [F3] HH-CALIB. 2 Press the Hi-Hat together with your foot and press [F2] “NEXT”. [F1] NEXT 3 Open the Hi-Hat ompletely. Confirm the action by pressing the button [F1] “FINISH”.
Now the Hi-Hat is fully calibrated and playable. With the Hi-Hat symbol, you can directly test whether the mechanism works. Then confirm the setting by pressing the button [F1] ”DONE“ [F1] DONE 5 If you want to leave the calibration without saving, press the button 30 |G3 – Owner’s Manual [F3].
7 USER INTERFACE - BASICS 7.1 GENERAL FUNCTIONS The G3 module is equipped with buttons and dials that make it easy for you to operate. You can reach each main menu by pressing the corresponding button on the module. To exit a menu, you can press another menu button. If you are in a submenu, then you can go back one level at a time by pressing [F3] You can also use the navigation keys [8] for operation.
7.2 LOADING AND SAVING FROM PRESETS In some menus you can load presets or save or rename your own user presets. In the following points, you can see examples of the function and operation. As soon as you make changes to the settings that are not automatically saved, a [*] is shown next to the corresponding name to indicate this. Save your changes accordingly before (!) changing the drum kit preset. Unsaved settings will otherwise be discarded. 7.2.
7.2.2 SAVE Presets marked with the symbol cannot be overwritten. Please select a free user slot from the list and press [F2]. User slots that have already been saved can be overwritten or renamed by pressing [F2]. 7.2.3 NAME Use the navigation keys [8] or the dial [6] to select the desired character. Press [ENTER] to confirm the respective character. To change the cursor position, use the dial [5] .
8 HOME HOME The start screen with the most important functions for playing and practising. The active drum kit is shown in the middle of the screen. If the number of the drum kit is marked with an asterisk, the parameters of the kit have been changed. To keep the settings, save the preset before switching to another preset. Functions Drum Kit choice Here you have several options: Press [F1] to open the drum kit browser.
Metronome settings You can start and stop the metronome at any time by pressing [ENTER]. You can also switch to the detailed metronome level with [F3]. The field at the bottom right of the screen also flashes Turn the dial [7] to select the tempo. Touch [F3] to open the metronome editor. Here you can change the time signature, the rhythm (interval), the click volume and many other metronome settings. Volume settings Use the dial master outputs. Use the dial output.
8.1 DRUM KIT PRESETS HOME [F1] Drum Kit On the Home screen, you can access the entire list of drum kits by tapping [F1] (Drum Kit). By default, the active drum kit is highlighted in the list. All drum kits can be managed in this window. Presets that are factory-installed are marked with a sign. Self-created presets are marked with a "U". Example: "U001” Press [F3] to exit the menu.
8.2 SNARE STYLE – RIMSHOT, RIMCLICK & X-FADE SENSITIVITY HOME [F2] X-Fade You can set a fixed or variable sound for the snare rim by pressing the [F2] key several times: 1. Rimshot 2. X-Stick 3. X-Fade = A dynamically controlled function that switches between a cross-stick and a rimshot, depending on the strength of the strike. 4. X-Fade EDIT = A window opens with a fader. Now you can set the threshold value that suits you with the dial [6]. The window closes automatically after 2 seconds.
8.3 METRONOME SETTINGS / CLICK Home [F3] Click This view contains all metronome functions. In the middle of the display you see the set tempo in beats per minute (bpm). The highlighted number on the right side of the screen shows the current count of the set time signature (bottom centre - TIME SIG). If activated, the ACCENT symbol ( ) on the left side of the display shows whether the first beat is emphasised or not.
Options When you press the [F1] key, the full list of available metronome settings opens. For some of these functions, a simplified setting option is shown on the display. Turn the dials [5], [6] and [7] to adjust the values or scroll through the sub-menus to set the time signature, rhythm interval or click volume. Tap Press the Button [F2] “TAP” to tap the tempo. Interval / Rhythm interval Use the dial [5] to set the interval. Time Sig Scroll through the preset time signatures with the dial [6].
8.4 OPTIONS Home [F3] [F1] Click-Options Navigate through the list with the dial [5] or the navigation keys [8]. The selected function is highlighted by a white bar. If there are advanced editing options for an entry, you can adjust them further with the dial [7] or by pressing [ENTER]. Accent One ( ) Switch between "on" and "off" by pressing [F1]. When the function is on, the symbol in the main window is highlighted and the first beat is emphasised.
9 INSTRUMENT The Instrument menu contains all sound options. You can create your own drum kit presets and modify the drum kit presets. For example, change the individual pad sounds, tune them and add effects. It is also possible to add equalizers and compressors to each pad and to select a second sound for each channel. The permanently installed drum kit presets are a good starting point. All available options are part of the drum kit parameters and affect the level of the pads and pad components.
9.1 SOUND EDITING INSTRUMENT [F1] Instrument In the view you now have the possibility to edit or exchange your loaded sound. Functions: [F1] [FX SEND] Mixer to add effects to your sound. [F2] [SOUND] Sound selection for the selected input. [F3] Back to INSTRUMENT main menu The display window is always overwritten with the currently loaded sound (e.g. 22" Brooklyn twenty-two) of the selected zone (KICK I HEAD). You will find the parameters that you can change in the list.
9.1.4 ATTACK TIME Change the "attack" of the drum by setting a low value for a direct and tight attack sound and a high value for a rather soft attack sound. This way, in the case of a snare, you can also simulate different snare wire tensions. 9.1.5 RELEASE TIME Controls the length of the sustain (decay). In this way, the dampening of an instrument can be simulated. The natural sustain of the DRY sample (without effects) shortens in low dial positions and sounds longer in high dial positions.
9.2 FX SEND INSTRUMENT [F1] [F1] FX Send The Ambient [AMB], Instrument Reverb [I-REV], Room Reverb [R-REV] and Multi Effects [MFX] controls allow you to mix the individual effects. The effect is only applied to the selected input. The global change can be found under [MENU] [F2] “MIX“. Use the dial [5] [
9.3 SOUND INSTRUMENT [F1] [F2] Sound Under [SOUND] you can assign a new sound to each of your inputs and zones. This gives you the possibility to create your own drum kit presets or to adapt the sound of existing presets. Of course, you can also use your own .wav file here. Read chapter "USB Load/Save" on how to import a Wav file. Select Input Use the dial [6] [] to select the input whose sound you want to change. The input is displayed at the top left.
9.3.1 SOUND GROUPING Sound Grouping is used to assign all relevant samples of the instrument sampled from individual sounds directly to the corresponding zones. For example: Snare = Snare CS (consisting of two samples = Snare Center & Snare Side) & Snare Rim + X-Stick Tom Pad = Head & Rim(shot) Cymbals = Bow, Bell & Edge Activate the function by pressing [F2] [GROUPING].
9.1 EQUALIZER & COMPRESSOR 9.2 INSTRUMENT [F2] EQ I Comp The G3 module offers a fully parametric 3-band equalizer and a compressor for each input channel/pad. Both features are implemented as insert types in the signal path. In this way, it is possible to individually shape the sound of each connected pad. Pad EQ and compressors are part of the drum kit parameters and a part of the mix that can be heard in Direct Outs and Digital Outs.
INSTRUMENT [F2] [F1] EQ I Comp The G3 offers a selection of presets to improve your sound, even without a sound engineering background. Load a preset [F2] and observe how it affects the sound. To change individual parameters, select the corresponding menu item from the list with the dial [5] or the navigation keys [8]. Change the value according to your wishes with the dial [7] or the navigation keys [8]. You can select the inputs with the dial [6]. To exit the menu, press [F3].
Enabled Switch function on and off (on / off) Gain Boosts or attenuates the range of the set band frequency determined by Q and increases or decreases the audio signal by the set dB value. Q-Factor Determines the bandwidth/quality of the bell filter. Determines the shape of the curve around the curvature point. High values lead to a sharp change in curvature and a narrow bandwidth.
9.3 SECOND SOUND INSTRUMENT [F3] Second Sound (2nd Sound) allows you to place another sound on top of a pad sound. When the Second Sound is activated, both sounds are played simultaneously. To activate the 2nd Sound for your input, select the menu item "SECOND SOUND ACTIVE" with the dial [5] or the navigation key [8] and set it to "ON" with the dial [7] [], the navigation key [8] with [ENTER].
9.3.1 SOUND SELECTION / SECOND SOUND INSTRUMENT [F3] [F2] 2nd Sound Selection Under [SOUND] you can assign a new sound. Of course, you can also use your own .wav file here. Select input Use the dial [6] [] to select the input whose sound you want to change. The input is displayed at the top left. Select sound source With the dial [7] [TYPE] you can select the sound category from whose list you choose your sound.
10 TRIGGER SET In the "Trigger Set" mode, you select the pad triggers (drum sensors) and you can make settings. The G3 drum module can be adjusted to your personal, individual playing style. When you make changes to a preset, they are automatically saved. You will also find an asterisk [*] next to the trigger setup name. If you want to save your settings in your own preset, then you can do this under: [TRIGGER SET] -> [F1] Settings -> [F2] Preset.
Under the direct access [SETUP] you can determine what type of pad or cymbal is placed on the input. Example: Cymbal = Edge, Bow, Bell 10.1 SETTINGS TRIGGER SET [F1] Settings In the SETTINGS you can adjust your trigger and all the associated functions to your wishes. In the upper area you see the selected instrument. With the dial [6] [] you can choose between the zones of the instrument (HEAD I RIM; BELL I EDGE I BOW).
10.1.1 PARAMETER TRIGGER SETTINGS [F1] Parameter GAIN This is an amplification of the received trigger signals before input. Some pads or triggers available on the market produce accurate but weak signals that can be amplified by this parameter before they are registered as an input signal in the G3 module. The construction of the pad used can also contribute to weak signals.
HIGH LEVEL Upper, accepted level of the input signal. In conjunction with Threshold, it defines the limits of the range of the input signals. Signals with levels between Threshold and High Level generate MIDI notes with velocity values between 8 and 127. All signals with levels above High Level generate MIDI notes with velocity 127. Values between Treshold and High Level define the possible dynamic range. SCAN TIME The sampling time of the input signal.
RETRIGGER MASK Retrigger Mask determines how many milliseconds must pass after a previously detected signal before new signals are accepted - to prevent a "machine gun effect" or false trigger due to vibrations after a beat. As another threshold value, this is one of the most important parameters and it may take some time to find the best value.
CURVE ID Here you will find the selection of different trigger curves that significantly influence the response behaviour of the corresponding pad. The following preset curves are available for selection: Linear, Convex, Concave.
DYN LEVEL & DYN TIME Dyn Level determines how hard the G3 tries to suppress false triggers, whereas Dyn Time determines how long false triggers are suppressed. For most pads with rubber playing surfaces, Dyn Level values between 8 and 15 and Dyn Time between 8 and 20 should give the best results. For pads with fabric mesh heads, it may be necessary to increase Dyn Time to over 20 and up to 60 as the skin diameter increases.
10.1.2 X-TALK X-Talk is a tool to avoid unwanted signals in other pads. Vibrations can trigger the triggers of other instruments. With X-Talk, you can set a threshold for other triggers, above which they will only react to vibrations in the environment. Velocity values below this threshold are ignored by the analysis unit (G3 module). This practice comes at a price, however, as the physical effects of two instruments on each other are usually mutual.
10.1.3 PRESET TRIGGER SET [F1] [F2] Save your own preset here and load presets you have created yourself. Use the dial [5] or the navigation keys [8] to select an appropriate preset from the list. To load the preset, press [F1] or [ENTER]. To save your own preset, select a free USER slot and press [F2]. Press [F3] to cancel the operation. For a detailed description of how to load, save and overwrite presets, see: Loading and saving from Presets.
10.2 SETUP With the [F2] [SETUP] key, you can directly access the selection of triggers and their presets. TRIGGER SET [F2] Inputs & Components Here you can see directly which trigger is assigned to which input. Select Input Select the input channel with the navigation keys [8] or the dial [5]. To change individual components, press [F2] [BANK] or the [ENTER] key. Load and save In contrast to the instrument level, the trigger select settings are saved automatically.
10.2.1 SELECTING & CHANGING INDIVIDUAL TRIGGERS/ BANK TRIGGER SET [F2] [F2] Use the dial [5] or the navigation keys [8] to select the input channel you want to change and press [F2] [Bank] or [ENTER]. Now select the category of your trigger with the dial [5] [] or the navigation keys [8]. If you have selected the hi-hat channel, the symbol (hi-hat) is also displayed. Confirm your selection with Press [F1] or by pressing [ENTER] [F3] to go back one step.
Select the trigger with the dial [5] or the navigation keys [8]. Confirm your selection with [F1] or by pressing [ENTER]. Press [F3] to go back one step. 10.2.2 PRESET / LOAD & SAVE TRIGGER SET [F2] [F1] Preset To make it easier for you to get started with the GEWA instrument, we have created trigger presets for you. Of course, you can also create, save or load your own presets. Use the dial [5] or the navigation keys [8] to select a corresponding preset from the list.
10.3 HI-HAT CALIBRATION The hi-hat is the most complex instrument of a drum kit. It requires particularly good coordination between hardware and software to produce the best playing results. Proceed as follows to calibrate the hi-hat. TRIGGER SET [F3] Hi-Hat Calibration Press [12] [TRIGGER SET]. 1 [Trigger Set] Press [F3] “HH-CALIB“. [F3] HH-CALIB. 2 Press the Hi-Hat together with your foot and press [F2] “NEXT”. [F1] NEXT 3 Open the Hi-Hat completely.
Now the Hi-Hat is fully calibrated and playable. With the Hi-Hat symbol you can directly test whether the mechanism works. Then confirm the setting by pressing the button [F1] ”DONE“ [F1] DONE 5 If you want to leave the calibration without saving, press the button [F3].
11 MENU Under “MENU” you can access: MIX, EFFECTS, SOUND-IMPORT, MIDI- and SETUP-Menu. In the following, the individual menus and their functions are explained in detail. MENU Selecting the menu item. Select the desired menu item with the dial [5], the navigation keys [8] (or, if necessary, by pressing the keys [F2] [F3]). You can open the respective menu items from the list with [F1] or by pressing [ENTER]. MIX Press [F1] MIX to access all volume controls.
11.1 MIX Under “MIX” you will find the mixers to adjust the volume settings for your G3 module. You can control the volume of the individual channels of each drum kit preset, control the FX volume and have the option to control the volume of the hi-hat and the outputs. Not all changes are automatically saved but are part of the drum kit settings. These include the hi-hat volume, the FX level and the mixer for the individual channels of the drum kit.
11.1.1 GENERAL MENU [F2] [F1] In the [GENERAL] menu, you will find the volume settings for the master outputs, the headphones, the mix-in (& Bluetooth), the metronome (click) and the songplayer (song). Master-Out - Volume Headphones - Volume Mix-In & Bluetooth - Volume Metronome - Volume Songplayer - Volume Select channel Use the dial [5] [
11.1.2 HI-HAT VOLUME MENU [F2] [F1] [F1] Hi-Hat Vol In the [HIHAT VOL] menu you will find the volume settings for the Hi-Hat. The following are available for selection: EDGE BOW BELL CHICK SPLASH Edge Surface Bell Stepped Hi-Hat Generation of a cymbal sound by striking the Hi-Hat quickly with the foot. Rand Oberfläche Glocke Getretene Hi-Hat Erzeugung eine Beckeklangs durch schnelles Anschlagen der Hi-Hat mit dem Fuß.
11.1.3 FX LEVEL MENU [F2] [F2] In the [FX LEVEL] menu, you can change the global effect volumes. The following are available for selection: AMB I-REV R-REV MFX Ambience (Room) Instrumental Reverb Room Reverb Multi Effects Choose effect Use the dial [5] [
11.2 EFFECTS The G3 is equipped with four different effect modules, so you can edit your drum sound down to the smallest detail and customise it according to your wishes. Not all changes are automatically saved, but are part of the drum kit settings. If changes have been made that have not yet been saved, this is marked with a [*]. MENU [F3] Effects When you press the [EFFECTS] button, you first see an overview of all available effects.
11.2.1 AMBIENT MENU [F3] [F1] Ambient The Ambience module contains room recordings made in the Berlin Funkhaus studios. Since a room reacts to moving air in a characteristic and consistent way, the possibilities of the parameters are limited by the type of effect. Ambience controls the time it takes for sound to bounce off an obstacle, resulting in an echo.
11.2.1.1 FX S END - A MBIENT MENU [F3] [F1] [F1] Ambient Via [FX Send], you can specifically assign the effect to each channel. Select channel Use the dial [5] [] or the navigation keys [8] to select the channel you want to change the volume of. Change volume Turn dial [7] [] or press navigation key [8] to change the volume. Grouping Turn the dial [6] and activate the GROUPING function.
11.2.2 INSTRUMENT REVERB MENU [F3] [F1] This module contains classic and generic algorithms for simulating an instrument-specific reverb. Some reverb types are traditionally generated electronically, while others (e.g. Plate) emulate mechanical devices that add artificial reverb to the dry recording. The difference between instrument reverb and room reverb is conceptual rather than a property. Does an instrument possess reverb when there is no room? This is certainly a philosophical question.
11.2.2.1 FX S END - R EVERB MENU [F3] [F1] [F1] Reverb With [FX Send], you can assign the effect volume to each channel specifically. Select channel Use the dial [5] [] or the navigation keys [8] to select the channel you want to change the volume of. Change volume Use the dial [7] [], the navigation keys [8] or the [+] & [-] keys to change the volume. Grouping Turn the dial [6] and activate the GROUPING function.
11.2.2.2 P RESET MENU [F3] [F2] You can choose from presets, create your own or rename them. Use the dial [5] or the navigation keys [8] to select a corresponding preset from the list. To load the preset, press [F1] or [ENTER]. To save your own preset, find a free USER slot and press [F2]. Press [F3] to exit the layer or any menu key to exit the entire menu.
11.2.2.3 R EVERB T YPES MENU [F3] [INST REV. o. ROOM REV.] [F1] Reverb You have the possibility to choose from different reverb types. Use the dial [7], the navigation keys [8] or the [+] and [-] keys. Plate1 Small Plates Mechanically generated reverb without early reflections. This is a simulation of a smaller reverb plate with a specific characteristic. Plate1 Med Plates Mechanically generated reverb without early reflections.
simulations. Hall Large An algorithm that simulates a large concert hall with early reflections and a longer decay than room simulations. 11.2.2.4 R EVERB P ARAMETER MENU [F3] [INST REV. o. ROOM REV.] [F1] Reverb You have the option of changing further parameters. Select the corresponding parameter with the dial [5] or the navigation keys [8] and change it with the dial [7], the navigation keys [8] or the [+] and [-] keys. Level Adjust the volume/level of the effect (globally).
Turning the effect on / off Use the dial [6] and switch to [on] or [off]. Exit the level Press [F3] to exit the layer or any menu key to exit the entire menu. 11.2.3 ROOM REVERB MENU [F3] Reverb The functions available in this module are the generic counterpart to the Ambience module. It offers the same reverb types and parameters as Instrument Reverb, but with a focus on the room-specific qualities of the reverb.
11.2.4 MULTI FX MENU [F3] Effects in this module include anything not related to ambience, instrument reverb or room reverb, such as frequency modulation. The results are achieved by using algorithms to create a specific effect. In contrast to the reverb modules, the parameters of the multi-effect module change depending on the selected algorithm. The reciprocal effect parameters are drum kit parameters and are stored directly in the kit.
11.2.4.1 FX S END – M ULTI FX MENU [F3] [F1] [F1] Multi FX Via [FX Send], you can specifically switch the effect to each channel. Select channel Use the dial [5] [] or the navigation keys [8] to select the channel you want to change the volume of. Change volume Use the dial [7] [], the navigation keys [8] or the [+] & [-] buttons to change the volume. Grouping Turn the dial [6] and activate the GROUPING function.
11.2.4.2 P RESET – M ULTI FX MENU [F3] [F2] You can choose from presets, create your own or rename them. Use the dial [5] or the navigation keys [8] to select a corresponding preset from the list. To load the preset, press [F1] or [ENTER]. To save your own preset, find a free USER slot and press [F2]. Press [F3] to exit the layer or any menu key to exit the entire menu. For a detailed description of how to load, save and overwrite presets, see: Loading and saving from presets.
11.2.5 FX TYPE – MULTI FX MENU [F3] [MULTI FX] [F1] Multi FX You have the possibility to choose from different Multi FX types. To do this, use the dial [7], the navigation keys [8] or the [+] and [-] keys. Each FX type has different parameters that are listed. You will find a tabular list in the following chapter. Delay Delay Time, Feedback, Pre-Low-Pass, High Damp Records a segment of the played sound and repeats it several times with a certain delay (multi-echo).
LFO. Auto-Pan Modulation Rate, Modulation Depth Creates a panorama effect of the sound between the left and right speaker with a maximum phase shift of 180°. The volume of both channels (left and right) is animated by a sine LFO waveform. Bit-Crusher Bit Resolution, Down Sampling, Brightness This effect increases the sharpness of your sound by reducing the resolution of the signal's waveform (along amplitude and period). Exit the level Press [F3] to exit the layer or any menu key to exit the entire menu.
11.2.6 PARAMETER DETAIL – MULTI FX MENU [F3] [MULTI FX] [F1] Multi FX - Parameter Multi Effects – Mutual Parameters Parameter Value Range Level Send to Room Reverb Note Description % Adjusts the balance between Dry and Wet = On/OFF signal sent to the mixer. % When Room Reverb is active, Multi Effects can sound self-sufficient and out of place. With this parameter, you can add room sound to a multi-effect for an integrated sound of the drum kit.
Distortion / Saturation Parameter Value range Unit Description Choose between two methods of effect generation with different characteristics: OD (Overdrive) and DS (Distortion). While Overdrive models the characteristics known from tube amplifiers, Distortion provides the distortion characteristics typical of transistor amplifiers. Type OD, DS Drive 0-100 % This parameter controls the intensity of the effect (scaling up frequency amplitudes). The values range from 0% (linear) to 100% (max.
Phaser Parameter Rate Value range Unit 0-10 Hz Description Controls the length of the LFO waveform period and thus the frequency of the generated sweep. Depth 0-127 Controls the intensity of the effect by adjusting the height of the LFO amplitude. The parameter values range from 0 (off) to 127 (intense). Resonance 0-127 Corresponds to the "Q" factor in equalization. This parameter controls the width of the bell filter shape. Set the width of the bell filter shape here.
Delay Parameter Type Value range Unit Description Mono produces a mono signal that is audible at both speakers simultaneously. In stereo mode, the delayed signals alternate between the left and right speakers. The mono signal is shifted to the left speaker and the second signal for the stereo effect is inserted between the mono signals on the right speaker. This doubles the feedback frequency (delay time is halved).
11.3 USB LOAD/SAVE In the "USB Load/Save" menu, you have the option of importing your own samples. In addition, backups and drum kit preset parameters can be imported and exported. MENU USB Load/Save USB Load/Save Insert a USB stick into the module. If no stick is recognised, [INSERT USB STICK] appears on the display. The following options are available: ===IMPORT=== (load into the module) Wave/Sound Import your own Wav-samples to integrate them into your drum kit. Backup Import a backup.
11.3.1 IMPORT – WAVE/SOUND In this menu you can load up to 100 of your own samples from your USB stick into the module. The total memory is limited to 111MB. MENU USB Load/Save Wave/Sound Wave/Sound Opening the file manager Select the memory location to be occupied with the dial [5] or the navigation keys [8] and open the file manager by pressing the [F1] key. You can select a free memory location (--EMPTY--) or overwrite an already occupied memory location.
11.3.2 LOAD – WAVE/SOUND In this menu you can load up to 100 of your own samples from your USB stick into the module. The total memory is limited to 111MB. MENU USB Load/Save Wave/Sound Load Wave/Sound Selecting the sample Select your sample with the dial [5] or the navigation keys [8]. Use the [PLAY/STOP] or [PREVIEW] key to preview the sound. Load the sample by pressing [F1] or [ENTER].
11.3.3 IMPORT – BACKUP MENU USB Load/Save Backup Selecting the backup Select your backup (GDR file) with the dial [5] or the navigation keys [8]. Load the backup by pressing the [F1] key or [ENTER]. Exiting the level Press [F3] to exit the level or any menu key to exit the entire menu.
11.3.4 IMPORT – KIT MENU USB Load/Save Kit Import - Kit Selecting the kit Select the KIT (GDK file) to be imported with the dial [5] or the navigation keys [8]. Load the kit by pressing the [F1] or [ENTER] keys. Exiting the level Press [F3] to exit the level or any menu key to exit the entire menu. Now save and name the loaded kit directly in the [HOME] [KIT] menu to a free user slot. For a detailed description of how to load, save and overwrite presets, see: Loading and saving from presets.
11.3.5 EXPORT – BACKUP & KIT MENU USB Load/Save Kit Export – Backup & Kit Creating the backup or kit Select the corresponding menu with the dial [5] or the navigation keys [8]. Open the menu by pressing the [F1] or [ENTER] keys. Naming the backup or kit In the next step, you will be asked to enter a file name. For a detailed description of how to load, save and overwrite presets, see: Loading and saving from presets. Only the currently loaded kit is saved.
11.4 SETUP In the setup menu, you can adjust basic settings for your device and establish a Bluetooth connection. MENU SETUP Setup Press the [MENU] [SETUP] key to open the menu. Use the dial [5] or the navigation keys [8] to select a corresponding list entry. Use the dial [7] [] or the navigation keys [8] to adjust the values. or press [F1] or [ENTER] to open the selected list entry. Press [F3]to exit the level or any menu key to exit the entire menu.
Language Choose from available menu languages. Knob Brightness Adjust the brightness of the LED key illumination. Auto-Off If the module is not used, it switches off automatically after a longer period of inactivity (factory setting). You have the option of changing the time interval or switching off the function. Sound Preview ON = You can listen to the drum kits directly in the kit-list without loading them. OFF = You need to load the drum kit first to preview it.
Clear All * Resetting the module to the factory settings. All user presets and settings are deleted. * [ABORT] [CLEAR (…)] Make your selection with the dial [6] [
11.4.1.1 P AIRING MENU SETUP [F2] [F1] Pairing Step by step explanation 1. Press [F1] [PAIRING] 2. Switch your device to Bluetooth search mode and select the "GEWA G3" module. GEWA G3 3. Enter the PIN-code 4.
After a successful connection, you have the possibility to choose between different Bluetooth-functions with the dial [5]: Funktion Off Off Audio + MIDI Audio & MIDI-connerction Audio Only audio MIDI Only MIDI As soon as your device is connected to the G3 module, the connection is established automatically, even after a restart of the module. You can change the volume at the sending device and additionally via the "MIX-IN" channel in: [MENU] [MIX].
11.4.2 BT NAME MENU SETUP [F2] [F2] Press [F2] [BT NAME] to assign a new name. Use the navigation keys [8] or the dial [6] to find the desired character. Press [ENTER] to confirm the respective character. To change the cursor position, use the dial [5] . Use the dial [7] ABC abc to change the upper and lower case as well as special characters. You can delete individual characters by pressing [F2]]. You can cancel at any time by pressing [F3].
11.5 MASTER You can access important features in the ‘Master’ menu. Here you will find all settings for the global equalizer and compressor settings, the MIDI functions and the routing functions. MENU Master Master Press [MENU] [MASTER] to open the menu. The following functions are available: Routing Here you can assign the inputs to your outputs. EQ / Compressor Global equalizer and compressor settings. MIDI All MIDI setting options.
11.5.1 ROUTING / INSTRUMENT MENU Master [F2] You can send any input signal to a variety of outputs built into the G3 using the routing matrix. The matrix also controls the USB out. In this section, you will learn how to work with each matrix. The routing function of the G3 is divided into 2 input categories: Routing and Routing Others. While the input channels displayed vary, the functionality is identical. Thus, the content of the following subchapters applies to each matrix.
11.5.1.1 S ELECTING AND A CTIVATING /D EACTIVATING THE OUTPUTS Input channel/ Input First select the input channel you want to activate/deactivate (horizontally) with the dial [5] or the navigation buttons [8] [ ] [ ]. Alternatively, you can also use the [+] and [-] keys. Output channel/ Output Use the dial [6] or the navigation keys [8] to select the output channel (vertical) [ ] [ ].
11.5.1.2 D EFAULTS MENU Master [F2] [F2] Press [F2] [DEFAULTS] to access preset routings. Use the dial [5] or the navigation keys [8] to select the preset from the list and confirm the selection with [ENTER] or [F1]. Press [F3] to exit the level or any menu key to exit the entire menu.
11.5.2 ROUTING / OTHERS MENU Master [F2] [F1] Routing In the level, you can assign the effects, the metronome (click) and the playback (mix-in, Bluetooth, songplayer) to the corresponding outputs. The master output and the headphone output are available here. Effects, songs and metronome are generally not sent via the direct outs. Master-Out Headphones The operation is the same as described in the previous chapter. Press [F3] to exit the level or any menu key to exit the entire menu.
11.5.3 ROUTING DAW If you connect your G3 module to a computer via USB cable, then you will have the 6 USB-Outs and the sum of the Master-Outs are available. The table shows the channel assignment. DAW Channel (USB) 1 (Master Out 1) 2 (Master Out 2) 3 4 5 6 7 8 Only the dry signals are sent via the USB channels. Only the Ambient effect is output as well. You can record the other effects via channels 1&2. Here, the entire sum of the direct outs is reproduced.
11.5.4 MASTER & HEADPHONE EQUALIZER / COMPRESSOR MENU Master EQ/COMPRESSOR [F1] MASTER EQ I Comp As for the individual inputs, the G3 module offers you a fully parametric 3-band equalizer as well as a compressor for the master and headphone outputs. MASTER COMPRESSOR & HEADPHONES COMPRESSOR With the compressor, a smoother audio output can be achieved. Unwanted peaks can be lowered and quiet sounds can be raised.
11.6 MIDI Under this menu item, you will find the MIDI (Musical Instrument Digital Interface) implementation of the G3 to configure the associated connections on the back of the unit. Furthermore, MIDI notes sent from each pad can be individually adjusted for MIDI outputs. For users without MIDI experience: Note that MIDI is about control data and not about sound generation itself.
MENU Master MIDI [F1] MIDI You can access various MIDI functions in your G3 module. MIDI PAD SETTINGS Some external applications use mappings of MIDI control signals that differ from the standard MIDI file, so that communication with other MIDI devices can be faulty. In this tab, the user can adjust note values for MIDI OUT configurations. MIDI IN control signals related to trigger detection of connected pads are fixed and cannot be modified.
11.6.1 MIDI PAD SETTINGS In this view, the user can adjust note values for MIDI OUT configurations. An example of a deviation from the G3's internal MIDI note assignment is that some manufacturers use a specific note setup internally (e.g. the assignment starts at a different octave of the keyboard). In order to make these units compatible with each other, their external note configuration must be matched. Please also refer to the MIDI implementation for the units you wish to interact with.
11.6.1.1 V IEW MENU Master MIDI Pad Settings [F1] [F1] MIDI Pad Settings Press [F1] [VIEW] to switch between the "Channel-View" and the "List-View". Press [F3] to exit the level or any menu key to exit the entire menu.
11.6.1.2 D EFAULTS MENU Master MIDI Pad Settings [F1] [F2] Basic settings Press [F2] [DEFAULTS] in the "CHANNEL-VIEW" to restore the default settings. You can reset the MIDI Pad Settings for a ZONE, an entire PAD or ALL PADS. Turn the dial [6] [
11.6.1.3 A SSIGNMENT MENU Master MIDI Pad Settings [F1] [F2] MIDI Pad Settings Select MIDI note Use the dial [5] or the navigation keys [8] to select the corresponding note. Press [F2] or [ENTER] to edit the note. Exit menu Press [F3] to exit the level or any menu key to exit the entire menu. Use the control dial [5] or the navigation keys [8] to select the corresponding note. Press [ENTER] to confirm the selection.
11.6.2 MIDI CONTROL MENU Master MIDI Control [F1] Under “MIDI Control” you will find a selection of hardware components to control other instruments or to have these instruments controlled by external MIDI devices. You have the option of assigning a limited number of continuous controllers from the range of 127 controllers defined in the MIDI standard. Select input channel Use the dial [5] [] or the navigation keys [8].
The following table lists all available and relevant Continuous Controllers with their controller numbers and description. Each line is updated together with the selection of a controller number. Active controller numbers are automatically stored in the G3's device database. The following table shows an expanded view of the underlying menus. Each controlling component connected to the corresponding input channels (HH Pedal, Snare, Ride, Toms/Aux) has access to the same set of available controllers.
11.6.3 MIDI GLOBAL SETTINGS MENU Master MIDI Global Settings [F1] This menu item contains all settings for connecting the G3 to other MIDI devices for remote control. Select menu item Use the dial [5] or the navigation keys [8]. Changing the setting Use the dial [7] [], the Navigation buttons [8] or the [+] [-] keys. Press [F3] to exit the level or any menu key to exit the entire menu.
11.6.3.1 B ASIC FUNCTION OF MIDI ROUTING The following table shows you how best to route your MIDI signals.
11.6.3.2 E XPLANATION OF THE INDIVIDUAL SELECTION POINTS EXTERNAL MIDI MIDI INPUT Select how you want to establish the MIDI connection. Cable Cable BT LE Bluetooth Low Energy Receive external MIDI data. Off To Ext MIDI To USB MIDI To Both USB MIDI Off Passing on incoming MIDI data to socket Passing on incoming MIDI data to USB-Out Passing on to both outputs.
MIDI CHANNEL Select the MIDI channel on which you want to transmit and receive MIDI data. There are 16 channels available. The factory setting is channel 10, which is generally accepted as the standard MIDI channel for percussive instruments. Off; 1-16 PROGRAM CHANGE TX (TransmitChannel) PROGRAM CHANGE RX (ReceiveChannel) Channels available for selection. Switch on the Transmit channel if you want to change MIDI programmes of external devices by changing your drum kit.
12 USB/SONG / PLAYER In the "Player" section, you can load mp3 and wav files with a USB stick and play to the music or record yourself directly with the "RECORD" function. In the following chapters, you can read about how the player and the record function are structured and work. To use the player functions, press the "USB/SONG" key [13] . 12.1 SONGPLAYER USB/SONG Load Insert a USB stick into the module. Press the [13] [USB/SONG] key.
Use the navigation keys [8] or the dial [5] to select the folder or song from the list. To load, press [F1] or [ENTER] or cancel the operation with [F3]. [F1] 3 If you have opened a folder, then proceed as described in point 3 to load a song. To return to a higher folder level, select the folder from the list. [F1] 3.
USB/SONG Player When you have loaded a song, various functions are available: Start the songs Press the [PLAY/STOP] or [ENTER] key to start the song. Pause Press the [PLAY/STOP] button briefly. The song pauses and the button flashes. Stop To stop the song, press and hold the [PLAY/STOP] key for one second. Alternatively, you can press the [ENTER] button once. Next track / track back Use the Down [ ] & Up [ track or back one track.
12.2 RECORD USB/SONG Record You have the option of recording directly onto your USB stick. All sounds that can be heard via the master outputs (drum kit, songplayer, etc...) are recorded. Insert a USB stick into the module. Press the [14] [RECORD] key. The recording starts and the [RECORD] key flashes. [RECORD] 1 To stop recording, press the [14] [RECORD] button again. [RECORD] 2 To assign a file name now, press [F1] or discard the file by pressing [F3] [DISCARD].
13 UPDATE GEWA is constantly working on updates to give you the most enjoyment out of your instrument in the future. Under [MENU] SETUP INFO you will find the version and serial number of your G3 module. Updated files can be found at: www.gewadrums.com/service Follow the installation steps from the website and load the update into the root directory of your USB-stick. 1. Insert the USB stick and switch on the device. Keep the [F1] and [F3] keys pressed during the booting-up process.
14 USEFUL INFORMATION 14.1 WARRANTY Warranty for a period of 2 years from the date of purchase on hardware and workmanship is granted by the dealership where the digital drum set or console was originally bought. In the event of a proven defect, the buyer has in the first instance only the right to receive supplementary performance. Supplementary performance includes either rectification or supply of a replacement product. Equipment or exchanged parts become to be the property of the processing dealership.
14.2 TROUBLESHOOTING AND POSSIBLE SOLUTIONS Problem The console does not boot when pressing the power button. Possible Solutions 1 Make sure the power cable is connected correctly to electrical outlet and apparatus. Live installations will cause power button to light up. (standby red, on white) Perform a hard reset by holding down the power button until the device shuts down. Try to restart by tapping the power button again. The user interface freezes.
14.3 MIDI LIST / N OTES & NRPN / GEWA G3 & G5 & G9 14.3.1 MIDI IMPLEMENTATION For MIDI messages received on MIDI channel 10. MIDI Message HEX Code Description NOTE ON 99H kk vv Note ON #kk(1-127), velocity vv(1-127). vv=0 means NOTE OFF NOTE OFF 89H kk vv Note OFF #kk(1-127), vv is don’t care.
Tom4 Ride Crash Crash2 Hi-Hat AUX1 AUX2 AUX3 128 |G3 – Owner’s Manual 6 Head 0x29 41 6 Rim 0x27 39 7 Bow 0x33 51 7 Bell 0x35 53 7 Edge 0x3B 59 8 Bow 0x31 49 8 Bell 0x11 17 8 Edge 0x37 55 9 Bow 0x39 57 9 Bell 0x12 18 9 Edge 0x34 52 11 Bow 0x2E 46 11 Edge 0x1A 26 11 Bow 0x17 23 11 Edge 0x18 24 11 Bow 0x14 20 11 Edge 0x19 25 11 Bow (Closed)* 0x2A 42 11 Edge 0x16 22 11 Pedal Chick 0x2C 44 11 Pedal Splash 0x15 21 11 Bel
AUX4 14 Bell 0x18 24 15 Head 0x5E 94 15 Rim 0x5F 95 15 Bell 0x19 25 Chan# is the internally used channel for drum sound play. Externally (on MIDI_IN) all these drums sounds are triggered through MIDI channel 10. Note# 1 till 16 are used to trigger the metronome click sounds (0x01 = “one”, 0x02 = “two” etc.).
44 - G#2 Drum Kit HH Pedal Chick 45 - A2 Drum Kit Tom 2 46 - A#2 Drum Kit HH Bow (Open) 47 - B2 Drum Kit Tom 2 Rim 48 - C3 Drum Kit Tom 1 49 - C#3 Drum Kit Crash Cymbal 50 - D3 Drum Kit Tom 1 Rim 51 - D#3 Drum Kit Ride Cymbal 52 - E3 Drum Kit Crash 2 Edge 53 - F3 Drum Kit Ride Bell 54 - F#3 GM set Tambourine 55 - G3 Drum Kit Crash Edge 56 - G#3 GM set Cowbell 57 - A3 Drum Kit Crash Cymbal 2 58 - A#3 Drum Kit Tom 3 Rim 59 - B3 Drum Kit Ride Edge 60 - C4 GM set Hi Bongo … (s
14.3.3 DRUM EDIT NRPN CONTROLS NRPN sending method: CTRL#99=high byte, CTRL#98=low byte, (CTRL#38=value low byte), CTRL#6=value high byte Following is the list of available Edit Controls for the Pads/Triggers mentioned in the table above: MIDI Message HEX Code Description Pad Instrument Settings (“rr” is the MIDI note number of the according Pad/Trigger) * NRPN 0ArrH B9H 63H 0AH 62H rr 06H vv MIDI Note number (for external MIDI), vv=0..
Routing Drums bus switches, 14bit (including NRPN LSB value): MSB (mb) bits 6/5 : Master (Main) Out L/R MSB (mb) bits 4/3 : Monitor Out L/R MSB (mb) bits 2/1 : Headphone Out L/R NRPN 0FrrH B9H 63H 0FH 62H rr 26H lb 06H mb MSB (mb) bit 0 : Direct Out 7 LSB (lb) bit 6 : Direct Out 6 … LSB (lb) bit 0 : Direct Out 0 Bits 6..
Individual Hi-Hat Volumes can be sent with: rr=42 (Bow), rr=26 (Edge), rr=19 (Bell), rr=44 (Pedal Chick), rr=21 (Pedal Splash) ** “Sound Select” is managed by sending “Sound Group” NRPN and “Sound Instr.” NRPN. Available Sound Groups are: 0=Kick, 1=Snare, 2=Tom, 3=Crash, 4=Ride, 5=Hi-Hat, 6=Cymbal SFX, 7=Percussion1, 8=Percussion2, 9=Sound-FX, 10…109=Imported Sounds, 110…=Waves *** Pad Mixer, EQ and Compressor settings are done per pad trigger group (e.g. head + rim, or bow + edge + bell).
0305h High Damp 0= no damping, till 127=max damping 0 0307h Reverb Type 0..2=Room, 3..5=Hall, 6..8=Plate1, 9..
0405h Modulation Rate: 0 = 0Hz till 127 = 10Hz, formula: Rate(Hz) = 10*(value/127)^2 0406h Modulation Depth, 0 to 127 Multi Effects: Flanger 0404h Modulation Rate: 0 = 0Hz till 127 = 10Hz (formula see above) 0405h Modulation Depth, 0 to 127 0406h Delay Time: 0 = 0.
380Fh High Band Freq. (note 1) 0=20Hz…7Fh=16kHz 3810h Low Mid Band Q-Factor 0:Q=0.1 …7Fh:Q=8.0 3811h High Mid Band Q-Factor 0:Q=0.1 …7Fh:Q=8.0 Master Output Compressor/Limiter 3818h Compressor ON/OFF: =0 OFF, else ON OFF 3819h Attack time: 0=fast attack (0.1ms), … 60=1ms, …100=10ms, till 127=slow attack (100ms), exp. Curve 40h 381Ah Release time: 0=fast release (10ms), … 60=100ms, … 100=1s, till 127=slow release (~5s), exp.
391Dh Boost: 0=1x ... 127=8x 0 391Eh Knee : 0=hard, else soft 0 391Fh Request Input / Gain Reduction / Output levels (see below for Response message) - 3A55h Equalizer ON/OFF 0=OFF, else ON OFF 3A08h Low Band Gain 0=-15dB…40h=0dB…7Fh=+15dB 40h 3A09h Low Mid Band Gain 0=-15dB…40h=0dB…7Fh=+15dB 40h 3A0Ah High Mid Band Gain 0=-15dB…40h=0dB…7Fh=+15dB 40h 3A0Bh High Band Gain 0=-15dB…40h=0dB…7Fh=+15dB 40h 3A0Ch Low Band Freq. (note 1) 0=20Hz…7Fh=16kHz 3A0Dh Low Mid Band Freq.
14.3.
44rrH Head/Rim resp. Bow/Edge/Bell*** High Level 8..127 45rrH Hi-Hat Pedal Low Position 0..127 46rrH Hi-Hat Pedal High Position 0..127 47rrH Head/Rim resp. Bow/Edge/Bell*** Scan Time 10..100 48rrH Head/Rim resp. Bow/Edge/Bell*** Retrigger Mask 1..127 49rrH Trigger Type Head/Bow :1 = Single, 2 = Dual, 3 = ”3-way” , Rim/Edge: 0 = Piezo, 1 = Switch 4ArrH Positional Sensing* 0 = OFF, else ON 4CrrH Curve preset # ** 0..15 4DrrH Hi-Hat Pedal Chick Sensitivity 0..
14.3.8 TRIGGER CURVE PACKET DESCRIPTION Description 0x5443 Packet Type = "TC" (Trigger Curve) CRV ID Curve ID (xx..15) VAL1 1st value of trigger curve (X=0) VAL2 2nd value of trigger curve (X=MAX/8) … … VAL9 Last value of trigger curve (X=MAX) 14.3.
3742h Power OFF Control 0=OFF, 1=30min, 2=1h, 3=2h, 4=4h 0 375Fh Song (PC-IN) volume 0 (mute) … 40h= -12dB … 7Fh=0dB 40h (-12dB) 3806h Master Output Balance 0=left only …40h=Center… to 7Fh=right only 40h (Center) 3807h Master Output Level 0=mute, to 7Fh=0dB 40h (-6dB) 3906h Monitor Output Balance 0=left only …40h=Center… to 7Fh=right only 40h (Center) 3907h Monitor Output Level 0=mute, to 7Fh=0dB 40h (-6dB) 3A06h Headphone Output Balance 0=left only …40h=Center… to 7Fh=right only 40h (Ce
14.3.
3723h USB MIDI Soft through 0=Off, 1=to MIDI-Out 0 (Off) 3724h HH Pedal CC 0=Off, 1,2,4,11,16,17,18,19 4 3725h Snare CC 0=Off, 1,2,4,11,16,17,18,19 16 3726h Ride CC 0=Off, 1,2,4,11,16,17,18,19 17 3727h Toms/AUX CC 0=Off, 1,2,4,11,16,17,18,19 18 3728h Kit Volume CC#7 0=Off,1=On 1 (On) 14.3.
15 TECHNICAL DATA G3 Drum Console – Technical Data Drum Kits 168 (40 Preset + 128 User Presets) Instruments More than 400 Effect types Pad Compressor & 3-band full parametic EQ per pad Output compressor & 4-band full parametricr EQ for headphone and master-output 1. 2. 3. 4. User sample import Ambient Reverb: Sample-based per instrument Room Reverb: 12 algorithms Instrument Reverb: 12 algorithms Multi Effects: 9 algorithms 100 Wave File format: WAV (only PCM format) (44.