GFI Backup 2011 Getting started guide
http://www.gfi.com E-mail: info@gfi.com The information and content in this document is provided for informational purposes only and is provided "as is" with no warranty of any kind, either express or implied, including but not limited to the implied warranties of merchantability, fitness for a particular purpose, and noninfringement. GFI Software is not liable for any damages, including any consequential damages, of any kind that may result from the use of this document.
Contents 1 About GFI Backup 1.1 1.2 1.3 1.4 2 3 5 17 Introduction ............................................................................................... 17 Step 1: Adding a test backup task............................................................. 17 Step 2: Restoring test backup task............................................................ 26 Step 4: Validating the restore process ...................................................... 28 Troubleshooting and support 5.1 5.2 5.3 5.4 5.
List of screenshots Screenshot 1 - Installation: Use default or custom connection settings ................................. 9 Screenshot 2 - Installation: Specify custom connection settings .......................................... 10 Screenshot 3 - Installation: Specify credentials used for local backup ................................. 11 Screenshot 4 - Installation: Installation summary ................................................................ 12 Screenshot 5 - Installation: Home page...........
1 About GFI Backup 1.1 Introduction This getting started guide is a comprehensive guide aimed at assisting you in installing and configuring GFI Backup for first time use. 1.2 Using this manual This manual contains the following chapters: CHAPTER DESCRIPTION Chapter 1 About GFI Backup Introduces this manual and provides the basic information on how to use it. Chapter 2 System requirements Provides the minimum system requirements to install and run GFI Backup.
1.2.2 Administration and Configuration manual Detailed administration and configuration guidelines are provided in a separate manual, GFI Backup Administration and Configuration manual that is installed with the product or separately downloadable from the GFI web site: Online manuals 1.
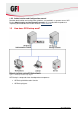
1.3.1 GFI Backup Administration Console Install the GFI Backup Administration Console in a location with network access to all the computers that require a backup solution.
2 System requirements 2.1 GFI Backup Administration Console 2.1.1 Hardware requirements Processor: Intel Pentium 4 onwards RAM: 1GB Hard disk: 500MB for installation, temporary files and logs 2.1.
Ensure that your firewall settings enable communications between all the computers where GFI Backup Agents are installed and the server where GFI Backup Administration Console resides. For further information on how to configure the Windows Firewall refer to: http://kbase.gfi.com/showarticle.
2.3.
3 Installing GFI Backup 3.1 Installation 1. Double click the GFI Backup Administration Console application setup. 2. Click Next at the Welcome screen to continue setup. 3. Choose the license type and click Next. To compare the available GFI Backup editions, refer to Compare editions. 4. Carefully read the End-User License Agreement. If you agree to the terms laid out in the agreement, select I accept the terms of the license agreement and click Next.
Screenshot 2 - Installation: Specify custom connection settings 6. If Use custom settings is selected in step 5, or if multiple IP addresses are discovered, select and key in the IP address, HTTP and HTTPS ports to use and click Next to continue setup. For computers with multiple IP addresses (for example, Internal and External networks), you must specify an IP address reachable by all subnets where the GFI Backup Agents will be installed.
Screenshot 3 - Installation: Specify credentials used for local backup 7. Key in the local administrator account details required by the GFI Backup Agent to execute backup and restore tasks and for the configuration of other administrative settings. Click Next to continue setup. Leave the Domain text box blank, if you do not know the domain name or your machine is not a domain member. 8. Key in or browse to select the folder where GFI Backup Administration Console will be installed and click Next. 9.
Screenshot 4 - Installation: Installation summary 10. On installation completion, review the Installation Summary page and click Finish to finalize installation. On completion, GFI Backup is automatically launched. This enables you to configure and start using GFI Backup. If GFI Backup is not launched automatically, refer to Common Issues section within the Troubleshooting and support chapter.
Screenshot 5 - Installation: Home page To manually load the GFI Backup Administration Console web interface, click Start ► Programs ► GFI Backup 2011 ► GFI Backup 2011 Administration Console.
3.2 Post install configurations 3.2.1 Introduction This section is only applicable when installing GFI Backup in Network mode. 3.2.2 Step 1: Select the Data Access Method The Data Access Method is the method used by GFI Backup to retrieve information located on the source computers. When switching to a Network license, the Startup Wizard enables you to select the preferred Data Access Method. Screenshot 6 - GFI Backup: Select Data Access Method 1.
One account for all: Choose this option if your network setup allows for a single user account that has read access privileges on all the data to back up from networked computers and write rights over the locations where to restore data (for example, a domain or a local administrator account) Also, key in the user account‟s credentials. This option is recommended for Microsoft Active Directory environments. Key in the credentials in „domain\user‟ or „user@domain.com‟ format.
1. Locate the config.ini file in the \GFI Backup 2010 Administration Console\htdocs\config\ folder. 2. Open config.ini with a text editor and locate the [proxy] identifier. 3. Provide the following information: OPTION DESCRIPTION EXAMPLE proxy_address = Defines proxy IP address where data should be relayed to. proxy_address = 192.168.3.122 proxy_port = Defines proxy IP port where data should be relayed to.
4 Testing GFI Backup 4.1 Introduction Once GFI Backup is installed and the post configuration settings are configured, test your GFI Backup installation to ensure that GFI Backup is working correctly. Follow the steps in the example in this section to configure a test backup. This test will enable you to configure a basic backup task with minimal configuration to execute the backup task and to restore data back to its original location.
Screenshot 9 - Test backup: Select the destination media used for backup 3. In the welcome screen, select Backup to Local/External HDD or LAN/FTP location.
Screenshot 10 - Test backup: General tab 4. In the General tab, key in the new backup task details: Backup Task Name: Define the backup task name that will be associated with the new task being created. Backup Description: Key in an optional description of the new backup task being created. Click Next.
Screenshot 11 - Test backup: Computer tab 5. In the Computer tab, choose All users on selected computers option from the Run backups jobs for: drop-down. Choose the computers for which the new backup operation will be applicable and click Next.
Screenshot 12 - Test backup: Source tab 6. In the Source tab, click Files/Folders ► Browse. Select the source folder to backup and click Next.
Screenshot 13 - Test backup: Destination tab 7. In the Destination tab, select Folder/External HDD on computer running agent and click Browse. Select the source folder to backup and click Next.
Screenshot 14 - Test backup: Options tab 8. In the Options tab, select Full Backup. This will copy all data to the backup destination. Click Next. For this test, all other options in the Options tab should be left to the default values. For more information on how to configure these settings, refer to the GFI Backup Administration and configuration manual installed with the product.
Screenshot 15 - Test backup: Scheduler tab 9. In the Scheduler tab, select Run manually from the Schedule type drop-down. This enables you to execute the task manually on completion of the wizard.
Screenshot 16 - Test backup: Summary of backup settings dialog 10. In the Summary of backup settings dialog review the task being set up and click Finish. Click Yes to start backup.
4.3 Step 2: Restoring test backup task 1. After the backup task is complete, locate the source files previously backed up on the local computer and either remove (delete) or rename the folder containing such files. This will facilitate the restore validation process and it will be easier to see that the files are restored. 2. From the GFI Backup Administration Console main screen, select Restore and in the welcome screen, click Next. 3. Select Restore Other Backup and click Next.
Screenshot 18 - Test restore: Select computer and backup to restore 5. From the Select Computer list, select the user for which to restore data. 6. From the list of backups displayed, select the backup to restore. 7. To restore to a location different from the original location, select Restore to a different location, key in the path and click Next to continue restore configuration. Alternatively, to restore to the original location, click Next.
Screenshot 19 - Test restore: Summary of backup restore dialog 8. In the Summary of backup restore dialog, review the restore information displayed. 9. Click Finish to start restore operation and wait for the task to complete. 4.4 Step 4: Validating the restore process Check that the contents of the restored folders match the original source files previously backed up. Files should match in both content and attributes.
5 Troubleshooting and support 5.1 Introduction This chapter explains how to resolve any issues encountered during installation of GFI Backup. The main sources of information available to solve these issues are: This manual - most issues can be solved through the information in this section. GFI Knowledge Base articles Web forum Contacting GFI Technical Support 5.2 Common Issues ISSUE ENCOUNTERED SOLUTION GFI Backup does not load startup wizard or login screen.
5.4 Web Forum User to user technical support is available via the GFI web forum. Access the web forum by visiting: http://forums.gfi.com/. 5.5 Request technical support If none of the resources listed above enable you to solve your issues, contact the GFI Technical Support team by filling in an online support request form or by phone. Online: Fill out the support request form and follow the instructions on this page closely to submit your support request on: http://support.gfi.
6 Glossary TERM DEFINITION Active Directory A technology that provides a variety of network services, including LDAP-like directory services. Advanced Encryption Standard An encryption standard approved by and in use, amongst others, by the National Security Agency (NSA) of the U.S. Government for the encryption of sensitive material. While it is slower than ZIP encryption, it is more secure.
TERM DEFINITION Daily Backup Status report A report that enables users to keep track of the status of backup tasks on a daily basis. It is automatically generated and distributed via email on a daily basis and takes into consideration only the tasks executed during the previous 24 hours. DAT See Digital Audio Tape Deployment The act of installing software on to a system, for example, the installation of the GFI Backup Agent on client computers.
TERM DEFINITION LAN folder A backup destination on a LAN where backups will be saved on the successful execution of a backup task. Media Spanning The process of splitting a backup task across multiple media to backup data which volume is more than what the media allows. Microsoft Volume Shadow Copy Service A Microsoft Windows OS (Windows XP and Windows 2003 onwards) that provides the backup infrastructure for Windows based computers and servers.
7 Appendix 1 - Credentials for remote operations 7.1 Introduction On all Microsoft systems, an entity that requests access to data requires rights to access such data, otherwise access is denied. In the case of GFI Backup, the credentials are defined in Settings ► Backup /Restore Settings as the method used by GFI Backup to acquire read rights. When installing GFI Backup Network Edition, the wizard will guide you to configure the Data Access Method.
7.3 Credentials supplied by users This method is typically recommended for workgroups where the use of a single, common user account cannot be relied upon to access data on networked computers. In this case, users will be asked to key in their login credentials via the GFI Backup Agent login credentials screen. These credentials are then securely stored and used at the time of backup execution to access the data to back up. This option can also be used in Microsoft Windows Active Directory environments.
Choosing the Use credentials supplied by users, will prompt users to provide their credentials at these times: Upon agent installation: The user installing the agent will be asked to provide his/her credentials when the agent is installed. Upon first login: Users other than the one that installed the agent will be asked to provide their credentials when they log in for the first time on a computer that has the agent installed.
Index H Hot backup 32 A Active Directory 15, 35 Advanced Intelligent Tape 31 B Backup actions 31 Backup destination 23, 32, 33 Backup notifications 31 Backup policy 31 Backup rotation scheme 31 Backup schedule 31 Backup source 31 Backup task name 19, 31 Backup window 31 Blu-ray disk 31 Build Notifications 30 C Common Issues 29 Compression 31, 33 Compression level 31 Credentials 15, 31, 35, 36, 37 I Incremental backup 32 Item level restore 32 K Knowledge Base 29 L LAN folder 33 Linear Tape Open 33 M
Z ZIP password protection 33 40 GFI Backup 2011 Index