GFI MailEssentials 2010 Getting Started Guide By GFI Software Ltd.
http://www.gfi.com info@gfi.com Information in this document is subject to change without notice. Companies, names, and data used in examples herein are fictitious unless otherwise noted. No part of this document may be reproduced or transmitted in any form or by any means, electronic or mechanical, for any purpose, without the express written permission of GFI Software Ltd. GFI MailEssentials was developed by GFI Software Ltd. GFI MailEssentials is copyright of GFI Software Ltd.
Contents 1 Introduction 1.1 1.2 1.3 2 About this manual Terms used in this manual Licensing 1 2 2 How does GFI MailEssentials work? 3 2.1 2.2 3 Introduction System requirements Important settings Installing on gateway servers for SMTP Servers Post-install actions 7.1 7.2 8 Introduction System requirements Important settings Installing on gateway servers for Lotus Domino Installation for SMTP Servers 6.1 6.2 6.3 6.
9 Troubleshooting and support 9.1 9.2 9.3 9.4 9.5 9.6 9.7 Introduction Troubleshooting: Installation issues Knowledge Base Web Forum Request technical support Build notifications Documentation 10 Appendix - Installing MSMQ 10.1 Windows Server 2003 10.
1 Introduction 1.1 About this manual The scope of this „Getting Started Guide‟ is to help you install and run GFI MailEssentials on your network with minimum configuration effort. It describes: 1. The various environments and email infrastructures supported by this product 2. Guides you through the respective installation procedure 3. Walks you through the key steps needed to get the product running on default settings.
1.2 Terms used in this manual The following terms are used in this manual: “NOTE:” o This provides additional information and references essential to GFI MailEssentials‟ operation. “IMPORTANT:” o This provides important information such as warnings and cautions that advise of potential issues commonly encountered. For any technical terms and their definitions as used in this manual refer to the Glossary chapter. 1.3 Licensing Information on licensing is available on: http://www.gfi.
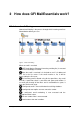
2 How does GFI MailEssentials work? 2.1 Inbound mail filtering Inbound mail filtering is the process through which incoming email are filtered before delivery to users. Figure 1 - Inbound mail filtering When an email is received: SMTP level filtering (Directory Harvesting and Greylist) is executed before the email body is received. When the email is received, it is checked to see if it is addressed to a list in the list server. If the email matches a list, it will be processed by the list server.
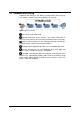
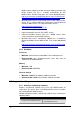
2.2 Outbound mail filtering Outbound mail filtering is the process through which email sent by users within a company is processed before it is sent out. Figure 2 - Outbound mail filtering User creates and sends email. Remote commands check executes any remote commands in email if any are found. If none are found, email goes to the next stage. Email is next checked to see if it should be archived. If archiving is enabled, email is saved in the archiving database.
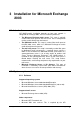
3 Installation for Microsoft Exchange 2003 3.1 Introduction GFI MailEssentials installation depends on how your network is configured for Exchange 2003. You can install this product on: The Microsoft Exchange 2003 server: This setup is typically used to filter email spam on the mail server that is configured to receive emails directly from the internet.
MailEssentials reporter to enable anti spam report generation. For UK/US English OS this is installed automatically by GFI MailEssentials. For other languages, this can be downloaded from: http://www.microsoft.com/downloads/details.aspx?FamilyId=3144 B72B-B4F2-46DA-B4B6-C5D7485F2B42&displaylang=en Microsoft Virtual Server cluster group resource with a physical disc cluster. This is required ONLY for environments running Microsoft Exchange 2003 clusters. For more information refer to: http://technet.
<..\Program Files\Common Files\GFI> <..\Program Files (x86)\Common Files\GFI> <..\Inetpub\mailroot> If installed on a gateway machine. <..\Program Files\Exchsrvr\Mailroot> If installed on the same machine as Microsoft Exchange 2003. 3.3.2 Firewall port settings Configure your firewall to allow the following port connections. These ports are used by GFI MailEssentials to connect to GFI servers: DNS (Port 53) - Used by anti spam filters (IP DNS Blocklist, Sender Policy Framework, Header Checking).
On upgrading an existing installation, licensing reverts to trial version and a new fully purchased license key for the GFI MailEssentials 2010 is required. For more information on new license keys, refer to: http://customers.gfi.com You cannot change the installation path during GFI MailEssentials upgrades. When upgrading from GFI MailEssentials 9, the current Bayesian weights file will be upgraded to the new format used in GFI MailEssentials 10 or later.
mailessentials2010_x64.exe (64-bit install) accordingly. 3. Select installation language and click Next. 4. Select whether to check for newer versions/builds of GFI MailEssentials and click Next. 5. Read licensing agreement. To proceed with the installation select I accept the license agreement and click Next. 6. Click Next to install in default location or click Browse to change path. 7. Specify user details and enter license key. Click Next to continue. 8. Specify the email address where notifications (e.
Screenshot 3 - Installing Microsoft Message Queuing Service 10. If Microsoft Message Queuing Services (MSMQ) is not installed then the dialog in the above screenshot will open. Select Yes to install MSMQ. Click Next to continue. 11. Click Finish to finalize your installation. On completion, setup will: Ask you to restart the SMTP service. IMPORTANT: Failing to restart the SMTP service will negatively affect anti spam filtering and email flow. Check whether Microsoft XML engine is installed.
Post-Installation Wizard 1. Click Next in the welcome page. Screenshot 4 - DNS Server settings 2. In the DNS Server dialog, select: Use the same DNS server used by this server - Select this option to use the same DNS server that is used by the operating system where GFI MailEssentials is installed. Use an alternate DNS server - Select this option to specify a custom DNS server IP address. Click Test DNS Server to test connection with the specified DNS server.
Screenshot 5 - Internet connectivity settings 3. In the Internet Connectivity Settings dialog, specify how the server where GFI MailEssentials is installed connects to the internet. If the server connects through a proxy server click Configure proxy server… and specify proxy settings. Click Next to continue.
4. In the Inbound email domains dialog specify all the domains to filter for spam. Any local domains that are not specified in this list will not be filtered for spam. Click Next to continue. NOTE: When adding domains, select Obtain domain‟s MX records and include in perimeter servers list to retrieve the domain‟s MX records and automatically add them to the perimeter SMTP servers list (configured in the next step). Screenshot 7 - SMTP Server settings 5.
Screenshot 8 - Selecting the default anti-spam action to use 6. In the Default anti-spam action dialog select the default action to be taken when emails are detected as spam. Click Next to continue. 7. Click Finish to finalize the installation. The GFI MailEssentials installation is now complete and the anti-spam system is up and running. For more information about how to optimize GFI MailEssentials refer to Post-install actions chapter.
3.5 Installing on an email gateway or relay/perimeter server Introduction GFI MailEssentials can be installed: On a perimeter server (e.g. in a DMZ) As a mail relay server between the perimeter (gateway) SMTP server and the recipients‟ inboxes. Both setups enable you to reduce unnecessary email traffic by using your Active Directory resources (at a perimeter/gateway server level) to drop connections for non-existent email recipients in incoming email.
version and a new fully purchased license key for the GFI MailEssentials 2010 is required. For more information on new license keys, refer to: http://customers.gfi.com. You cannot change the installation path during GFI MailEssentials upgrades. When upgrading from GFI MailEssentials 9, the current Bayesian weights file will be upgraded to the new format used in GFI MailEssentials 10 or later. The new format is more compact and uses less memory. NO DATA WILL BE LOST. Upgrade procedure 1.
Step 1: Enable IIS SMTP Service Windows Server 2003 1. Go to Start ► Control Panel ► Add or Remove Programs ► Add/Remove Windows Components. 2. Select Internet Information Services (IIS) and click Details. 3. Select the SMTP Service option and click OK. 4. Click Next to finalize your configuration. Windows Server 2008 1. Launch the Windows Server Manager. 2. Navigate to the Features node and select Add Features. 3. From the Add Features Wizard select SMTP Server checkbox.
Step 3: Enable email relaying to your Microsoft Exchange server: 1. Right click on the new domain (e.g. test.gfi.com) and select Properties. 2. Select the Allow the Incoming Mail to be Relayed to this Domain checkbox. Screenshot 11 - Configure the domain 3. Select the Forward all mail to smart host option and specify the IP address of the server managing emails in this domain. IP address must be enclosed in square brackets e.g. [123.123.123.123] so to exclude them from all DNS lookup attempts. 4.
Screenshot 12 - Relay options 5. Select the Only the list below option and click Add. 6. Specify IP(s) of the mail server(s) that are allowed to route emails through your mail relay server. You can specify: Single computer - i.e. Authorize one specific machine to relay email through this server. Use the DNS Lookup button to lookup an IP address for a specific host. Group of computers - i.e. Authorize specific computer(s) to relay emails through this server.
Step 5: Enable your Microsoft Exchange Server to route emails via mail relay server/GFI MailEssentials Screenshot 13 - Forwarding email to GFI MailEssentials machine 1. Launch Exchange System Manager. 2. Right click Connectors node and select New ► SMTP Connector. Screenshot 14 - Specifying IP of GFI MailEssentials machine 3. Select the Forward all mail through this connector to the following smart host option, and specify the IP of your mail relay server within square brackets (i.e.
MailEssentials is installed) e.g. [123.123.1.123]. Screenshot 15 - Adding a bridgehead 4. Click Add and select the virtual SMTP Server (i.e. the email relay server on which GFI MailEssentials is running). Screenshot 16 - Adding SMTP as address space 5. Click on the Address Space tab then click Add.
6. Select SMTP and click OK. 7. Click OK to finalize your configuration. All emails will now be forwarded to the GFI MailEssentials server. Step 6: Update your domain MX record to point to mail relay server Update the MX record of your domain to point to the IP of the new mail relay server. If your DNS server is managed by your ISP, ask your ISP to update the MX record for you.
to: http://support.microsoft.com/support/kb/articles/Q153/1/19.asp Installation procedure 1. Logon to your Microsoft Exchange Server machine using administrator credentials. 2. Double click mailessentials2010.exe (32-bit install) or mailessentials2010_x64.exe (64-bit install) accordingly. 3. Select preferred install language and click Next. 4. Select whether to check for newer versions/builds of GFI MailEssentials and click Next. 5. Read licensing agreement.
Screenshot 19 - Installing Microsoft Message Queuing Service 10. If Microsoft Message Queuing Services (MSMQ) is not installed then the dialog in the above screenshot will open. Select Yes to install MSMQ. Click Next to continue. 11. Click Finish to finalize your installation. On completion, setup will: Ask you to restart the SMTP service. IMPORTANT: Failing to restart the SMTP service will negatively affect anti spam filtering and email flow. Check whether Microsoft XML engine is installed.
Post-Installation Wizard 1. Click Next in the welcome page. Screenshot 20 - DNS Server settings 2. In the DNS Server dialog, select: Use the same DNS server used by this server - Select this option to use the same DNS server that is used by the operating system where GFI MailEssentials is installed. Use an alternate DNS server - Select this option to specify a custom DNS server IP address. Click Test DNS Server to test connection with the specified DNS server.
Screenshot 21 - Internet connectivity settings 3. In the Internet Connectivity Settings dialog, specify how the server where GFI MailEssentials is installed connects to the internet. If the server connects through a proxy server click Configure proxy server… and specify proxy settings. Click Next to continue.
4. In the Inbound email domains dialog specify all the domains to filter for spam. Any local domains that are not specified in this list will not be filtered for spam. Click Next to continue. NOTE: When adding domains, select Obtain domain‟s MX records and include in perimeter servers list to retrieve the domain‟s MX records and automatically add them to the perimeter SMTP servers list (configured in the next step). Screenshot 23 - SMTP Server settings 5.
Screenshot 24 - Selecting the default anti-spam action to use 6. In the Default anti-spam action dialog select the default action to be taken when emails are detected as spam. Click Next to continue. 7. Click Finish to finalize the installation. The GFI MailEssentials installation is now complete and the anti-spam system is up and running. For more information about how to optimize GFI MailEssentials refer to Post-install actions chapter. 3.
Process 1: Install GFI MailEssentials on the Active cluster node. Process 2: Stop the GFI MailEssentials Legacy Attendant and the GFI POP2Exchange cluster resources and move the Exchange Virtual Server cluster group resource to a passive/other node. Process 3: Install GFI MailEssentials on another cluster node.
Screenshot 25 - Confirm the upgrade 2. Click Yes to start the upgrade process and follow on-screen instructions. For assistance refer to the Installation procedure chapter in the section below. 3.6.2 New installations Important notes 1. Only active/passive cluster setups are supported. 2. Before starting installation, close any running Windows applications. 3. Before starting installation, Microsoft Exchange Server 2003 needs to be installed in clustered mode. 4.
Installation procedure Step 1 - Install GFI MailEssentials in the shared hard drive on active server 1. Logon to the active node of your Microsoft Exchange cluster using administrator credentials. 2. Double click mailessentials2010.exe (32-bit install) or mailessentials2010_x64.exe (64-bit install) accordingly. 3. Select install language and click Next. 4. Select whether to check for newer versions/builds of GFI MailEssentials and click Next. 5. Read licensing agreement.
Screenshot 27 - Installing Microsoft Message Queuing Service 10. If Microsoft Message Queuing Services (MSMQ) is not installed then the dialog in the above screenshot will open. Select Yes to install MSMQ. Click Next to continue. 11. Click Finish to finalize your installation. On completion, setup will: Ask you to restart the SMTP service. Failing to restart the SMTP service will negatively affect anti spam filtering and email flow. Check whether Microsoft XML engine is installed.
Post-Installation Wizard 1. Click Next in the welcome page. Screenshot 28 - DNS Server settings 2. In the DNS Server dialog, select: Use the same DNS server used by this server - Select this option to use the same DNS server that is used by the operating system where GFI MailEssentials is installed. Use an alternate DNS server - Select this option to specify a custom DNS server IP address. Click Test DNS Server to test connection with the specified DNS server.
Screenshot 29 - Internet connectivity settings 3. In the Internet Connectivity Settings dialog, specify how the server where GFI MailEssentials is installed connects to the internet. If the server connects through a proxy server click Configure proxy server… and specify proxy settings. Click Next to continue.
4. In the Inbound email domains dialog specify all the domains to filter for spam. Any local domains that are not specified in this list will not be filtered for spam. Click Next to continue. NOTE: When adding domains, select Obtain domain‟s MX records and include in perimeter servers list to retrieve the domain‟s MX records and automatically add them to the perimeter SMTP servers list (configured in the next step). Screenshot 31 - SMTP Server settings 5.
Screenshot 32 - Selecting the default anti-spam action to use 6. In the Default anti-spam action dialog select the default action to be taken when emails are detected as spam. Click Next to continue. 7. Click Finish to finalize the installation. The GFI MailEssentials installation is now complete and the anti-spam system is up and running. For more information about how to optimize GFI MailEssentials refer to Post-install actions chapter. Step 2 - Move the Exchange Virtual Server cluster group 1.
6. Click Next to install in default location or click Browse to change path. 7. Specify user details and enter license key. Click Next to continue. 8. Specify the email address where notifications (e.g. failed anti spam filters, spam digests) are sent. Screenshot 33 - Selecting SMTP mode or Active Directory mode 9. Specify whether GFI MailEssentials will get the list of email users (required for user-based configuration/rules e.g. disclaimers) from Active Directory or SMTP server. Click Next to continue.
Screenshot 34 - Installing Microsoft Message Queuing Service 10. If Microsoft Message Queuing Services (MSMQ) is not installed then the dialog in the above screenshot will open. Select Yes to install MSMQ. Click Next to continue. 11. Click Finish to finalize your installation. On completion, setup will: Ask you to restart the SMTP service. Failing to restart the SMTP service will negatively affect anti spam filtering and email flow. Check whether Microsoft XML engine is installed.
Screenshot 35 - DNS Server settings 2. In the DNS Server dialog, select: Use the same DNS server used by this server - Select this option to use the same DNS server that is used by the operating system where GFI MailEssentials is installed. Use an alternate DNS server - Select this option to specify a custom DNS server IP address. Click Test DNS Server to test connection with the specified DNS server. If test is unsuccessful, specify another DNS server. Click Next to continue.
Screenshot 36 - Internet connectivity settings 3. In the Internet Connectivity Settings dialog, specify how the server where GFI MailEssentials is installed connects to the internet. If the server connects through a proxy server click Configure proxy server… and specify proxy settings. Click Next to continue.
4. In the Inbound email domains dialog specify all the domains to filter for spam. Any local domains that are not specified in this list will not be filtered for spam. Click Next to continue. NOTE: When adding domains, select Obtain domain‟s MX records and include in perimeter servers list to retrieve the domain‟s MX records and automatically add them to the perimeter SMTP servers list (configured in the next step). Screenshot 38 - SMTP Server settings 5.
Screenshot 39 - Selecting the default anti-spam action to use 6. In the Default anti-spam action dialog select the default action to be taken when emails are detected as spam. Click Next to continue. 7. Click Finish to finalize the installation. The GFI MailEssentials installation is now complete and the anti-spam system is up and running. For more information about how to optimize GFI MailEssentials refer to Post-install actions chapter.
Display Name: GFI MailEssentials List Server Dependencies: GFI MailEssentials Legacy Attendant Start Parameters: None Registry Replication: None Service Name: GFIMETRXSVC Display Name: GFI MailEssentials Enterprise Transfer Service Dependencies: GFI MailEssentials Legacy Attendant Start Parameters: None Registry Replication: None To add these services: 1. Go to Control Panel ► Administrative Tools ► Cluster Administrator. 2.
4 Installation for Microsoft Exchange 2007 & 2010 4.1 Introduction GFI MailEssentials installation depends on your network infrastructure, i.e. Microsoft Exchange 2007/2010 or SBS 2008/2011 setup. You can install this product on: Same server running Microsoft Exchange or SBS: This setup is typically used to filter email spam on Microsoft Exchange or SBS servers set to receive emails directly from „outside‟ (i.e. the internet).
Other components Microsoft .NET Framework 2.0 Microsoft XML core services: This is required by the GFI MailEssentials reporter to enable anti spam report generation. For UK/US English OS this is installed automatically by GFI MailEssentials. For other languages, this can be downloaded from: http://www.microsoft.com/downloads/details.aspx?FamilyId=3144 B72B-B4F2-46DA-B4B6-C5D7485F2B42&displaylang=en Microsoft Message Queuing Services.
<..\Program Files\Exchsrvr\Mailroot> If installed on the same machine as Microsoft Exchange 2007/2010. 4.3.2 Firewall port settings Configure your firewall to allow the following port connections. These ports are used by GFI MailEssentials to connect to GFI servers: DNS (Port 53) - Used by anti spam filters (IP DNS Blocklist, Sender Policy Framework, Header Checking). FTP (Ports 20 and 21) - Used by GFI MailEssentials to connect to 'ftp.gfisoftware.com' and retrieve latest product version information.
You cannot change the installation path during GFI MailEssentials upgrades. Upgrade procedure 1. Launch GFI MailEssentials installation on the server where your earlier version of GFI MailEssentials is installed. Screenshot 40 - Confirm the upgrade 2. Click Yes to start the upgrade process and follow on-screen instructions. For assistance refer to New installations section below. 4.4.2 New installations Important notes 1.
filters, spam digests) are sent. Screenshot 41 - Selecting SMTP mode or Active Directory mode 9. Specify whether GFI MailEssentials will get the list of email users (required for user-based configuration/rules e.g. disclaimers) from Active Directory or SMTP server. Click Next to continue.
10. If Microsoft Message Queuing Services (MSMQ) is not installed then the dialog in the above screenshot will open. Select Yes to install MSMQ. Click Next to continue. 11. Click Finish to finalize your installation. On completion, setup will: Check whether Microsoft XML engine is installed. This is automatically installed if not found on UK/US English OS. For other OS languages, this has to be manually downloaded and installed. Microsoft XML engine can be downloaded from: http://www.microsoft.
Screenshot 44 - Internet connectivity settings 3. In the Internet Connectivity Settings dialog, specify how the server where GFI MailEssentials is installed connects to the internet. If the server connects through a proxy server click Configure proxy server… and specify proxy settings. Click Next to continue.
4. In the Inbound email domains dialog specify all the domains to filter for spam. Any local domains that are not specified in this list will not be filtered for spam. Click Next to continue. NOTE: When adding domains, select Obtain domain‟s MX records and include in perimeter servers list to retrieve the domain‟s MX records and automatically add them to the perimeter SMTP servers list (configured in the next step). Screenshot 46 - SMTP Server settings 5.
Screenshot 47 - Selecting the default anti-spam action to use 6. In the Default anti-spam action dialog select the default action to be taken when emails are detected as spam. Click Next to continue. NOTE: When installing on Microsoft Exchange 2010 and the default action selected is Move to mailbox sub-folder, a user with impersonation rights must be created.
Screenshot 48 - Server roles detected and list of components to install. 7. A list of the Microsoft Exchange Server 2007/2010 server roles detected and GFI MailEssentials components required is displayed. Click Next to install the required GFI MailEssentials components. 8. Click Finish to finalize the installation. The GFI MailEssentials installation is now complete and the anti-spam system is up and running.
Figure 4 - A typical Perimeter SMTP Relay Server setup 4.5.1 Pre-install actions Step 1: Send and Receive connector setup NOTE: These connectors are not required for Microsoft Exchange Server 2007/2010 installed with Edge Server Role. Ensure that the required Send connectors and Receive connectors to and from Microsoft Exchange 2007/2010 are created for servers installed with Hub Transport Role. Where these are not yet created: 1.
required) and click Next. Select the Hub Transport server with which this connector will be associated and click Next. Verify the configuration summary and click New to create the new send connector. NOTE: On completion, the GFI MailEssentials connector will be available in the Send Connectors tab and is enabled by default. 2.
Important notes Upgrades cannot be undone i.e. you cannot downgrade to an earlier version once you have installed the latest version. On upgrading an existing installation, licensing reverts to trial version and a new fully purchased license key for the GFI MailEssentials 2010 is required. For more information on new license keys, refer to: http://customers.gfi.com You cannot change the installation path during GFI MailEssentials upgrades.
4. Select whether to check for newer versions/builds of GFI MailEssentials and click Next. 5. Read licensing agreement. To proceed with the installation select I accept the license agreement and click Next. 6. Click Next to install in default location or click Browse to change path. 7. Specify user details and enter license key. Click Next to continue. 8. Specify the email address where notifications (e.g. failed anti spam filters, spam digests) are sent.
Screenshot 51 - Installing Microsoft Message Queuing Service 10. If Microsoft Message Queuing Services (MSMQ) is not installed then the dialog in the above screenshot will open. Select Yes to install MSMQ. Click Next to continue. 11. Click Finish to finalize your installation. On completion, setup will: Ask you to restart the SMTP service. IMPORTANT: Failing to restart the SMTP service will negatively affect anti spam filtering and email flow.
Post-Installation Wizard 1. Click Next in the welcome page. Screenshot 52 - DNS Server settings 2. In the DNS Server dialog, select: Use the same DNS server used by this server - Select this option to use the same DNS server that is used by the operating system where GFI MailEssentials is installed. Use an alternate DNS server - Select this option to specify a custom DNS server IP address. Click Test DNS Server to test connection with the specified DNS server.
Screenshot 53 - Internet connectivity settings 3. In the Internet Connectivity Settings dialog, specify how the server where GFI MailEssentials is installed connects to the internet. If the server connects through a proxy server click Configure proxy server… and specify proxy settings. Click Next to continue.
4. In the Inbound email domains dialog specify all the domains to filter for spam. Any local domains that are not specified in this list will not be filtered for spam. Click Next to continue. NOTE: When adding domains, select Obtain domain‟s MX records and include in perimeter servers list to retrieve the domain‟s MX records and automatically add them to the perimeter SMTP servers list (configured in the next step). Screenshot 55 - SMTP Server settings 5.
Screenshot 56 - Selecting the default anti-spam action to use 6. In the Default anti-spam action dialog select the default action to be taken when emails are detected as spam. Click Next to continue. NOTE: When installing on Microsoft Exchange 2010 and the default action selected is Move to mailbox sub-folder, a user with impersonation rights must be created.
Screenshot 57 - Server roles detected and list of components to install. 7. A list of the Microsoft Exchange Server 2007/2010 server roles detected and GFI MailEssentials components required is displayed. Click Next to install the required GFI MailEssentials components. 8. Click Finish to finalize the installation. The GFI MailEssentials installation is now complete and the anti-spam system is up and running.
servers running the Edge Transport roles. Instructions on how to install GFI MailEssentials are provided in the previous sections.
5 Installation for Lotus Domino 5.1 Introduction Installing GFI MailEssentials with Lotus Domino enables you to scan all inbound emails received from „outside' (i.e. the internet) for spam before reaching your Lotus Domino server. Outbound emails relayed to GFI MailEssentials are also processed (e.g. adding of disclaimers and auto-whitelisting) before these are sent via internet.
5.2.2 Hardware Processor Minimum: Intel Pentium or compatible 1 GHz 32-bit processor Recommended: x64 architecture-based server with Intel 64 architecture or AMD64 platform. Memory Minimum: 1GB Recommended: 2GB RAM Physical Storage Minimum: 500MB for installation, 2GB for execution. Recommended: 500MB for installation, 4GB for execution 5.3 Important settings 5.3.1 Antivirus and backup software Antivirus and backup software may cause GFI MailEssentials to malfunction.
o 'http://db11.spamcatcher.net' earlier) (GFI MailEssentials 14 or o 'http://sn92.mailshell.net' (GFI MailEssentials 14 SR1 or later) Remoting (Ports 8021) - Used in the latest builds of GFI MailEssentials for inter-process communication. No firewall configuration is required to allow connections to or from the remoting ports since all the GFI MailEssentials processes run on the same server. NOTE: Ensure that no other applications (except GFI MailEssentials) are listening on port 8021.
Screenshot 58 - Internet Information Services (IIS) Manager 3. In the left pane, expand the respective server node. Right click on Default SMTP Virtual Server and select Properties. 4. Select the IP address currently assigned to your SMTP server and click OK. 5. Expand the Default SMTP Virtual Server node. 6. Right click Domains and select New ► Domain. 7. Select the Remote option and click Next. 8. Specify domain name (e.g. test.gfi.com) and click Finish.
Screenshot 59 - Configure the domain 3. Select the Forward all mail to smart host option and specify the IP address of the server managing emails in this domain. IP address must be enclosed in square brackets e.g. [123.123.123.123] so to exclude them from all DNS lookup attempts. 4. Click OK to finalize your configuration. Step 4: Secure your SMTP email-relay server If unsecured, your mail relay server can be exploited and used as an open relay for spam.
Screenshot 60 - Relay options 5. Select the Only the list below option and click Add. 6. Specify IP(s) of the mail server(s) that are allowed to route emails through your mail relay server. You can specify: Single computer - i.e. Authorize one specific machine to relay email through this server. Use the DNS Lookup button to lookup an IP address for a specific host. Group of computers - i.e. Authorize specific computer(s) to relay emails through this server.
5. Click Save and Close to save configuration. b. Configure Lotus Domino LDAP settings 1. From the „Directory Assistance database‟, click on Add directory assistance to create a new Assistance document. 2. Select the LDAP Clients checkbox from the „Make this domain available to:‟ option. 3. From the „server configuration‟, edit the credentials under the configuration. Enable Anonymous authentication to allow GFI MailEssentials to access Lotus Domino LDAP.
Test IIS SMTP outbound connection via test email 1. Send an email from an „internal‟ email account to an external account (e.g. Gmail) 2. Ensure that the intended recipient/external user received the test email. NOTE: You can also use „Telnet‟ to manually send the test email and obtained more troubleshooting information. For more information refer to: http://support.microsoft.com/support/kb/articles/Q153/1/19.asp 5.4.
instructions. For assistance refer to New installations section below. 5.4.3 New installations Important notes 1. During installation, GFI MailEssentials restarts IIS services. This is required to allow GFI MailEssentials components to be registered and started. 2. Before starting installation, close any running Windows applications. Installation procedure 1. Logon to the email gateway server where GFI MailEssentials will be installed using administrator credentials. 2. Double click mailessentials2010.
9. Specify the email address where notifications (e.g. failed anti spam filters, spam digests) are sent. Screenshot 64 - Selecting SMTP mode 10. Select No, I do not have Active Directory… option to use SMTP server to get the list of email users. Click Next to continue.
11. If Microsoft Message Queuing Services (MSMQ) is not installed then the dialog in the above screenshot will open. Select Yes to install MSMQ. Click Next to continue. 12. Click Finish to finalize your installation. On completion, setup will: Ask you to restart the SMTP service. IMPORTANT: Failing to restart the SMTP service will negatively affect anti spam filtering and email flow. Check whether Microsoft XML engine is installed. This is automatically installed if not found on UK/US English OS.
server. If test is unsuccessful, specify another DNS server. Click Next to continue. Screenshot 67 - Internet connectivity settings 3. In the Internet Connectivity Settings dialog, specify how the server where GFI MailEssentials is installed connects to the internet. If the server connects through a proxy server click Configure proxy server… and specify proxy settings. Click Next to continue.
Screenshot 68 - Inbound email domains 4. In the Inbound email domains dialog specify all the domains to filter for spam. Any local domains that are not specified in this list will not be filtered for spam. Click Next to continue. NOTE: When adding domains, select Obtain domain‟s MX records and include in perimeter servers list to retrieve the domain‟s MX records and automatically add them to the perimeter SMTP servers list (configured in the next step).
Screenshot 69 - SMTP Server settings 5. In the SMTP Servers dialog specify how the server receives external emails. If emails are routed through other servers before they are forwarded to the GFI MailEssentials server, add the IP address of the other servers in the list. For more information about perimeter SMTP servers refer to: http://kbase.gfi.com/showarticle.
Screenshot 70 - Selecting the default anti-spam action to use 6. In the Default anti-spam action dialog select the default action to be taken when emails are detected as spam. Click Next to continue. 7. Click Finish to finalize the installation. The GFI MailEssentials installation is now complete and the anti-spam system is up and running. For more information about how to optimize GFI MailEssentials refer to Post-install actions chapter.
6 Installation for SMTP Servers 6.1 Introduction Installing GFI MailEssentials with other SMTP servers enables you to scan all inbound emails received from „outside' (i.e. the internet) for spam before reaching your SMTP Server. Outbound emails relayed to GFI MailEssentials are also processed (e.g. adding of disclaimers and auto-whitelisting) before these are sent via internet.
6.2.2 Hardware Processor Minimum: Intel Pentium or compatible 1 GHz 32-bit processor Recommended: x64 architecture-based server with Intel 64 architecture or AMD64 platform Memory Minimum: 1GB Recommended: 2GB RAM Physical Storage Minimum: 500MB for installation, 2GB for execution Recommended: 500MB for installation, 4GB for execution 6.3 Important settings 6.3.1 Antivirus and backup software Antivirus and backup software may cause GFI MailEssentials to malfunction.
o 'http://db11.spamcatcher.net' earlier) (GFI MailEssentials 14 or o 'http://sn92.mailshell.net' (GFI MailEssentials 14 SR1 or later) Remoting (Ports 8021) - Used in the latest builds of GFI MailEssentials for inter-process communication. No firewall configuration is required to allow connections to or from the remoting ports since all the GFI MailEssentials processes run on the same server. NOTE: Ensure that no other applications (except GFI MailEssentials) are listening on port 8021.
Screenshot 71 - Internet Information Services (IIS) Manager 3. In the left pane, expand the respective server node. Right click on Default SMTP Virtual Server and select Properties. 4. Select the IP address currently assigned to your SMTP server and click OK. 5. Expand the Default SMTP Virtual Server node 6. Right click Domains and select New ► Domain. 7. Select the Remote option and click Next. 8. Specify domain name (e.g. test.gfi.com) and click Finish.
Screenshot 72 - Configure the domain 3. Select the Forward all mail to smart host option and specify the IP address of the server managing emails in this domain. IP address must be enclosed in square brackets e.g. [123.123.123.123] so to exclude them from all DNS lookup attempts. 4. Click OK to finalize your configuration. Step 4: Secure your SMTP email-relay server If unsecured, your mail relay server can be exploited and used as an open relay for spam.
Screenshot 73 - Relay options 5. Select the Only the list below option and click Add. 6. Specify IP(s) of the mail server(s) that are allowed to route emails through your mail relay server. You can specify: Single computer - i.e. Authorize one specific machine to relay email through this server. Use the DNS Lookup button to lookup an IP address for a specific host. Group of computers - i.e. Authorize specific computer(s) to relay emails through this server.
Verify that MX record has been successfully updated To verify whether MX record is updated do as follows: 1. Click Start ► Run and type in Command 2. From the command prompt type in: nslookup 3. Type in: set type=mx 4. Specify your mail domain name. The MX record should return the servers.
earlier version once you have installed the latest version. On upgrading an existing installation, licensing reverts to trial version and a new fully purchased license key for the GFI MailEssentials 2010 is required. For more information on new license keys, refer to: http://customers.gfi.com You cannot change the installation path during GFI MailEssentials upgrades.
5. Read licensing agreement. To proceed with the installation select I accept the license agreement and click Next. 6. Click Next to install in default location or click Browse to change path. 7. Specify user details and enter license key. Click Next to continue. Screenshot 76 - Specify mail server details 8. Specify IP address and listening port of your SMTP server and the external domain name used. Click Next to continue. 9. Specify the email address where notifications (e.g.
Screenshot 77 - Selecting SMTP mode 10. Select No, I do not have Active Directory… option to use SMTP server to get the list of email users. Click Next to continue. Screenshot 78 - Installing Microsoft Message Queuing Service 11. If Microsoft Message Queuing Services (MSMQ) is not installed then the dialog in the above screenshot will open.
MSMQ. Click Next to continue. 12. Click Finish to finalize your installation. On completion, setup will: Ask you to restart the SMTP service. IMPORTANT: Failing to restart the SMTP service will negatively affect anti spam filtering and email flow. Check whether Microsoft XML engine is installed. This is automatically installed if not found on UK/US English OS. For other OS languages, this has to be manually downloaded and installed. Microsoft XML engine can be downloaded from: http://www.microsoft.
Post-Installation Wizard 1. Click Next in the welcome page. Screenshot 79 - DNS Server settings 2. In the DNS Server dialog, select: Use the same DNS server used by this server - Select this option to use the same DNS server that is used by the operating system where GFI MailEssentials is installed. Use an alternate DNS server - Select this option to specify a custom DNS server IP address. Click Test DNS Server to test connection with the specified DNS server.
Screenshot 80 - Internet connectivity settings 3. In the Internet Connectivity Settings dialog, specify how the server where GFI MailEssentials is installed connects to the internet. If the server connects through a proxy server click Configure proxy server… and specify proxy settings. Click Next to continue.
4. In the Inbound email domains dialog specify all the domains to filter for spam. Any local domains that are not specified in this list will not be filtered for spam. Click Next to continue. NOTE: When adding domains, select Obtain domain‟s MX records and include in perimeter servers list to retrieve the domain‟s MX records and automatically add them to the perimeter SMTP servers list (configured in the next step). Screenshot 82 - SMTP Server settings 5.
Screenshot 83 - Selecting the default anti-spam action to use 6. In the Default anti-spam action dialog select the default action to be taken when emails are detected as spam. Click Next to continue. 7. Click Finish to finalize the installation. The GFI MailEssentials installation is now complete and the anti-spam system is up and running. For more information about how to optimize GFI MailEssentials refer to Post-install actions chapter.
7 Post-install actions To ensure that your GFI MailEssentials anti spam system is effectively up and running, perform the following post-install actions: Step 1: Launch GFI MailEssentials Configuration console Click on Start ► All Programs ► GFI MailEssentials ► GFI MailEssentials Configuration. Step 2: Enable Directory Harvesting This filter uses Active directory or LDAP lookups to verify whether inbound emails are addressed to legitimate „internal‟ email accounts. To enable this filter: 1.
Step 4: Enable Greylist The Greylist filter temporarily blocks incoming emails received from unknown senders and sends a retry message. A legitimate SMTP server will try to resend an email if a retry message is received, while spam servers normally ignore error messages. NOTE: To enable Greylist, GFI MailEssentials must be installed on the perimeter SMTP server. 1. Right click Anti spam ► Anti-Spam Filters ► Greylist node and select Properties. 2. Click the Greylist tab. 3.
7.2 GFI MailEssentials Configuration At this stage, your GFI MailEssentials anti spam system is up and running. All inbound email will be scanned by the anti spam filters enabled by default. Filter Description SpamRazer An anti-spam engine that determines if an email is spam by using email reputation, message fingerprinting and content analysis. Yes Directory Harvesting Stops email which is randomly generated towards a server, mostly addressed to non-existent users.
Move to specific folder Move to junk mail folder Move to subfolder in user mailbox Forward to email address Delete Tagging Filters Quarantine Anti spam filter actions SpamRazer Yes Yes Yes Yes Yes Yes Yes Directory Harvesting Yes Yes Yes Yes Yes Yes Yes Phishing Yes Yes Yes Yes Yes Yes Yes Sender Policy Framework Yes Yes Yes Yes Yes Yes Yes Whitelist N/A Email Blocklist Yes Yes Yes Yes Yes Yes Yes IP DNS Blocklist Yes Yes Yes Yes Yes Yes Yes U
8 Uninstalling GFI MailEssentials 8.1 Introduction This chapter describes how to uninstall GFI MailEssentials for all supported operating systems. NOTE 1: If you are planning to uninstall and reinstall GFI MailEssentials to fix problems you may be having during installation, you should first read the Troubleshooting and support chapter in this manual. NOTE 2: Third-party components which are required by GFI MailEssentials, such as Microsoft .
9 Troubleshooting and support 9.1 Introduction This chapter explains how to resolve any GFI MailEssentials issues encountered during installation. The main sources of information available to solve these issues are: This manual - most issues can be solved through the information in this manual section. GFI Knowledge Base articles Web forums Contacting GFI Technical Support 9.
install to complete could not be run. Contact your support personnel or package vendor.”: “Setup failed to launch installation engine: Access is denied.” or: “Error installing Ikernel.exe, access is denied.” 5. Ensure that the following Microsoft Windows technologies are installed correctly and not corrupt: Microsoft Windows Management Instrumentation (WMI) Microsoft Windows Installer Microsoft .Net Framework Microsoft Data Access Components (MDAC) 6.
9.5 Request technical support If none of the resources listed above enable you to solve your issues, contact the GFI Technical Support team by filling in an online support request form or by phone. Online: Fill out the support request form and follow the instructions on this page closely to submit your support request on: http://support.gfi.com/supportrequestform.asp Phone: To obtain the correct technical support phone number for your region please visit: http://www.gfi.com/company/contact.
10 Appendix - Installing MSMQ 10.1 Windows Server 2003 The message queuing service is a scalable system service developed by Microsoft to enable high volume event processing. GFI MailEssentials uses this service for the list server. The message queuing service is included with every Windows 2003 and XP version, although not always installed by default. To check whether MSMQ is installed and to install it if it is not: 1.
Screenshot 86 - Message queuing component 4. In the Message Queuing dialog select the Core functionality checkbox and then click OK. Screenshot 87 - MSMQ Core functionality 5. In the Application Server dialog click OK and then click Next in the Windows Components Wizard window to start installing the message queuing service. 6. When the installation of the message queuing service is complete, you need to click Finish in the Windows Components Wizard. The Message Queuing Service is now installed.
10.2 Windows Server 2008 For detailed instructions on how to install MSMQ on Windows Server 2008 refer to: http://technet.microsoft.com/en-us/library/cc730960.
11 Glossary Active Directory A technology that provides a variety of network services, including LDAP-like directory services. AD See Active Directory Auto-reply An email reply that is sent automatically to incoming emails. Bayesian Filtering An anti-spam technique where a statistical probability index based on training from users is used to identify spam.
114 Glossary Internet Information Services A set of Internet-based services created by Microsoft Corporation for internet servers. IMAP See Internet Message Access Protocol Internet Message Access Protocol One of the two most commonly used Internet standard protocols for e-mail retrieval, the other being POP3.
Remote commands Instructions that facilitate the possibility of executing tasks remotely. Secure Sockets Layer A protocol to ensure an integral and secure communication between networks. Simple Mail Transport Protocol An internet standard used for email transmission across IP networks. SMTP See Simple Mail Transport Protocol Spam actions Actions taken on spam emails received, e.g. delete email or send to Junk email folder.
12 Index Internal email, 22, 73, 100 A Active Directory, 7, 9, 15, 23, 31, 37, 47, 49, 58, 76, 99, 113 Antivirus, 6, 46, 68, 84, 105 IP DNS Blocklist, 7, 68, 101 K Keyword checking, 100, 102 Auto-replies, 3 B Bayesian Analysis, 101 C Cluster, 6, 28, 29, 30, 31, 36, 42, 43, 64 D Dashboard, 100 Directory harvesting, 3, 99, 101, 102 Disclaimers, 9, 23, 37, 58, 83 DMZ, 5, 15, 16, 47, 99, 113 DNS Server, 22, 88 E Email Blocklist, 101 Email monitoring, 3 G GFI MailEssentials reporter, 6 Greylist, 3, 100
R Remote commands, 4, 115 S Sender Policy Framework, 7, 68, 101 SMTP Server, 9, 16, 17, 23, 37, 49, 58, 69, 70, 83, 85, 86, 88, 92, 100 SMTP Virtual Server, 17, 18, 70, 86, 87 118 Glossary Spam actions, 115 SpamRazer, 7, 68, 101 U Updates, 7, 68 URI DNS Blocklist, 101 W WebDAV, 115 Whitelist, 4, 99, 101 Getting Started Guide