
manual


30 Installation for Microsoft Exchange 2003 Getting Started Guide
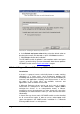
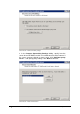
Screenshot 25 - Confirm the upgrade
2. Click Yes to start the upgrade process and follow on-screen
instructions. For assistance refer to the Installation procedure chapter
in the section below.
3.6.2 New installations
Important notes
1. Only active/passive cluster setups are supported.
2. Before starting installation, close any running Windows applications.
3. Before starting installation, Microsoft Exchange Server 2003 needs
to be installed in clustered mode.
4. Before starting installation ensure that you have a Microsoft Virtual
Server cluster group resource with a physical disc cluster available.
Pre-install actions
Create Microsoft Virtual Server cluster group resource
Before you can create an Exchange Virtual Server in a Windows
Server cluster, you must first create a cluster resource group. This is
the unit of failover in a Windows Server cluster. When Exchange
Server is running in a Windows Server cluster, the cluster resource
group that contains the Exchange cluster resources is referred to as
an Exchange Virtual Server.
To create a resource group for an Exchange Virtual Server in a
Windows Server cluster do as follows:
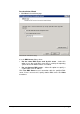
1. Start Cluster Administrator. On prompt, specify cluster details (e.g.
name) or click the browse button to select cluster in which you want
to create an Exchange Virtual Server.
2. In the console tree, right-click Groups and select New ► Group.
3. In the New Group Wizard that starts automatically, specify a name
for the new cluster group, and click Next.
4. Click Finish to finalize your configuration. This new group object is
displayed under Groups in Cluster Administrator.