05mm User Manual 148mm V502G-J66 12MP Digital Camcorder 82-448 -02040-000v1.
Camcorder Parts 2 14 1 15 4 3 5 6 7 8 9 10 13 12 16 17 18 19 20 11 1 Focus switch 2 Microphone 8 Mode/ button 9 USB Port 14 Speaker 15 Shutter Button ( 3 Strap hook 4 Record button ( 10 TV-out Connector 11 SD/MMC Card Slot 16 Lens 17 Video light 12 Power Button ( 18 Flash strobe 19 Battery cover ) 5 Up button (Zoom in) 6 Down button (Zoom out) 7 Button Video light 13 LCD Panel )/ ) 20 Tripod Port 1
Loading the battery Please use two AA batteries. 1. Slide open the battery compartment cover as indicated. 2. Load the batteries into the battery compartment with + and - ends correctly installed. 3. Replace the cover. open close Inserting the SD/MMC card (optional) 1. Lift the SD card cover. 2. Insert the card in the direction of indication until it reaches the end of the slot. 3. When using a SD card, the built-in memory will become inaccessible. 4.
Turning on the camcorder Open the LCD panel. OR Press and hold down the Power button ( ) for 3 seconds. Turning off the camcorder Close the LCD panel. OR Press and hold down the Power button ( Press the Power button ( ) for 3 seconds. ) shortly will turn the video light on/off.
Reading LCD indicators Digital Camcorder mode: Flash mode Focus mode Photo resolution NightShot 1.1x Zoom ratio SD card inserted Battery life Number of pictures/files Playback thumbnail mode: Current/total recordings Play mode File type Highlight box Playback full mode: Recording time Play mode Volume Video REC mode: Video light mode Recording time Focus mode Video resolution NightShot 1.
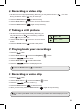
Recording a video clip 1. Set the focus to an appropriate setting. Normally, you may set the focus to ( filming conditions. Select ( ) only for close-ups. 2. Press the Record button ( 3. Use the Zoom buttons ( ) for most ) to start recording. ) to zoom in or zoom out the screen. 4. Press the Record button ( ) again to stop recording. Taking a still picture 1. Set the focus to an appropriate setting. Normally, you may set the focus to ( ) for most filming conditions. Select ( ) only for close-ups. 2.
Connecting the camcorder to a TV Connect your camcorder and TV via the accessory AV cable for real-time display. You can display your video clips, still pictures, and audio recordings directly on your TV, sharing them with your friends and family. TV AV-Mode Video Audio TV OUT 1. Turn on your TV and switch the TV to AV mode. The TV system is different across countries. If you need to adjust the TV-out setting, please refer to page 9 for more information.
Mode selection 1. Turn on the camcorder. 2. Press the button. 3. Use the Zoom buttons ( 4. Press the ) to select the desired item. button to confirm. Basic operation How to... Action Move the highlight bar Use the Zoom buttons ( Confirm an item Press the Exit menu/Go back to upper menu Press the Mode/ ) to move up or down. button. button (when in sub-menu). Menu items in Camera mode (1) Power-on → Press the Item button.
Menu items in Camera mode (2) Item Option Video Resolution VGA QVGA Auto WB The camcorder automatically adjusts white balance. This setting is suitable for outdoor recording in sunny weather. Cloudy This setting is suitable for recording in cloudy weather or shady environments. Fluorescent This setting is suitable for indoor recording with fluorescent lamp lighting, or environments with high color temperature.
Menu items in Playback mode Power-on → Press the Mode button → Enter the Playback ( the Shutter button ( ). ) mode → Press Item Option Delete One Yes/No Delete current file. Description Delete All Yes/No Delete all pictures and video/audio files stored in the memory. Menu items in Setting mode (1) Power-on → Press the Mode button → Enter the Setting ( Item Option Beep On/Off Flicker 50Hz/60Hz ) mode. Description Enable beep sound on/off. Set flicker frequency to 50Hz or 60Hz.
Menu items in Setting mode (2) Item Option Language USB Mode Description Lets you select the language used for OSD. Menu When connected to a PC, the camcorder displays a menu for you to choose a desired connection mode. Camera When connected to a PC, the camcorder automatically enters Camera (PC camera) mode. Disk When connected to a PC, the camcorder automatically enters Disk (removable disk) mode. Start Movie On/Off Enable/disable the movie sequence when the camcorder is powered on.
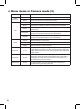
Storage Capacity Audio (min.) Video (min.
GFM Guarantee If you are not totally satisfied with this GFM product, you may return it to any Meijer store for a full refund within 6 months (180 days) of purchase when accompanied by a receipt. For customer support, please call (866) 845-9436 or go to www.gfmproducts.com. Dist. by Wholesale Merchandisers, Inc.
105mm Quick Guide 148mm V502G-J66 5MP Digital Camcorder 82-448 -02040-000v1.