
Full Product Manual

3BUTTON WATER RESISTANT REMOTE TRANSMITTER
PROGRAMMING AND REMOTE TRANSMITTER OVERVIEW
All GHOST CONTROLS
®
remote transmitters must be programmed before they will operate the Gate Opener System so that the safety and security of your system is
maintained.
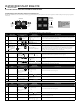
PROGRAMMING REMOTE TO GATE CONTROLLER
STEP
LED/ALARM
BEFORE PRESSING
BUTTONS SEQUENCE
TO PRESS
LED/ALARM
AFTER PRESSING
DESCRIPTION
1
Press & hold LEARN XMTR
button
on gate system
controller
Gate alarm sounds and LEARN
XMTR LED on system controller
stay
Places gate controller into Learn Remote mode for 10 seconds. NOTE-The gate system
controller will exit the Learn Remote mode after 10 seconds and return to normal operation if
there is no valid remote transmitter signal received.
2
Gate controller LED is
Press & hold
or
for 2 seconds
Gate controller alarm beeps or gate
begins moving
Programs this button into memory.
3
Release the
or
LEARN XMTR LED goes
The new transmitter’s ID has been saved into the memory of the main system controller.
4
No alarm sounds,
LEARN XMTR LED
on main controller is
LED on
remote is
Press and release the
or
button
Transmitter LED
on when button is depressed
Test the transmitter button you just programmed. LED on transmitter turns on only when
button is depressed to indicate it is transmitting GhostCode
TM
signal to gate controller. Each
press of this remote button will cycle the gate as follows: OPEN-STOP-CLOSE-STOP-
OPEN. The LED will be flashing rapidly when the transmitter is transmitting. Maximum
transmitting time is approximately 20 seconds to save battery life.
ADD AN ADDITIONAL REMOTE TRANSMITTER TO CONTROL THE GATE *REMOTE A IS YOUR TRAINING REMOTE AND ALREADY CONTROLS THE GATE
1
Press & hold the on
Remote B
(Learning) for at least 3 seconds
or until the LED goes
Remote LED is
This process assumes that *Remote A (Teaching Remote) is ALREADY capable of controlling
the gate. This puts Remote B (Learning Remote) into Learning Mode.
2
Press & hold
or
on Remote A, the Teaching
Remote.
LEDs on both Teaching and
Learning Remote
are
*Remote A (Teaching Remote) is in Teach Mode, and Remote B (Learning Remote) is in
Learn Mode.
3
Press & release
or on
Remote B, the Learning Remote.
Remote LED goes
Indicates that the Learning Remote button (Remote B) pressed in this step is now programmed
to operate the same gate as the Teaching Remote (*Remote A).
CLONE / COPY BUTTON 1’S ID TO BUTTON 2’S BUTTON 1 ALREADY CONTROLS THE GATE
STEP
NOTE
BUTTONS SEQUENCE
TO PRESS
LED/ALARM
AFTER PRESSING
DESCRIPTION
1
Press & hold LEARN
button on Remote for AT
LEAST 3 seconds until the
LED turns on
LED on Remote stays
Places remote transmitter into Learning mode.
2
Release the LEARN Button
LED remains
Remote is in Learning Mode.
3
Press and Release Button 1
LED should start
(2 flashes a sec)
Remote is sending button 1’s ID.
4
Press and Release Button 2
LED should go
Button 1’s ID is accepted by button 2. Both buttons should now work the same gate.
CLONE / COPY BUTTON 2’S ID TO BUTTON 1’S BUTTON 2 ALREADY CONTROLS THE GATE
STEP
NOTE
BUTTONS SEQUENCE
TO PRESS
LED/ALARM
AFTER PRESSING
DESCRIPTION
1
Press & hold LEARN
button on Remote for AT
LEAST 3 seconds until the
LED turns on
LED on Remote stays
Places remote transmitter into Learning mode.
2
Release the LEARN Button
LED remains
Remote is in Learning Mode.
3
Press and Release Button 2
LED should start
(2 flashes a sec)
Remote is sending button 2’s ID.
4
Press and Release Button 1
LED should go
Button 2’s ID is accepted by button 1. Both buttons should now work the same gate.
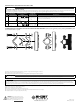
WATER RESISTANT REMOTE
INSTRUCTIONS
NOTE:
REMOTES A & B MUST BE
TOUCHING AND ORIENTED
AS SHOWN TO PROGRAM
REMOTE B FROM
REMOTE A
Transmitting
Receiving
REMOTE A
(TRAINING)
REMOTE B
(LEARNING)
BUTTON 1
Activates
Gate 1 or
Gate 2
®
BUTTON 2
Activates
Gate 1 or
Gate 2
® ®
LEARN BUTTON
To Program Additional Remote
LED LIGHT