Owner’s Manual & Installation Guide Vintage Faucets Note: Read all instructions before proceeding with installation. All specifications are subject to change without notice.
Table of Contents: Installing a Deck Mount Faucet................................................................................................... 2 Installing a Floor Mount Faucet .................................................................................................. 5 Installing a Wall Mount Faucet .................................................................................................... 8 NOTE: Due to the complexities of this installation a professional plumber is required.
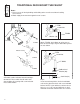
TRADITIONAL DECK MOUNT TUB FAUCET Notes: 1. Please ensure all local plumbing and building codes are observed when installing these faucets. 2. Water supply lines must be roughed in on 8” centers. T-FB1 Union Nut 17 T-DLBO 11 Washer (10) Step 2 9 T-HLVR 11 Attach T-DLBO deck elbows to union nuts on back of faucet body using one #10 rubber gasket on each elbow.
TRADITIONAL DECK MOUNT TUB FAUCET (cont.) 1 T-FB1 Union Nut 2 T-DLBO Cone Washer Flange (top of tube) Nut Step 5 U-FSUP Tub NOTE: U-FSUP SUPPLY LINES CAN BE CUT TO CORRECT HEIGHT. MAKE SURE TO CUT FROM BOTTOM OF TUBE. Attach #1 hand shower holder with #2 rubber gasket to outlet above diverter handle.
TRADITIONAL DECK MOUNT OPTIONAL SHUT OFF VALVE White Porcelain Valve Stem Handle Hub T-HLVR U-DVLV T-HPLV T-HCRS Step 1 Screw handle hubs onto valve stems. Disassemble handle and install onto stem by securing with screw included. Reassemble handle. NOTE: Rotate valve stem counter-clockwise until it stops to open valve prior to installing handle. Handle must be installed pointing up.
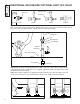
TRADITIONAL FLOOR MOUNT TUB FAUCET Notes: 1. Faucet is not for use on concrete floors. 2. Please ensure all local plumbing codes are observed during installation 3. Water supply lines must be roughed in on 8” centers. T-FB1 Union Nut 17 U-FRSR 11 Washer (10) 9 T-HLVR 11 Step 2 Attach hot and cold risers U-FRSR to union nuts on back of faucet body using one #10 rubber gasket on each riser. White Porcelain 1 11 T-HPLV 2 T-HCRS Step 1 Screw #11 handle hub onto hot/cold cartridges #9 and #17.
TRADITIONAL FLOOR MOUNT TUB FAUCET (cont.) End View Side View U-SBRC 8" NOTE: When using the U-SBRC support brace it must be installed onto faucet risers prior to securing to floor Tub Step 6 Slide #25 decorative escutcheon onto bottom of risers U-FRSR and push part way up. Screw #26 floor flange onto threaded portion of each riser until it stops. Step 7 Insert risers into hole in floor and secure floor flanges with appropriate screws/bolts for your flooring type.
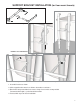
SUPPORT BRACKET INSTALLATION (for floor mount faucets) STEP 7 STEP 1 STEP 7 FIGURE 1 Bracket Assembly FIGURE 2 & 3 Slide Bracket FIGURE 4 Bend Strap FIGURE 5 Secure Strap 1. Assemble bracket as shown. 2. Slide support bracket onto risers before decorative escutcheons. 3. Bend metal strap around drain to create a clamp. Secure with screw provided. Recommended height is just below drain overflow. 4. Proceed with step 6 of faucet installation.
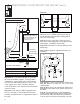
TRADITIONAL WALL MOUNT TUB FAUCET Notes: 1. Please ensure all local plumbing and building codes are observed when installing these faucets. 2. Mounting location depends on tub design and location. Be sure to identify tub height when determining faucet location. 3. There must be a minimum of 2" gap between top of tub rim and bottom of the faucet spout to comply with plumbing codes. (See fig. 4) 4. Water supply lines must be roughed in on 8” centers.
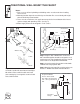
TRADITIONAL WALL MOUNT TUB FAUCET (cont.) Finished Wall 1 2 2" Minimum Step 5 Attach #1 hand shower holder with #2 rubber gasket to outlet above diverter handle. 28 18 6 Large end 1 Small end 28 Tub Figure 4 Step 6 Attach small end of #18 hand shower hose with #28 washer to outlet on side of #1 hand shower holder. Step 7 Attach large end of #18 hand shower hose with #28 washer to #26 hand shower and place in #1 holder. Step 8 Turn water and check all connections for leaks.
Contact information 548 South Columbus Avenue Mount Vernon, New York 10550 Phone: 888-560-5222 Info@giagni.
1 1