
Installation Guide


6
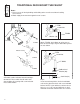
8"
TRADITIONAL FLOOR MOUNT TUB FAUCET (cont.)
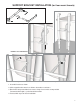
End View
Side View
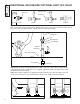
Step 6 Slide #25 decorative escutcheon onto
bottom of risers U-FRSR and push part way up.
Screw #26 floor flange onto threaded portion of
each riser until it stops.
Step 7 Insert risers into hole in floor and secure
floor flanges with appropriate screws/bolts for your
flooring type. (Hardware not included)
Step 8 Slide decorative escutcheon down to cover
floor flange.
Step 9 Tighten optional support bracket to risers
and drain
Dimension X
If using support bracket
3-3/4”
If NOT using support bracket
2-1/2” TO 3-1/2”
Step 4 Drill (2) 1-1/8” holes into floor on 8” centers
for hot and cold water supplies. If using U-SBRC
support brace, water supply holes must be drilled
at 3-3/4” from drain outlet (center to center). If not
using support brace, holes should be drilled at
2-1 /2” minimum to 3-1/2” maximum from drain outlet
(center to center).
Step 5 If desired, attach U-SBRC support bracket
to risers. See page 7. (Tub model LCAT-167 does
not have an exposed drain so support brace will not
be used)
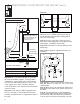
Step 10 Attach small end of #18 hand shower hose
with #28 washer to outlet on side of #1 hand
shower holder.
Step 11 Attach large end of #18 hand shower hose
with #28 washer to #6 hand shower and place in
#1 holder.
Step 12 Connect preferred ½” pipe (supplied by
installer) into female threaded riser U-FRSR from
under flooring. Make hot/cold water connections.
Turn on water and check all connections for leaks.
NOTE: When using the
U-SBRC support brace
it must be installed onto
faucet risers prior to
securing to floor
U-SBRC
Tub
Decorative
Flange (25)
Floor Flange
(26)
See Step 4
X
Washer
1/2" NPT Female Adapter
18
28
6
large end
1
Small
end
28