2005 Reign SERIES DUAL-SUSPENSION BIKE TECHNIC MANUAL 1
CONTENTS PRODUCT FEATURE SECTION 1. SIZING SECTION 2. REAR SHOCK SECTION 3. TORGUE SETTING SECTION 4.
Reign Product feature This bike is long travel XC bike. It can be go anywhere and anything. The rear suspension system is a new design which is called maestro, this maestro feature is vpp design and to get the overall suspension behavior to the best not only one point is the best . 1. Minimal power loss 2. Low kickback 3. Minimal brake lockout 4. Linear rising rate suspension design 5. Best traction The Reign has some features are design as below 1. 5.8” rear travel and 6” front fork 2.
1. Sizing The actual frame measurements and geometries are listed below. Size 15.5〞 16” 18〞 20〞 21” Top Tube (mm) 560 570 590 613 630 Seat Tube (mm) 394 406 457 508 533 Seat Angle 73.5° 73.5° 73.5° 73° 73° Head Angle 70° 70° 70° 70° 70° B.B. Drop (mm) -12 -12 -12 -12 -12 Rear Center (mm) 438 438 438 438 438 Wheel Base (mm) 1071.4 1082.2 1105.5 1127.1 1145.5 2.Rear shock The Reign series is all purpose dual suspension long travel XC bike.
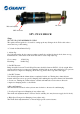
Air valve Rebound adjuster SPV Air Valve SPV 3 WAY SHOCK Setup SPV SET-UP QUICK REFERENCE GUIDE This quick reference guide is to be used for setting up the any Swinger shock. Follow this order to ensure the best possible tuning. * Coil and Air Shock Initial Set Up 1. Adjust Sag: Sag is the amount the shock compresses under normal body weight. On the air shock, there are sag incrementations on the inside of the shock that can be used to help adjust sag. Cross country: Freeriding: 25-30% Sag 30-40% Sag 2.
*Note: On the 6-way shock, please make sure that the two compression adjuster knobs on the reservoir are fully open when setting the shock pressure and volume. You can turn them after you set up the pressure and volume adjuster to achieve more compression damping.
3. Torque settings The bolts used to attach the rear suspension unit are very high grade products factory installed to specific torque specification. If it becomes necessary to remove or tighten the pivot bolts extreme care should be taken when re-tightening them. All bolts should be cleaned and re-set using LocTite Primer (﹟243) All bolts location and tighten torque please refer to the illustration below. 2 7 4 3 1 5 6 Torque settings: 1. 2. 3. 4. 5. 6. 7.
4.