User Manual Model BL300-1/BL300-2 Digital Cordless Phone
TABLE OF CONTENTS Important Safety Instructions ..................................................................................................... 3 Safety Instructions for Handset Battery Pack ............................................................................ 4 LCD Display .............................................................................................................................. 6 Getting Started................................................................................
Important Safety Instructions BEFORE USING YOUR TELEPHONE EQUIPMENT, BASIC SAFETY PRECAUTIONS SHOULD ALWAYS BE FOLLOWED TO REDUCE THE RISK OF FIRE, ELECTRIC SHOCK AND INJURY TO PERSON, INCLUDING THE FOLLOWING: 1. Read and understand all instructions. 2. Follow all warnings and instructions marked on the product. 3. Unplug this product from the wall outlet before cleaning. Do not use liquid cleanser or aerosol cleanser. Use a damp cloth for cleaning. 4.
e. f. If the product has been dropped or cabinet has been damaged. If the product exhibits a distinct change in performance. 14. Avoid using a telephone (other than a cordless type) during an electrical storm. There may be a remote risk of electrical shock from lightning. 15. Do not use the telephone to report a gas leak in the vicinity of the leak. 16. This power unit is intended to be correctly oriented in a vertical or floor mount position. 17. Use only with Class (Class 2) power source 7.5VDC 320mA.
Handset Layouts Redial / Up key CID key / down key Left soft key ( SKL ) /Menu OK key Right soft key ( SKR ) / Intercom key Right key Phonebook key Left key/Mute key External Call key/Flash key Speaker phone key End call key Asterisk / Ringer off key Pause / Space key Hash key / Lock key 5
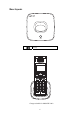
Base layouts Paging CID Charger suitable for Model BL300-2 6
LCD Display Main Menu idle Icon Small Icon Icon Name Battery icon Key lock icon Line in use icon Speak phone icon Mic mute icon No ring icon Signal icon Alarm icon Large Icon Date & Time icon Calls List icon Display Setup icon Base Setup icon Phone Book icon HS Settings icon Getting Started Install and Charge the Battery Pack 1 2 3 Open the battery compartment by sliding the cover down. Plug the Battery Pack connector into the Handset socket, then place the battery pack and wires in the compartment.
Place the handset in the base station to charge for 16 hours prior for first use. If you don’t properly charge the phone, battery performance will be compromised. Connecting the Base Station and Power Plug Connecting the plugs to the corresponding sockets in the base station (they can not be connected incorrectly because the sockets and plugs are designed prevent reverse poling). Lay the cable under the telephone to the rear. Plug the telephone line in the telephone connection socket.
Features We are very pleased that you have purchased this highly sophisticated, cordless telephone which is equipped with the following features: 1. 2. 3. 4. 5. 6. 7. 8. 9. 10. 11. 12. 13. 14. 15. 16. 17. 18. 19. 20. 21. 22. 23. 24. 25.
Using the Handset Telephone Basic Operation Making Internal Calls If more than one handset is registered on the base station, internal calls can be made free of charge. Press [SKR] key. Press or key to select the required handset (Handset 1, Handset 2…). Press [SKL] key to carry out the conversation. Press key to end the call. Note: During the conversation, you can use levels). or key to adjust the speaking volume (5 Making External Calls Pre-dialing: Press key and wait for a dialing tone.
After the connection is established, user can view Redial、Calls List、Phone Book by pressing [SKL] button. ● Press key to terminate the call. Receiving External Calls When an external call is received, all handsets registered and the base station ring ,and flashes in the handset display, if configured, the telephone number of the caller appears (network depended). If the caller has been entered in your phone book, the name appears. ● Press key to establish the connection.
Save Redial Memory ● Press key to view the dialed calls. ● Press or key to select the desired record. ● Press [SKL] key to enter Redial menu.. ● Press or key to select [Save Number] and press [SKL] key. ● Enter name (max. 15 characters) and press [SKL] key when finished. ● Press or key to select a group and press [SKL] key. Delete a Single Redial Memory ● Press key to view the dialed calls. ● Press or key to select the desired record. ● Press [SKL] key to enter Redial menu..
● Press or key to select [Use Number] ● Press [SKL] button to use the telephone number, you may edit the number and make the call, but the edited number cannot be saved in this option. Dialing from the Phone Book ● Press button when in standby mode, the first entry in the phone book appears. Note: If there is no record in phone book, empty information will display ● Press or key to select the required subscriber from the phone book. ● Press key to dial the number.
Three Party Conference After have received an external call, it is possible to include a second handset in the conversation (three way conference). ● Press [SKR] key to hold the external call and initiate an internal call. ● Press or key to select the required handset (Handset 1, Handset 2…) that needs to participate in the conference (e.g. 2). ● Press [SKL] key to establish the conference call after the other handset answered the internal call.
In standby mode, press key to access Redial In standby mode, press key to access Call List In standby mode, press key to enter Phone Book. Phone Book The telephone can store up to 50 entries in the phone book. Store numbers frequently used in order to be able to dial them quickly and easily. When the function is supported by the telephone provider service and the caller, the handset displays the name of the caller (when stored in the phone book). New Entry ● Press [SKL] button to enter the main menu.
● Press [SKL] key to access phone book menu, and then press or to select the submenu [Delete Entry]. ● Press [SKL] key to delete the entry, and the LCD will show “Delete?” ● Press [SKL] button to confirm. Edit Entry ● Press [SKL] button to enter the main menu. ● Press or key to select [phone Book]. ● Press [SKL] button to enter [phone Book]. ● Press or key to select a desired entry. ● Press [SKL] key to access phone book menu, and then press or to select the submenu [Edit Entry].
Date & Time ● Press [SKL] button to enter the main menu. ● Press or key to select [Date&Time]. ● Press [SKL] button to enter [Date&Time]. Enter the date (MM:DD:YY). ● Press [SKL] button. Enter the time (HH:MM). ● Press key to switch the format(am/pm/24). ● Press [SKL] button to confirm the date/time setting. Call List IMPORTANT: To use the “Call List” function, you must subscribe to your network operator’s Caller Line Identification (CLI) service. Call List can contain up to 30 records.
If you choose [Delete All], ● Press [SKL] key to delete the entry, and the LCD will show “Delete All?” ● Press [SKL] button to confirm. If you choose [Use Number], press [SKL] key to view user number. Display Setup ● Press [SKL] button to enter the main menu. ● Press or key to select [Display Setup]. ● Press [SKL] button. Wallpaper ● Press or key to choose the selection [Wallpaper] through the submenu [Display Setup]. ● Press [SKL] button.
Language ● Press or key to choose the selection [Language] through the submenu [Display Setup]. ● Press [SKL] button. ● Press or key to select the language. ● Press [SKL] button to confirm the setting. Base Setup ● Press [SKL] button to enter the main menu. ● Press or key to select [Base Setup]. ● Press [SKL] button to access Base Setup menu. Ringer ● Press or key to choose the selection [Ringer] through the submenu [Base Setup]. ● Press [SKL] button.
[Ring Tone 5] , [Ring Tone 6] ● Press [SKL] button to confirm the selection. Dial Mode ● Press or key to choose the selection [Dial Mode] through the submenu [Base Setup]. ● Press [SKL] button. ● Press or key to select [Tone] or [PULSE]. ● Press [SKL] button to confirm the selection. MW Indication If you have subscribed to a voice messaging service, the icon will be displayed to alert you if you have a new messages waiting.
Ringer Setup Ringer Volume ● Press or key to choose the selection [Ringer Setup] through the submenu [HS Settings]. ● Press [SKL] button. ● Press or key to choose the selection [Ringer Volume] ● Press [SKL] button. ● Press or key to select a ringer volume: [Ringer Volume 1], [Ringer Volume 2], [Ringer Volume 3], [Ringer Volume 4], [Ringer Volume 5] or [Off]. ● Press [SKL] button to confirm. Ext.Ringtone ● Press or key to choose the selection [Ext.Ringtone] through the submenu [Ringer Setup].
Group Melody ● Press or key to choose the selection [Group Melody] through the submenu [Ringer Setup]. ● Press [SKL] button. There are 6 pre-set caller groups: [VIP], [Business], [Family], [Friends], [School] and [Others]. ● Press or key to choose one of the groups. ● Press [SKL] button. ● Press or key to select one type of ring tone (14 ring melodies). ● Press [SKL] button to confirm. Set Alarm ● Press or key to choose the selection [Set Alarm] through the submenu [HS Settings].
Auto Talk The automatic talk function enables the incoming call to be taken immediately when the handset is removed from the base station. ● Press or key to choose the selection [Auto Talk] through the submenu [HS Settings]. ● Press [SKL] button. ● Press or key to select [Off] or [On]. ● Press [SKL] button to confirm the setting Registration ● Press or key to choose the selection [Registration] through the submenu [HS Settings]. ● Press [SKL] button.
show on the display. ● Press [SKL] key to confirm. Select Base ● Press or key to choose the selection [Select Base] through the submenu [HS Settings]. ● Press [SKL] button. ● Press or key to select a Base. ● Press [SKL] button to confirm the selection. Tones On/Off ● Press or key to choose the selection [Tones on/off] through the submenu [HS Settings]. ● Press [SKL] button. ● Press or key to choose [Key tone], [Battery Low] and [Out of Range]. ● Press [SKL] button.
Consumer Information 1. This equipment complies with Part 68 of the FCC rules and the requirements adopted by the ACTA. On the back of this equipment is a label that contains, among other information, a product identifier in the format US: DDKW401BBL300X. If requested, this number must be provided to the telephone company. 2. An applicable certification jacks Universal Service Order Codes (USOC) for the equipment is provided (i.e., RJ11C) in the packaging with each piece of approved terminal equipment.
3) This device complies with part 15 of the FCC Rules. Operation is subject to the following two conditions: (1) This device may not cause harmful interference; and (2) This device must accept any interference received, including interference that may cause undesired operation. 4) For body worn operation, this handset has been tested and meets the FCC RF exposure guidelines. Use of accessories may not ensure compliance with FCC RF exposure guidelines.
If you are not totally satisfied with this GFM product,you may return it to any Meijer store for a full refund within 6 months(180days)of purchase when accompanied by a receipt. For customer support,please call(866)845-9436 or go to www.gfmproducts.com. Dist.by wholesale Merchandisers,Inc.