
Instructions / Assembly

ADJUSTABLE PIPE FLASHING #23190
INSTALLATION GUIDELINES
These basic installation guidelines are for use with typical or standard applications. It is always recommended to seek advice from a licensed
professional, and to check with your local building inspector or building permit office for approvals and possible variations that may apply.
CAUTION!
Working above grade is inherently dangerous, be sure that proper fall protection measures are in place.
When working with power tools and sheet metal, gloves and eye protection are absolutely required.
25 mil Aluminum Base with Adjustable Elastomer Collar • 1 ¼ - 1 ½ inch, 2 inch & 3 inch
Do not use petroleum based mastics, sealing compounds or paint on elastomer collar
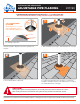
Using the pull tabs, adjust the size of the opening to fit
the pipe.
1. After shingling up to the pipe, slide flashing down over pipe.
3. Secure flange with 6 roofing nails. 4. Continue shingling above the vent pipe to complete the
installation. The tight neoprene seal means there's no need for
any sealant at the base of the pipe.
3 'N' 1 ADJUSTABLE
FLASHING
All tabs intact for 1 ¼ - 1 ½" pipes
Remove Pull Tab A for 2" pipes
Remove Pull Tabs A & B for 3" pipes
FLANGE
METAL BASE
PULL TABS
ELASTOMER
COLLAR
(A)
(B)
3 'n' 1 Flange: 10 ¾" x 14 ½"
3
2
1
Push down on
tab to break,
then pull up
to remove