
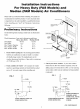
Installation guide


4. CHECK FORANYTHING THAT COULD BLOCK
AIRFLOW - check area outside of window for tldngs
such as shrubs, trees, or awrdngs. Inside, be sure
furniture, drapes, or blinds wifl not stop proper airflow:
5. Check the available electrical service - power sut_ly must
be the same as that shown on the unit serial nameplate,
(See Owner's Guide for serial plate location.) Power cord
is 48"loug. Be sure you have an outlet near.
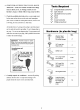
Tools Req u ired
%/ a la_e flat blade screwdriver
_/ tape measure
%/ adjustable wrench or pfiers
%/ pencil
%/ Level
%/ Socketwrenches
-./ Phillips screwdriver
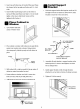
All rnodels have a 3-prong service plug to provide proper
service and safe positive groudiug. Do not change plug in
any way. Do not use an adapter plug. It'your present wall
outlet does not match your plug, call a qualified electrician
to make the needed change.
NN#,I_: Avoid fire hazard or electric
shock. Do not use an extension oord or an
adaptor plug. Do not remove any prong from
the power cord.
Grounding type wall
receptacle
/6"0 not, under an'y_\
cut,
Nremo_
Power supply cord
with 3-prong grounding
plug and current
detection device
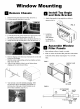
6. Carefully unpack air conditioner - remove all packing
material. Protect floor or carpet from damage. Two
people should be _Lsedto move and i_stall unit.
Hardware (in plastic bag)
Washer Head
LockingScrew
For window panels
3/4" Long Hex-
Head Screw
Safety Lock
1/2"Long Screw
and Locknut
3/4" Long Flat
Head Bolt and
Locknut
Sill Angle Bracket
Long hex-head
locking screw for
top angle, side
retainer 5/16"
Long
Qty.
2
3
4 ea.
2 ea.
2
fO
2