USERS’ MANUAL Aivia M8600 Wireless Macro Gaming Mouse Model: 28715860000CBS Aivia M8600 Wireless Macro Gaming Mouse Receiver Model: 28715860000CBS-RX 1
Aivia M8600 Wireless Macro Gaming Mouse Aivia, an integrated acronymic word, is derived from its key features – advanced, intuitive, and versatile interface archetype. The series is to emphasize the combination of subconscious, design and function as well as the pursuit of archetype. GIGABYTE believes each mouse and keyboard are the scrupulous work of mankind’s brainpower. Aivia is not only an extension to the human intellect, but also an intuitive extension to the use of artificial intelligence.
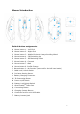
Mouse Introduction Default button assignments A Mouse button 1 – Left Click B Mouse button 2 – Right Click C Mouse button 3 – Middle Click and 4 ways Scrolling Wheel D Mouse button 4 – DPI Switching Up E Mouse button 5 – DPI Switching Down F Mouse button 6 – Forward G Mouse button 7 –Back H Mouse button 8 –Profile Change I Mouse button 9 – No function (reserved for the left hand mode) J Cable Lock/ Unlock Switch K Pro-laser Gaming Sensor L Battery Charging Connector M ID Connecting Button N
Installation Wireless Mode 1. Insert the battery into M8600 2. Switch on M8600. 3. Connect the Charging Dock to your computer with the mini-USB cable. 4. Press the connecting buttons on M8600 and Charging Dock at the same time. When the pairing process is completed, your M8600 is then ready for use in wireless mode. 5. To charge M8600 in wireless mode, just place it on the Charging Dock. There is also a spare charging battery to replace.
LED Light System M8600 has a profile/Battery/Sensitivity LED indicator on its front side, which displays the status of profile/ battery life/sensitivity/ stage. PROFILE INDICATOR The LED color of mode indicator would change along with profile switch. There are 5 different LED colors corresponding 5 profiles to change over on the mouse. The LED color could be selected from the GHOST Engine software based on your preference.
GHOSTTM Macro Engine GHOSTTM Macro Engine supports Windows 98, Windows 2000, Windows XP, and Windows7. Install the software to assign buttons and set up your personal profile. Please make sure to connect your M8600 with mini USB cable to the PC as a wired mode while editing the function through GHOSTTM Engine software. (In a wireless mode, you are only allowed to change sensitivity, left-handed/right-handed mode, and gaming/power saving mode in GHOSTTM Engine.
MACRO EDITING The macro editing tab allows you easily to record all the commands, including key bindings and the press of mouse button. Each single macro also can be imported and exported onto your hard disk for further usage. Start with: Step1 Click "Record the duration or intervals" if you'd like to record intervals between two commands. Step2 Double-click “Cycle through selection of action mode” to change the execute mode.
Export To export your macro to the PC. Import To import a macro to the macro editing in GHOST engine application program. Re-edit the macro Dragging the macro script back to macro editing allows you to re-edit this macro. SENSITIVITY/ SCROLLING Sensitivity As default setting, there are three sensitivity stages: 800, 1600, 3200 and 5600DPI (dots per inch). You can set up preferred sensitivity value of three sensitivity stages , then you can simply adjust through on-the-fly switch .
Product Specification Mouse and Receiver: Antenna Gain=0dBm Operating Frequency: 2402/ 2439/ 2450/ 2411/ 2468/ 2425/ 2447/ 2479MHz Channel Number: 8 channels Transmitter Output Power: 0 dBm Modulation:2.4G GFSK modulator Operating Temperature Range: 0°C(32°F) ~ 40°C(104°F) Power Type of wireless module: Mouse : Battery supply voltage Receiver : NB or PC USB Port Supply Voltage Battery (assembled in the mouse) Battery Pack: BURNABY INTERNATIONAL TECHNOLOGY Model: SANYO NP 80/ 3.
the instructions, may cause harmful interference to radio communications. However, there is no guarantee that interference will not occur in a particular installation If this equipment does cause harmful interference to radio or television reception, which can be determined by turning the equipment off and on, the user is encouraged to try to correct the interference by one or more of the following measures: -Reorient or relocate the receiving antenna.