GN-AP02G Wireless Access Point User’s Manual www.gigabyte.com.
Federal Communication Commission Interference Statement This equipment has been tested and found to comply with the limits for a Class B digital device, pursuant to Part 15 of the FCC Rules. These limits are designed to provide reasonable protection against harmful interference in a residential installation. This equipment generates, uses and can radiate radio frequency energy and, if not installed and used in accordance with the instructions, may cause harmful interference to radio communications.
Contents Chapter1 Introduction ....................................................…………............4 Overview .........................................................................…………4 Features ........................................................................…………4 Package Contents ..........................................................………….5 The Rear Panel ..............................................................………..5 The Front Panel ......................................................
Chapter1 Introduction Overview Thank you for using Gigabyte GN-AP02G Wireless-G Access Point. The IEEE 802.11g standard is designed as a higher-bandwidth - 54M bit/sec - successor to the popular 802.11b, or Wi-Fi standard, which tops out at 11M bit/sec. An 802.11g access point will support 802.11b and 802.11g clients. The GN-AP02G Wireless-G Access Point lets you connect IEEE 802.11g or IEEE802.11b devices to the network.
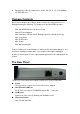
♦ Dynamically scales the data rate to 54, 48, 36, 24, 18, 12, 9, and 6Mbps for IEEE 802.11g Package Contents Before the installation procedures, please ensure the components are not damaged during the shipping.
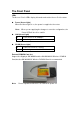
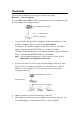
The Front Panel LEDs The Access Point’s LEDs display information about the Access Point’s status. Power (Green Light) When the Green light is on, the power is supplied to the router. Note: When you are applying the changes to save the configuration, the Power LED will be off for a while. LAN (Green Light) On The link active at 10/100Mbps. Flicker Data is being transmitted/received. WLAN (Green Light) On The wireless function is acting. Flicker Data is being transmitted/received.
Chapter 2 Installation Hardware Requirements To use the Wireless Access Point on your network, each computer may need the following requirements: An installed 802.11b/g wireless adapter. An Ethernet LAN switch or hub. A wired RJ-45 Ethernet cable System Requirements A Computer with Windows, Macintosh, or Linux-based operating system. To run AP Manager, you need a computer with Windows operating system.
Hardware Installation Follow these steps to install the Wireless Access Point. 1. Choose a proper place for Access Point. In general, the best location is at the center of your wireless coverage area, within line of sight to all wireless devices. Keeping clear of metal obstructions and away from direct sunlight. 2. Place the Access Point in the desired location. Normally, the higher you place the antenna, the better the performance will be. The antenna position enhances the receiving sensitivity. 3.
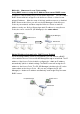
Illustration There are two installation mode for your reference as follow: Method 1: Static IP address If you are Not using a DHCP server in your network, you can configure the AP by connecting to the computer directly. PC(AP Manager) 192.168.1.x AP - DHCP (Disable) 192.168.1.1(default) 1. You will need to assign a Static IP Address to the computer that you are using to configure the Access Point on the same subnet. For instance, the default IP address of the Access Point is 192.168.1.
Method 2: Numerous Access Points setting Using DHCP server to setup the IP Address then remove DHCP server If require to setup as many Access Points at the same time. You can setup a DHCP Server and let it assign IP to all the Access Points so it has its own unique IP address. After the setup is finished, and then remove or disabled DHCP Server at last. Now, you can use the AP Manager to find all Access Points in your network, and then setup the N-Access Points as static IP address one by one.
Chapter3. Access Point Manager The Wireless Access Point can be configured through the AP Manager Utility .The Gigabyte Access Point Manager is used to configure Gigabyte Access Points. Note: The performance of wire line link is better than wireless link between the AP Manager and each Access Point. To use the wire line link to manage the Access Point is recommended. Installing the Access Point Manager Please follow these steps to install the Gigabyte AP Manager in the Windows. Step1.
Step4. Type the User Information then click “Next”. Step5. Click “Next” to accept the default directory or “Browse” to another location.
Step6. Click “Next”. Step7. Click “Next”.
Step8. Please wait a while. Step9. Click ”Finish” to complete setup.
Using the Access Point Manager You can launch Gigabyte AP Manager through Start \ Programs \ Gigabyte AP Manager Utility \ Gigabyte AP Manager. Enter the default password “admin” and click “OK” button. It will automatically search for Access Points on the same subnet when you open the Gigabyte AP Manager. You may click the icon to searching for Access Points manually.
Tree structure ESSID (GIGABYTE) AP Name (GN-AP02G) MAC Address (0020ED001700) Menu bar Tools Allow you to “search” for AP by ESSID, AP Name, MAC Address, and IP Address and “Connect to AP by IP” And allow you to “Save”, “Load” the AP configuration and “Copy”, “Paste” the configuration at the current page. Besides, it includes both ”System Reboot” and “Load” Default? Password Allow you to change the AP Manager password and set the SNMP community string.
Tool bar Find Access Point Find all AP in the same subnet. Save AP Configuration Save all setting of the AP to a temp file. Load AP Configuration Load the setting of the temp file that you saved before to the current AP. Page Copy Copy the setting of the current page. Page Paste Paste the setting you has copied to the current page.(You can paste the setting of AP1 to AP2 at the same tab page.) System Reboot Reboot the Access Point. Load Default Set the Access Point to the manufacture default.
System Page The System Page displays the Device Information and the Change Community String function. Device Information The Device Information include the AP name, MAC address, device description, the version information, the wireless type and card config type. 1. You can change the AP Name to whatever unique name, which can represent this AP. 2. Based on the “Card Config Type” you can choose which wireless type you want to use. Note: 1) Please expand the Wireless Lan card when power off.
Change Community String This function can let you change the community string to the AP. You can change a new community string on purpose to prohibit other AP Manager access and manage your AP. After you change the community string to AP, you need to do two following actions. 1. Use Password->Set Community String on the Menu Bar to set the community string to the AP manager. The AP Manager and the AP should have the same community string.
IP Config Page The IP Configure tab allows you to configure the IP parameters of the access point. IP Address Use this option to assign an IP address to the access point. The default IP address is 192.168.1.1. Please make sure the assigned IP address is unique on your network. Subnet Mask Specify the subnet mask of the access point. The default subnet mask is 255.255.255.0. Gateway Enter the IP address of the default route. The default gateway is 192.168.1.254.
If you want to get IP address from the DHCP server automatically on your network, you will select “Client Enabled”. Or you want to use the Access Point as a DHCP server to automatically assign dynamic IP address on the network, you will select “Server Enabled”. DHCP Client Range & DNS If you select the “Server Enabled” setting, please input the IP address range and the DNS for your network. The DNS information provied by your ISP company. 802.1d Spanning Tree Enabled or Disabled the 802.
Wireless Operation Page Normally, you can have the wireless works smoothly even you didn’t change any item in this page. Region Because of the different region has a different open channel regulation, please check whether the default region value is your local area. If it did not appear properly region please contact your local distributor or authorized reseller immediately. Channel ID Please choose the channel, which you can get best performance. Normally, it doesn’t need to change.
Auto Rate In this item you can select either “Enable” or “Disable” The default value is ”Enable”. Enable If the selection is “Enable”, the transfer rate will automatically change to the optimum rate allowed. The range of auto-change will base on the setting of “Transmit Rate”.
Encryption Page This page is the security configuration of the wireless connection. Protects your information with the highest level of industry-standard WEP encryption: 64/128-bit for 802.11b standard, and up to 152-bit for 802.11g standards. When the “Disable” is selected there is no WEP encryption. When “64bit”, “128bit” or “152bit” selected there is encrypted date transfer to prevent unauthorized user to access the wireless network.
If the 802.1x -Dynamic WEP option is selected, the Radius/WPA page will appear as shown below. RADIUS server IP RADIUS Port RADIUS sercet RADIUS Re-Key Please assign a IP address to the primary RADIUS server(authentication server). The setting range is 1~65536 and the default value is 1812. This filed can key in up to 256 character. Under this option two setting are possible: "Enable” or “Disable”. The default value is “Enable”.
One of the biggest drawbacks to traditional WEP security is that changing the encryption key is optional. Even if you do switch encryption keys from time to time, there is no option for globally rekeying all access points and all wireless NICs. Instead, rekeying is a tedious manual process and is completely impractical for large organizations. After all, the instant you rekey an access point, none of the clients will be able to access it until they are also rekeyed.
When WPA option is selected, the Radius/WPA page will appear as shown below. There are three settings you can select : “TKIP”, “AES” and “Auto”. RADIUS server IP Please assign a IP address to the primary RADIUS server(authentication server). RADIUS Port The setting range is 1~65536 and the default value is 1812. RADIUS sercet This filed can key in up to 256 character. WPA Re-Key Under this option two setting are possible: "Enable” or “Disable”. The default value is “Enable”.
When WPA PSK option is selected, the Radius/WPA page will appear as shown below. WPA Algorithm WPA shared Key WPA-PSK Re-Key WPA PSK Interval There are three settings you can select : “TKIP”, “AES” and “Auto”. This filed can key in up to 256 character. Under this option two setting are possible: "Enable” or “Disable”. The default value is “Enable”. Enter a Rekey Interval (normally the unit is seconds). Verify the desired setting and then click the “Apply” button to set the value into access point.
64 (40) Bits, 128 (104) Bits or 152 (128) Bits There are three levels of encryption 64 bits, 128 bits and 152 bits. The 64 bits encryption is referenced as a lower level encryption. The 152 bits encryption is referenced as a higher level encryption. The 64 bits WEP encryption use 40 bits as a secret key, which can controlled by user, and 24 bits as the initialize vector, which user can not control. These two portions plus together is 64 bits encryption.
Advanced Page For enhance the security of the wireless network, this AP provide the MAC address filtering mechanism to prevent the unauthorized user access. Check “Enable MAC filter” and key in MAC address table, then only those MAC address in the table are allowed to connect to this AP. Enable MAC Filter Choose the ”Enable MAC Filter” and click the “Add” button to add more MAC addresses or click “Remove” button to delete the MAC addresses from the Authorized MAC Address table.
WDS (Wireless Distribution System) OperationMode The Access Point supports three operation modes: ”Access Point”, “Point to Point”, “Point to MultiPoint”. The default operation mode is “Access Point”. Access Point The operational mode is set to Access Point by default. This connects your wireless PCs to a wired network. In most cases, no change is necessary.
Change AP Manager Password User can change the administration password of the AP manger to prevent other user access to the AP Manager. On the Menu Bar (Password->AP Manager Password) can invoke the password change dialog. Please enter a new admin password and confirm admin password then press “OK” button. You have to enter this new password to log in when you want to use the AP Manager next time. Set Community String The community string defines the relationship between AP manager and the AP.
Appendix A: Specification Physical Interface The Wireless Access Point includes 1 RJ-45 Ethernet LAN ports, one init hole and one antenna. Item Feature Description 1. LAN Port x 1 RJ-45, Auto-sensing for 10/100M Ethernet LAN connection. 2. Init Bottom Initial reset 3. Wireless 1 external antenna and 1 internal antenna support diversity. Specification System Specification Date Rate 11/5.5/2/1 Mbps for IEEE 802.11b 54/ 48/36/ 24/ 18/ 12/ 9/6 Mbps for IEEE 802.