GN-BR402W FCC ID : JCK-GN-BR402W Wireless Broadband Router User’s Guide http://www.gigabyte.com.tw Rev. 1.
Contents 1. PRODUCT INTRODUCT ION.......................................................................................................1 1-1 1-2 1-3 1-4 About this Product.................................................................................................................................................1 Accessories ................................................................................................................................................................1 Specifications ...
1. Product Introduction 1-1 About this Product Thank you for using Gigabyte GN-BR402W Wireless Broadband Router. This product comes with high-performance transmission rate and compatible wireless connectivity for either your home or business and will allow you to access the data whenever you want. You will be able to enjoy the freedom that wireless networking delivers.
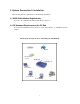
2. System Connection & Installation - The following lists the requirements for the hardware installation 2-1 ADSL/Cable Modem Requirements It needs to have ADSL/Cable Modem with RJ-45 connectors. 2-2 PC Hardware Requirement at the PC End It needs a PC with Ethernet card connection, or PC with USB Port, or a PCMCIA wireless adapter.
2-3 Connection for Ethernet User Step 1. Please prepare an Ethernet cable (RJ- 45) first. Step 2. Connect the Ethernet cable to the WAN port of the GN-BR402W. Step 3. Connect an end of the network cable to the ADSL/Cable Modem of the Ethernet connection port. Note: Please check if the light of the WAN port of the GN-BR402W is lit. If not, try to use the cross over (RJ- 45) Ethernet cable that comes with this product. Step 4. Connect any port of the area network LAN1, 2, 3, & 4 of the GN-BR402W to your PC.
3. Configuration 3-1 Preparation Generally speaking, using the GN-BR402W for Internet connection needs the ADSL or Cable service. We assume that you have already obtained the ADSL/Cable service from the local telephone company or the ISP Company, and get the related connection data ready. Such data include a. IP address provided by ISP b. Subnet mask c. Default gateway IP address d. Domain Name System (DNS) Server IP address - The ISP Company provides the above data.
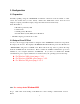
Step 2. Double click the “Network and Dial-up Connections”.
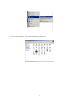
Step 3. Double click the “LAN CONNECTION”. Step 4. Click “Properties” in the box under LAN CONNECTION Status.
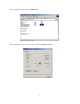
Step 5. Double click “Internet Protocol (TCP/IP)”. Step 6. Please select “Obtain an IP address automatically” and “Obtain DNS server address automatically”, and then enter “OK”. Now, the computer will obtain an IP address automatically from the GN-BR402W then you can go to Step11 directly. If you would like to obtain an IP address manually, please refer to Step7~Step10.
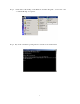
Step 7. Click “Start” at the desktop of the Windows, and then “Program”, “Accessories”, and “Command Prompt” in sequence. Step 8. Key in the command “ipconfig /release” in DOS mode, and then enter.
Step 9. Key in the command “ipconfig/renew”, and then e nter. Step 10. Key in “exit”, and then enter.
Step11. In your “IE Browser” select “Internet Options” under “Tools”. Step 12. In this dialogue box, please click “Connections” in the “LAN Settings”.
Step 13. Please DO NOT tick all of the selection boxes. Press “OK” after finishing with the setup, and refer to Section 3-3 for setup of broadband router. Note: If your ISP Company has a designated Proxy setting, key in the setting after you complete the GN-BR402W configuration Please jump to Section 3-3 to setup broadband router.
3-2-2 Setup Under the Window s 95/98/Me Ste p 1. Click “Start” at the desktop of the Windows, and select “Settings”, and then the “Control Panel”. Step 2. Double click “Network”.
Step 3. Under Network, double click the “Configuration”, and choose your appropriate setting “TCP/IP -> and your network card” below. Please choose the TCP/IP and the name of your network card. Step 4. Select IP Address. Please select “Obtain an IP address automatically”, and then press “OK”.
Step 5. In the window of “Gateway”, please clear all installed gateways and do not fill any of the blanks, and then press “OK”. Step 6. In the window of “DNS Configuration”, please select “Disable DNS” and then press “OK”.
Step 7. Please press “Yes”, and reset the computer screen as follows: After booting the computer, the computer will obtain an IP address automatically from the GN-BR402W then you can go to Step11 directly. If you would like to obtain an IP address manually, please refer to Step8~Step10. Step 8. After booting the computer, please click “Start” and choose “Run”. Step 9. Key in “winipcfg” , and press “OK”.
Step 10. In the pulled down menu, select your network card, press “Release All”, then press “Renew All”, and then press “OK”. Step11. Please select “Internet Options” under “Tools” of your IE Browser.
Step 12. In this dialogue box, please select “Connections” in the “LAN Settings”. Step 13. Please DO NOT tick all of the selection boxes. Press “OK” after finishing with the setup, and refer to Section 3-3 for setup of broadband router. Note: If your ISP Company has a designa ted Proxy setting, key in the setting after you complete the GN-BR402W configuration Please jump to Section 3-3 to setup broadband router.
3-2-3 Set Up Under Windows XP Step 1. Click the “Start” at the desktop of the Windows, and select the “Control Panel”. Step 2. Double click the “Network and Dial-up Connections”.
Step 3. Double click the “LAN CONNECTION”. Step 4. Click the “Properties” in the box under LAN CONNECTION.
Step 5. Double click the “Internet Protocol(TCP/IP)”. Step 6. Please select the “Obtain an IP address automatically” and “Obtain DNS server address automatically”, and then press “OK”. Now, the computer will obtain an IP address automatically from the GN-BR402W then you can go to Step11 directly. If you would like to obtain an IP address manually, please refer to Step7~Step10.
Step 7. Click the “Start” at the desktop of the Windows, and then the “Accessories”, and then the “Command Prompt”. Step 8. Input the “ipconfig /release” in the box of Command Prompt, and then press “OK”.
Step 9. Input “ipconfig/renew”, and then press “OK”. Step 10. Input “exit”, and then press . Step 11. Please select “Internet Options” under “Tools” of your IE Browser.
Step 12. In this dialogue box, please select “Connections” in the “LAN Settings”. Step13. setup. Please DO NOT tick all of the selection boxes. Press “OK” after finishing with the Note: If your ISP Company has a designated Proxy setting, key in the setting after you complete the GN-BR402W configuration Please jump to Section 3-3 to setup broadband router.
3-3 Setup for Broadband Router Step 1. Key in the preset IP address“192.168.1. 254” in the address column in the browser, and then press enter. Step 2.
Step 3. The homepage of the GN-BR402W will appear as shown below, and click the “Setup Wizard” on the screen, and such “Setup Wizard” will guide you to complete the necessary steps for the setup on screen as follows.
Step 4. “LAN Setup” is shown in the diagram. Each setup item of the local area network is default setting, and is not necessary to make change to it for normal operation. Please input the settings on your own if change is needed. DHCP Setup: - ”enable” indicates that the DHCP function of the GN-BR402W is initialized, and will automatically assign an IP address to the computer that is connected to the LAN end of the GN-BR402W. (Configure the DHCP starting address and the DHCP allocation number on your own.
27
Step 5. “WLAN Setup” is shown in the diagram. Each setup item of the Wireless local area network is default setting, and is not necessary to make change to it for normal operation. Please input the settings on your own if change is needed. DHCP Setup: - ”enable” indicates that the DHCP function of the GN-BR402W is initialized, and will automatically assign an IP address to the computer that is connected to the LAN end of the GN-BR402W.
Step 6. Choose your desired wide area network mode PPPoE: If you are using the hourly rate for the ADSL, please select this item. Note –PPPoE Please jump to Step 6 Dynamic IP Address: If you use the wideband fixed connection of ADSL/Cable Modem, but do not have a static IP, please select this item. Note –Dynamic IP Please jump to Step 10 Static IP Address: If you use the wideband fixed connection of ADSL/Cable Modem, but have a static IP, please select this item..
Step 7. If you select “PPPoE ” under the WAN TYPE SELECT, key in the User ID and password. The wideband company provides the above data, and press “Finish” to go to next step. Note: The “Idle Time” means after this time period if you do not use the Internet for a while, the time expired, and the WAN connection will be auto disconnected. The on-line charge will be stopped. IF you want to use the Internet again then the WAN connection will be auto reconnected to WAN. Step 8.
Step 9. Please wait a moment. Step 10. The IE browser will be automatically connected to the main menu, and your setup has completed by then. Please use your IE connect to Internet. If you can connect to the Internet , the setting is completed. If you use the Wireless Lan Card connection , please continue to section 3-4 Wireless Basic Setting.