Slate PC
Regulatory Notices CB : ● Only use batteries designed for this computer. The wrong battery type may explode, leak or damage the computer. ● Do not remove any batteries from the computer while it is powered on. ● Do not continue to use a battery that has been dropped, or that appears damaged (e.g. bent or twisted) in any way. Even if the computer continues to work with a damaged battery in place, it may cause circuit damage, which may possibly result in fire.
BSMI Notice (Taiwan Only) ● The symbol above must be attached to the product indicating compliance with the BSMI standard. ● Most Slat PC are classified by the Bureau of Standards, Meteorology and Inspection (BSMI) as Class B information technology equipment (ITE). ● Caution: Suggest to operate under 35˚C CCC (China only) ● On Class A systems, the following warning will appear near the regulation label: ● Warning: This is a Class A product.
The FCC RF safety requirement: The radiated output power of the wireless LAN Mini PCI Card and Bluetooth card is far below the FCC radio frequency exposure limits. Nevertheless, the Slate PC series shall be used in such a manner that the potential for human contact during normal operation is minimized as follows: (1) Users are requested to follow the RF safety instructions on wireless option devices that are included in the user’s manual of each RF option device.
Battery Maintenance Guidance Before you use your Slat PC on the road, you will have to charge the battery pack. The battery pack begins to charge as soon as the Slat PC is connected to external power using the power adapter. Fully charge the battery pack before using it for the first time. A new battery pack must completely charge before the Slat PC is disconnected from external power. It takes a few hours to fully charge the battery when the Slat PC is turned OFF.
Low Battery State : When the battery level is low, a notification message appears. If you do not respond to the low battery message, the battery continues to discharge until it is too low to operate. When this happens, your Slat PC goes into Suspend mode. There is no guarantee your data will be saved once the Slat PC reaches this point. CAUTION: To protect your Slat PC from damage, use only the power adapter that came with it because each power adapter has its own power output rating.
Congratulations on your purchase of the GIGABYTE Slate PC! Using GIGABYTE Slate PC for the First Time 2 1 3 1 Connect the power cord to the AC adapter. 2 Connect the AC adapter to the DC-in jack of the Slate PC. 3 Connect the power cord to the power outlet. 4 While the Battery Indicator lights on, press the Power Button to turn on the Slate PC. English This manual will help you to get started with setting up your Slate PC.
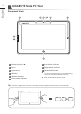
English 2 GIGABYTE Slate PC Tour Panoramic View 6 5 4 3 2 1 7 8 9 1 Directing Hot Key 7 Left Button of Mouse 2 Mic-in 8 Right Button of Mouse 3 Light sensor 9 Windows Button 4 Webcam 5 Webcam Indicator To control mouse direction; press the directing hot key to simulate as left key of mouse. 6 Power Status Indicator Back to Windows 8 Style UI mode. Tip: "Left click + Right click of mouse + Directing Hot Key" operate as the function of "Ctrl+Alt+Del".
3 English Top View 1 1 Speakers Left View 1 1 Power Button 2 Rotation Lock Button 3 Volume Control Key 4 SD Card Reader 5 Left Button of Mouse 6 Right Button of Mouse 7 USB Port 8 Headphone Jack 9 Microphone Jack 2 3 4 5 6 7 8 9 10 Press "+" or "-" to control volume. ● Press and release the Power button to turn on the operation system. Press "+" to enter into GIGABY TE BIOS Setup Utilit y.
English 4 Right View 1 2 3 4 5 1 DC-in Jack 4 SIM Card Slot 2 D-sub (VGA) Port 5 USB Port 3 HDMI Port Base View 1 1 Docking and extended battery connection ports
GIGABYTE Software Application You can activate GIGABYTE Smart Manager by double clicking on the shortcut icon on the desktop if the machine you purchased has the operation system built-in. GIGABYTE Smart Manager is an icon-based control interface, enabling users to intuitionally access common system setup as well as GIGABYTE exclusive utilities. Please be noted that the GIGABYTE Smart Manager interface, icons, utilities and software versions may vary based on the purchased models.
English 6 Smart USB Backup Guide (Original: Recovery Image USB) WARNING ●● You can backup original recovery image through this application in case of losing by device damage. ●● Y ou can backup original recovery image to USB disk and restore the system if any storage system replacement with the recovery USB disk. ●● B efore you restore the system through the recovery USB disk, please make sure that you have already made the backup of your data.
7 Recovery Guide When something is going wrong with the laptop operating system, the storage of the laptop has a hidden partition containing a full back up image of the operating system that can be used to restore the system to factory default settings. Note ˙˙If the storage has been switched or the partition deleted, the recovery option will no longer be available and a recovery service will be needed. ˙˙The recovery function is only available on devices with O/S preinstalled.
English 8 5 ▓▓ Choose “Refresh your PC” [Click on “Next”] > [Choose a target operating system.] > [Click on “Windows 8”.] > [Click on “Refresh” to execute recovery function.] Here are what will happen ˙˙Your files and personalization settings won’t be changed. ˙˙Your PC settings will be restored to factory default settings. ˙˙Apps from Windows Store will be kept. ˙˙Apps you installed from discs or websites will be removed. ˙˙A list of removed apps will be saved on your desktop.
9 1 Turn off and restart the laptop. 2 Press and release the Power button to turn on the operation system. Press “-” to enter into GIGABYTE System Recovery. Use Directing Hot Key to operate GIGABYTE Smart Recovery. 3 Choose “Troubleshoot” to enter the recovery settings. (Also you can choose “Continue” to exit recovery system and continue to Windows 8.1 for files or data backup.
English 10 ▓▓ Advanced options System Restore Use a restore point recorded on your PC to restore Windows. System Image Recovery Recover Windows using a specific system image file. Automatic Repair Fix problems that keep Windows from loading. Command Prompt Use the Command Prompt for advanced trobleshooting. UEFI Firmware Settings Change settings in your PC’s UEFI firmware. Startup Settings Change Windows Startup behavior.