Gaming Monitor User Guide Copyright © 2020 GIGA-BYTE TECHNOLOGY CO., LTD. All rights reserved. The trademarks mentioned in this manual are legally registered to their respective owners. Disclaimer Information in this manual is protected by copyright laws and is the property of GIGABYTE. Changes to the specifications and features in this manual may be made by GIGABYTE without prior notice.
Gaming Monitor User Guide CONTENTS SOFTWARE INSTALLATION.......................................................................................................4 Preparation..........................................................................................................................4 Installing the Software.....................................................................................................5 Uninstalling the Software................................................................
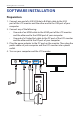
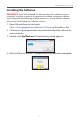
Gaming Monitor User Guide SOFTWARE INSTALLATION Preparation 1. Connect one end of a USB (A-Male to B-Male) cable to the USB port of the LCD monitor and the other end to the USB port of your computer. 2. Connect any of the following: • One end of an HDMI cable to the HDMI port of the LCD monitor and the other end to the HDMI port of your computer. • One end of a DisplayPort cable to the DP port of the LCD monitor and the other end to the DP port of your computer. 3.
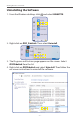
Gaming Monitor User Guide Installing the Software IMPORTANT! If you have installed an older version of the software on your computer, you have to remove the previously installed software first before proceeding with the following installation process. To uninstall the software, refer to the “Uninstalling the Software” section. 1. Open the web browser and enter https://www.gigabyte.com/Monitor/All-Series to the address bar. 2. Click on your gaming monitor name and download the software to your computer. 3.
Gaming Monitor User Guide Uninstalling the Software 1. From the Windows desktop, click and select GIGABTYE. 2. Right-click on OSD_Sidekick. Then select Uninstall. 3. The Programs and Features page appears on the screen. Select OSDSidekick from the list. 4. Right-click on OSDSidekick and select Uninstall. Then follow the on-screen instructions to uninstall the software.
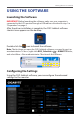
Gaming Monitor User Guide USING THE SOFTWARE Launching the Software IMPORTANT! Before launching the software, make sure your computer is connected to the LCD monitor through a USB cable as described in step 1 in “Preparation” on page 4. After the driver installation is complete, the OSD Sidekick software shortcut icon appears on the desktop. Double-click the icon to launch the software. Note: The first time you open the OSD Sidekick software, you need to run it as an administrator.
Gaming Monitor User Guide Note: • Most of the configuration options are similar with the OSD menu and Quick menu that you can directly access using the Control button on the monitor. For more information, refer to the monitor user guide. • To make the adjustment, generally, you can do one of the following: DD Drag the slider to adjust the setting. DD Click the ON/OFF button to enable or disable the function. DD Click the q icon to select the available option.
Gaming Monitor User Guide However, you can still do the following: DD Click E-sports Customize > to add an additional profile or import other profile. √√ To add an additional profile, select Add profile. Note: Make sure to configure the necessary Gaming & Picture settings before creating a new profile. √√ To import other profile from the specified folder, select Import profile. Browse the location and select the profile file to import. Then click OK to import the file.
Gaming Monitor User Guide Note: The default Profile folder is located at the OSDsidekick installation path. DD Click to export a profile to the specified folder. Browse the location and enter the file name. Then click OK to export the file.
Gaming Monitor User Guide Note: The default Profile folder is located at the OSDsidekick installation path. DD Click and do any of the following to customize the profile: - Rename the profile. - Click to modify the profile picture. Browse for the picture, and click OK to upload. - Click to confirm the modifications. - Click to reject the modifications. DD Click to delete the customized profile. DD Click to close the E-sports Customize menu.
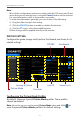
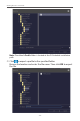
Gaming Monitor User Guide Customizing the Crosshair Cursor Set the CROSSHAIR setting to ON to activate the function. Then select one of the rectangular grids (marked in the illustration below) and click . Select the desired color and line thickness. Then draw a new crosshair cursor. Once complete, click Save. The new crosshair cursor will appear on the screen.
Gaming Monitor User Guide Exporting/Importing the Crosshair Cursor DD Click Export to export the Crosshair file to the specified folder. Browse the location and enter the file name. Then click OK to export the file. Note: The default Crosshair folder is located at the OSDsidekick installation path. DD Click Import to import the Crosshair file from the specified folder. Browse the location and select the Crosshair file to import. Then click OK to import the file.
Gaming Monitor User Guide Linking Apps to the Profile Click to link the profile with an application. Then select the application (*.exe) you want to link and click OK. When you open that application, the display setting will automatically change to the profile you linked.
Gaming Monitor User Guide Customizing the Dashboard Information Set the DASHBOARD setting to ON to activate the function. Then configure the following settings: DD In LOCATION, click the q icon to set the location of the options on the screen to Up or Down. Note: The DASHBOARD location on the right side or on the left side of the screen depends on the Game Assist location setting.
Gaming Monitor User Guide Customizing the Game Assist Settings Configure the following Game Assist settings: DD Set the REFRESH RATE setting to ON to enable displaying the refresh rate. DD Set the GAMING TIMER setting to ON to enable displaying the gaming timer. - Select either COUNT UP or COUNT DOWN the timer. - Click the q icon to set the countdown time. DD Set the GAMING COUNTER setting to ON to enable displaying the gaming counter.
Gaming Monitor User Guide HOT KEY Manage the keyboard shortcut to access a particular function which you are using frequently. Note: By default, the assigned hot keys appears on the HOT KEYS panel. Assigning a Hot Key 1. On the FUNCTION panel, scroll down to select the function you want to assign a hot key to. 2. Click to add the function to the HOT KEYS panel. 3. To assign a hot key to the function, do as follows: a) Click on one or more modifier key(s): ALT, SHIFT, and/or CTRL.
Gaming Monitor User Guide Modifier keys Symbol field Note: A function hot key consists of one or more modifier keys (Alt, Shift, Ctrl) plus a symbol. Editing a Hot Key To edit a hot key, do as follows: 1. Select the function on the HOT KEYS panel and click . 2. To assign a new hot key, do as follows: a) Click on one or more modifier key(s): ALT, SHIFT, and/or CTRL. b) Click on the symbol field and enter any desired symbol. c) Click to save the settings.
Gaming Monitor User Guide GENERAL SETTING Configure the display screen, system, and hot keys (for the Control button) related settings. Screen resolution & Frequency Display & System RGB Controller Hot Keys for Control button Changing the Hot Key for the Control Button On the QUICK SWITCH panel, you can change the preset hot key function for the Control button. Select the key position ( / select the desired option. / /( - 19 - ) and click the q icon.
Gaming Monitor User Guide ABOUT View the current firmware and software version and give you options to update the latest version. IMPORTANT! During the firmware updating process, do not turn off the monitor. Any interruption may cause the device to malfunction. Updating the Software Automatically Click LIVE UPDATE to check and automatically update software when a new version is available.
Gaming Monitor User Guide Updating the Firmware Manually Note: Updating firmware manually does not require Internet connection. 1. Click DOWNLOAD. Then download the latest firmware from GIGABYTE web site and save the file on your computer. 2. Click BROWSE. Then select for the firmware file (*.bin) and click OK. 3. The firmware file is displayed on the field. Click UPDATE to update the firmware to the latest version. 4. Wait until the updating process is complete.