GV-NX795T512H-RH GeForce™ 7950 GT Graphics Accelerator User's Manual Rev. 101 12MD-NX795THR-101R * The WEEE marking on the product indicates this product must not be disposed of with user's other household waste and must be handed over to a designated collection point for the recycling of waste electrical and electronic equipment!! * The WEEE marking applies only in European Union's member states. Copyright © 2006 GIGABYTE TECHNOLOGY CO., LTD Copyright by GIGA-BYTE TECHNOLOGY CO., LTD. ("GBT").
English Table of Contents 1. Introduction ......................................................................................... 3 1.1. Features ..................................................................................................... 3 1.2. Minimum System Requirements ................................................................... 3 2. Hardware Installation ........................................................................... 4 2.1. Board Layout ..................................
1.1. Features • • • • • • • • • Powered by NVIDIA® GeForce™ 7950 GT Graphics Processing Unit (GPU) Supports the newest PCI Express x16 Integrated with 512 MB DDRIII memory Supports DirectX 9.0c Supports NVIDIA® SLITM (Scalable Link Interface) technology (Note) Supports AV / S-Video and HDTV output Supports D-sub connector (by adapter) Supports 2 DVI-I connectors Supports HDCP (High-bandwidth Digital Content Protection) technology 1.2.
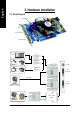
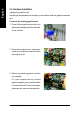
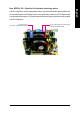
English 2. Hardware Installation 2.1.
DO NOT APPLY POWER TO YOUR SYSTEM IF IT HAS BEEN DAMAGED ON THE CARD. In order to ensure your graphics card working correctly, please use official Gigabyte BIOS only. Use none official Gigabyte BIOS might cause problem on the graphics card. -5- Hardware Installation English Expansion cards contain very delicate Integrated Circuit (IC) chips. To protect them against damage from static electricity, you should follow some precautions whenever you work on your computer. 1.
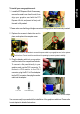
English 2.2. Hardware Installation Installing Your graphics card. Now that you have prepared your computer, you are ready to install your graphics accelerator card. To remove the existing graphics card: 1. Power off the computer and monitor, then disconnect the display cable from the back of your computer. 2. Remove the computer cover. If necessary, consult your computer's manual for help in removing the cover. 3. Remove any existing graphics card from your computer.
English To install your new graphics card: 1. Locate the PCI Express x16 slot. If necessary, remove the metal cover from this slot; then align your graphics card with the PCI Express x16 slot, and press it in firmly until the card is fully seated. * Please make sure that the gold edge connectors of the graphics card is securely inserted. 2. Replace the screws to fasten the card in place, and replace the computer cover.
English GIGABYTE Video Adapter for Nvidia Graphics Cards AV Out S-Video Out HDTV Component (Y+Pr+Pb) Connect to the TV-Out port on the graphics card. (1) Connecting HDTV Connect your HDTV cables to the video adapter according to the corresponding color. (Y= Green, Pr= Red, Pb= Blue) (2) Connecting S-Video If your TV has a S-Video connection, connect the SVideo cable from your TV to the S-Video Out port on the adapter.
In an SLI configuration, two SLI-ready graphics cards of the same model and the same manufacturers are connected together via SLI bridge connector in a system that provides two x16 PCI Express slots to scale graphics performance. The picture below shows that two graphics cards are linked in parallel in an SLI configuration. SLI bridge connector (provided by motherboard manufacturer) Two SLI-ready graphics cards of the same type.
English 3. Software Installation In this manual, we assume that your CD-ROM Drive letter to be Drive D: The installation of Windows® 2000 / Windows® XP drivers is very simple. When you insert the driver CD into your CD-ROM drive, you can see the AUTORUN window (if it does not show up, run "D:\setup.exe"). Then you can follow the guides to setup your graphics card driver. (Please follow the subsection 3.1.3 "Driver installation" to install the driver for your graphics accelerator.) 3.1.
Step 3. Click the "Next" button. Installing the components. Step 4. Click "Finish" to restart computer. Then the DirectX 9 installation is completed. - 11 - Software Installation English Step 2. Choose I accept the agreement and click the "Next" button.
English 3.1.3. Driver Installation A. New hardware found After the graphics card is inserted into your computer at the first time, the windows will automatically detect a new hardware in the system and pop out a "New Hardware Found" message. The following is the step-by-step installation guide. Step 1: Found new hardware wizard: Video controller (VGA Compatible) Click the "Next" button to install the driver. (There is a driver CD disk that came with your graphics accelerator, please insert it now.
Step 1. When autorun window show up, click Display Driver item. Step 2. When autorun window show up, Step 3. Click "Next" button. Windows installings the components. click Install Display Driver item. Step 4. Click "Finish" button to restart computer. Then the driver installation is completed. - 13 - Software Installation English B. Driver installation (Autorun Window) Insert the driver CD disk into your CD-ROM, and then you can see the AUTORUN window. If it does not show up, please run "D:\setup.
English 3.1.4. Taskbar Icon After installation of the display drivers, you will find a NVIDIA icon area. Click this icon to open the control panel. on the taskbar's status Right click the icon. You can adjust the properties of the graphics accelerator from here.
To access Display Properties pages, right-click the GIGABYTE icon on the taskbar and select Display Properties or right-click on Desktop and then select Properties. The Display Properties dialog box shows the information of display adapter, color, the range of display area, and the refresh rate. Settings (Resolutions and Color depth for Windows) You may adjust the screen resolution and color quality settings in this dialog box. You can move the slider to change the resolution.
English GeForce 7950 GT tab After pressing the Advanced button in Settings, you'll see the Plug and Play Monitor and NVIDIA GeForce 7950 GT Properties dialog box. Click the GeForce 7950 GT tab. (You can also click the NVIDIA icon on the taskbar and select Nvidia Display to access the GeForce 7950 GT properties page.
GeForce 7950 GT properties This page shows the Adapter, System and Driver version information. You can select other properties from the pop-out menu. nView Display Settings properties * nView allows you to connect separate displays to single graphics card. • nView Display mode: select your preferred nView display modes here. Options: Single display/ Clone/ Horizontal Span/ Vertical Span/ Dual View • Primary/Secondary display: select a single display or display pair.
English Dual-Monitor Setup: You can set the display to output from two monitors on the nView Display Settings page. This graphics card supports the following modes: (1) Clone Mode: Clone mode indicates that both displays in the display pair show images of the same desktop. Select Clone from the nView Display Mode list and click Apply. Clone Mode (2) Horizontal Span Mode: Horizontal Span mode indicates that both displays in the display pair function as one wide virtual desktop.
The sliders lets to decide whether your application should use quality or high performance texture. • Application profiles: Select the application profile from the list of profiles. • Global driver settings: Select the Settings item and move the slider below to set the degree of antialiasing to used in Direct3D and OpenGL applications. • Antialiasing settings value: allows to set the degree of the Global Driver Settings.
English Video Overlay Settings properties The Video Overlay Settings properties can adjust Overlay zoom controls and Overlay color controls. There is only one video overlay, which is only available on the Primary display. The video overlay controls are automatically activated during playback of any video file type that supports overlay adjustments. The "Adjust Colors" button will access "Color Correction" properties page.
The Temperature Settings properties can auto detected the GPU Core temperature. You can select the Notify when GPU core temperature exceeds threshold check box. Screen Resolutions & Refresh Rates properties The Screen Resolutions & Refresh Rates properties allows you to adjust the screen resolution, color quality and monitor settings (screen refresh rates). Or you can customize resolutions and refresh rates.
English 3.1.6. nView Properties Pages nView is a set of desktop tools designed to help you be more productive when using your graphics card. With nView you can set up multiple desktops to work with your applications. Multiple desktops give you extra desktop areas on which to run your applications so you won't have to crowd several open application windows on one desktop.
This tab contains information about the nView Desktop Manager. The setup wizard can also be accessed from this tab. nView Profiles properties This tab contains a record all nView display settings for easy software setup. nView Windows properties This tab allows you to control window and dialog box placement when using multiple monitors.
English nView Applications properties This tab allows you to control nView settings depending different applications. nView Desktops properties This tab allows you to create up to 32 unique desktops. nView User Interface properties This tab allows for customization of the nView user interface.
This tab provides special windows effects that you can apply to your applications. nView Zoom properties This tab provides dynamic zoom functionality on the desktop. Also enables full screen video playback via the video mirroring control button. nView Hot Keys properties This tab lets you perform various actions with shortcut keys or key combinations.
English nView Mouse properties This tab can modify and extend mouse behavior with kinematic actions. nView Tools properties This tab can improve nView functionality for mobile and desktop users.
With Windows running on your computer, you need to install the graphics card driver to take advantage of the higher performance, resolutions, and special graphics features of the graphics card. To ensure you install the latest driver, insert the Installation CD that shipped with your graphics card. To install the graphics card driver for Windows® 2000, please insert the Installation CD. Then the AUTORUN window will show up. Click Install Display Driver item, and follow the wizard to install the driver.
English 4. Troubleshooting Tips The following troubleshooting tips may help if you experience problems. Contact your dealer or GBT for more advanced troubleshooting information. Check that the card is seated properly in the PCI Express x16 slot. Ensure that the display cable is securely fastened to the card's display connector. Make sure that the monitor and computer are plugged in and receiving power. If necessary, disable any built-in graphics capabilities on your motherboard.
English 5. Appendix 5.1. How to Reflash the BIOS in MS-DOS Mode 1. Extract the downloaded Zip file to your hard disk(s) or floppy disk. This procedure assumes drive A. 2. Restart the computer in MS-DOS mode. (For Windows 2000/XP, you need a startup disk to restart the computer in MS-DOS mode.) 3. Change the command prompt to A:\>. 4. To back up the current BIOS, at the A:\> prompt, type[BIOS flash utility name] -s [BIOS file name] (example: gvf11 -s X795T9HR.F1) and press Enter. 5.
English 5.2 Connecting to a HDTV: Use the included component video adapter to connect a HDTV to the graphics card. Step 1: Connect the HDTV component cable to the adapter according to the corresponding color. (Y= Green, Pr= Red, Pb= Blue). Connect the TV Out cable from the adapter to the TV Out port on your graphics card. Step 2: After installation of the graphics card driver, right-click on Desktop and select Properties. When Display Properties dialog box appears, select the Settings tab.
GeForce 7950 GT Single Display Standard Modes Display Refresh Screen Rate Resolution (Hz) 320 x 200 60~75 320 x 240 60~75 400 x 300 60~75 480 x 360 60~75 512 x 384 60~75 640 x 400 (16:10) 60~75 640 x 480 60~240 720 x 480 60 720 x 576 50~60 800 x 600 60~240 848 x 480 60~240 960 x 600 (16:10) 60~240 1024 x 768 60~200 240 1088 x 612 (16:9) 60~200 240 1152 x 864 60~170 200 1280 x 720 (16:9) 60~150 170 1280 x 768 60~150 170 1280 x 960 60~150 170 1280 x 1024 60~150 170 1360 x 768 60~150 170 1600 x 900 (16:9) 60~1
English Display Screen Resolution 1600 x 1200 Refresh Rate (Hz) 60~100 120 1920 x 1080 (16:9) 30~85 100 1920 x 1200 (16:10) 60~85 100 1920 x 1440 60~85 2048 x 1536 60~85 2560 x 1600 60 (Dual-Link) Color Depth (bpp) 8bpp(256 color) 16bpp (65K color) 32bpp (16.7M) Standard mode 3 3 3 3 3 3 3 3 3 High mode 3 3 3 3 3 3 3 3 3 True mode 3 X 3 X 3 X 3 3 3 * This table is for reference only. The actual resolutions supported depend on the monitor you use.
English - 33 - Appendix
English GV-NX795T512H-RH Graphics Accelerator - 34 -