GV-N470UD-13I/ GV-N470OC-13I NVIDIA® GeForce GTX 470 Graphics Accelerator TM User's Manual Rev. 102 12MM-NV400-102R Copyright © 2010 GIGABYTE TECHNOLOGY CO., LTD Copyright by GIGA-BYTE TECHNOLOGY CO., LTD. ("GBT"). No part of this manual may be reproduced or transmitted in any form without the expressed, written permission of GBT. Trademarks Third-party brands and names are the properties of their respective owners. Notice Please do not remove any labels on this graphics card.
VGA Card GV-N470UD-13I Apr. 26, 2010 VGA Card GV-N470UD-13I Apr.
VGA Card GV-N470OC-13I May. 20, 2010 VGA Card GV-N470OC-13I May.
Table of Contents 1. Introduction ................................................................................................................ 5 1.1. Features ......................................................................................................................... 5 1.2. Minimum System Requirements .................................................................................... 5 2. Hardware Installation ...............................................................................
1. Introduction 1.1. Features • • • • • • • • Powered by NVIDIA® GeForce GTX 470 Graphics Processing Unit (GPU) Supports PCI Express 2.0 Integrated with 1280 MB GDDR5 memory Supports DirectX® 11 Supports NVIDIA® SLI (Scalable Link Interface) technology (Note 1) Supports 2 Dual-Link DVI-I connectors Supports 1 mini HDMI connector Supports HDCP (High-Bandwidth Digital Content Protection) technology TM TM 1.2.
2. Hardware Installation 2.1.
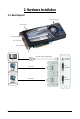
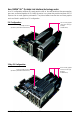
The GV-N470UD-13I/GV-N470OC-13I graphics card is a performance optimized high-end card. Power is taken from the PCI Express host bus as well as the external power connectors. NVIDIA power Connect power from the system power supply to the GeForce card(s).Use the connection method for your particular graphics card. • GV-N470UD-13I/GV-N470OC-13I:Connect two 6-pin PCI Express auxiliary power connectors coming fromthe computer power supply to the connectors on the top edge of the GeForce GTX 470 graphics card.
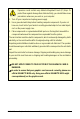
Expansion cards contain very delicate Integrated Circuit (IC) chips. To protect them against damage from static electricity, you should follow some precautions whenever you work on your computer. 1. Turn off your computer and unplug power supply. 2. Use a grounded wrist strap before handling computer components. If you do not have one, touch both of your hands to a safely grounded object or to a metal object, such as the power supply case. 3.
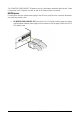
2.2. Hardware Installation Now that you have prepared your computer, you are ready to install your graphics card. Step 1. Locate the PCI Express x16 slot. If necessary, remove the metal cover from this slot; then align your graphics card with the PCI Express x16 slot, and press it in firmly until the card is fully seated. Make sure that the gold edge connector of the graphics card is securely inserted. Step 2. Replace the screw to fasten the card in place, and replace the computer cover. Step 3.
How NVIDIA® SLITM (Scalable Link Interface) technology works: In an SLI configuration, two/three SLI-ready graphics cards of the same model and the same manufacturers are connected together via SLI bridge connector in a system that provides two/three x16 PCI Express slots to scale graphics performance. The picture below shows that two and three graphics cards are linked in parallel in an SLI configuration. SLI Configuration: Two SLI-ready graphics cards of the same type.
3. Software Installation Notice the following guidelines before installing the drivers: 1. First make sure your system has installed DirectX 9 or later version. 2. Make sure your system has installed the appropriate motherboard drivers (for the motherboard drivers, please contact the motherboard manufacturer.) 3.1. Driver and Utility Installation 3.1.1. Driver Installation After installing the operating system, insert the driver disk into your optical drive.
Step 3: Click the Yes button. The system is installing the components. Step 4: Click the Finish button to restart the computer. Then the driver installation is completed.
3.2. Display Properties Pages Display Settings (Resolutions and Color Quality for Windows) To access Display Settings page, right-click on desktop and select Personalize, then the Personalization windows will show up. Select Display Settings to adjust the screen resolution and color quality settings. You can move the slider to change the resolution. You can click the item to change the color quality. Click the Advanced button for advanced settings.
3.3. Accessing NVIDIA Control Panel After installation of the display driver, right-click on the desktop and select NVIDIA Control Panel. The NVIDIA Control Panel is used to configure all your graphics card settings. Right-click on the desktop and select NVIDIA Control Panel. Or you can right-click on the desktop and select Personalize, and then the Control Panel\Appearance Personalization\Personalization window will show up. Select Display Settings.
Select the view of the NVIDIA Control Panel that is most appropriate for you. Standard Settings Advanced Settings The following pages provide details on configuring advanced settings. In the NVIDIA Control Panel, select a category to alter specific NVIDIA display settings. The categories are: 3D Settings Display Video In the NVIDIA Control Panel, change a view if you want.
3D Settings Tasks in the 3D Settings pages allow you to do the following: • Change the image and rendering settings of your 3D applications and games that utilize Direct3D and OpenGL technology. • Override the shipped clocked frequencies of your GPU and GPU memory to increase your GPU performance. • Assign specific 3D settings to a game so that these settings automatically load when a game is launched.
Display A variety of display features enable you to further manipulate and configure your display settings to optimize the use of your displays.
Adjust Desktop Color Settings Use this page to set the contrast, sharpness, and color depth (Digital Vibrance) of the images on your desktop. These changes will not affect any video playback. To change video color settings, go to Adjust Video Color Settings under the Video and TV section from the Start page. Adjust Desktop Color Settings You can adjust desktop color settings for your displays or enhance picture quality if you are using televisions.
Set Up Multiple Displays NVIDIA nView technology enables you to view your desktop in one of several multi-display modes to make the best use of the displays (monitors) that are connected to your computer. Dual-Monitor Setup You can set the display to output from two monitors on the Set Up Multiple Displays page. Select your preferred nView display modes here.
(3) As one large horizontal desktop (Horizontal span) (Note 1) Horizontal Span mode indicates that both displays in the display pair function as one wide virtual desktop. The width of each display is half the width of the total virtual desktop width. Horizontal Span Mode (4) As one large vertical desktop (Vertical span) (Note 1) Vertical Span mode indicates that both displays in the display pair function as one tall virtual desktop.
Video & Television Video and television features are similar to those for analog for optimal viewing. Tasks in the Video & Television pages allow you to do the following: • Adjust your television picture quality and video color settings for the best possible viewing in its environment. • Change the position and size of the desktop video to best fit your television screen. Adjust Video Color Settings Use the controls on this page to fine tune the color settings for video content on your display.
4. Troubleshooting Tips The following troubleshooting tips may help if you experience problems. Contact your dealer or GIGABYTE for more advanced troubleshooting information. Check that the card is seated properly in the PCI Express x16 slot. Ensure that the display cable is securely fastened to the card's display connector. Make sure that the monitor and computer are plugged in and receiving power. If necessary, disable any built-in graphics capabilities on your motherboard.
5. Appendix 5.1. How to Reflash the BIOS in MS-DOS Mode 1. Extract the downloaded Zip file to your hard disk(s) or floppy disk. This procedure assumes drive A. 2. Restart the computer in MS-DOS mode. (You may need a startup disk to restart the computer in MS-DOS mode.) 3. Change the command prompt to A:\>. 4. To back up the current BIOS, at the A:\> prompt, type[BIOS flash utility name] - s [ B I O S f i l e n a m e ] (example: gvf19 -s n470UD13I.F1) and press Enter. 5.
5.2.
Display Screen Resolution 1600 x 1200 Refresh Rate (Hz) 60~100 120 1920 x 1080 (16:9) 60~85 100 1920 x 1200 (16:10) 60~85 100 1920 x 1440 60~85 2048 x 1536 60~85 2560 x 1600 60 (Dual-Link) Color Depth (bpp) 8bpp(256 color) Standard mode 3 3 3 3 3 3 3 3 3 16bpp(65K color) High mode 3 3 3 3 3 3 3 3 3 32bpp(16.7M) True mode 3 X 3 X 3 X 3 3 3 * This table is for reference only. The actual resolutions supported depend on the monitor you use.
5.3. Regulatory Statements Regulatory Notices This document must not be copied without our written permission, and the contents there of must not be imparted to a third party nor be used for any unauthorized purpose. Contravention will be prosecuted. We believe that the information contained herein was accurate in all respects at the time of printing. GIGABYTE cannot, however, assume any responsibility for errors or omissions in this text.
Finally, we suggest that you practice other environmentally friendly actions by understanding and using the energy-saving features of this product (where applicable), recycling the inner and outer packaging (including shipping containers) this product was delivered in, and by disposing of or recycling used batteries properly.
GV-N400 Series Graphics Accelerator - 28 -