GV-RX80T256V Radeon X800XT Graphics Accelerator User's Manual Rev. 101 12MD-RX80T256V-101 Copyright © 2004 GIGABYTE TECHNOLOGY CO., LTD Copyright by GIGA-BYTE TECHNOLOGY CO., LTD. ("GBT"). No part of this manual may be reproduced or transmitted in any from without the expressed, written permission of GBT. Trademarks Third-party brands and names are the property of their respec tive owners.
English Table of Contents 1. Introduction .....................................................................................3 1.1. Features ................................................................................................. 3 1.2. Minimum System Requirement ................................................................ 3 2. Hardware Installation .......................................................................4 2.1. Board Layout ....................................................
English 1. Introduction 1.1. Features • Powered by ATI X800XT Visual Processing Unit (VPU) • Supports the newest PCI Express x 16 • Integrated with 128MB DDR memory • Supports DirectX 9.X • • • Features VIVO and D-Sub connectors Supports DVI-I connector Supports HDTV cable 1.2.
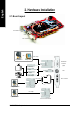
English 2. Hardware Installation 2.1.
1. Turn off your computer and unplug power supply. 2. Use a grounded wrist strap before handling computer components. If you do not have one, touch both of your hands to a safely grounded object or to a metal object, such as the power supply case. 3. Place components on a grounded antistatic pad or on the bag that came with the components whenever the components are separated from the system.
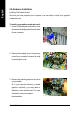
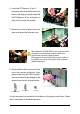
English 2.2. Hardware Installation Installing Your Graphics card. Now that you have prepared your computer, you are ready to install your graphics accelerator card. To install your graphics accelerator card: 1. Power off the computer and monitor, then disconnect the display cable from the back of your computer. 2. Remove the computer cover. If necessary, consult your computer's manual for help in removing the cover. 3. Remove any existing graphics card from your computer.
English 4. Locate the PCI Express x 16 slot. If necessary, remove the metal cover from this slot; then align your graphics card with the PCI Express x 16 slot, and press it in firmly until the card is fully seated. 5. Replace the screw to fasten the card in place, and replace the computer cover. After installing the GV-RX80T256V to your computer, please remember to connect at lease one power cable on the graphics card to the power supply connector.
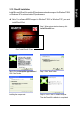
English 3. Software Installation In this manual, we assume that your CD-ROM Drive letter to be Drive D: The installation of Win® 2000 / Win® XP drivers is very simple. When you insert the driver CD into your CD-ROM drive, you can see the AUTORUN window (if it does not show up, run "D:\setup.exe"). Then you can follow the guides to setup your graphics card driver. (Please follow the subsection 3.1.3 "Driver installation" to install the driver for your graphics accelerator.) 3.1.
Install Microsoft DirectX to enable 3D hardware acceleration support for Windows® 2000 or Windows® XP to achieve better 3D performence. M Note: For software MPEG support in Windows® 2000 or Windows® XP, you must install DirectX first. Step 1. When autorun window show up, click Install DirectX 9 item. Click "Install DirectX 9" item. Step 2. Choose I accept the agreement and Click "Next" button. Step 3. Click "Next" button. Installing the components. Step 4. Click "Finish" to restart computer.
English 3.1.3. Driver Installation A. New hardware found After the graphics card is inserted into your computer at the first time, the windows will automatically detect a new hardware in the system and pop out a "New Hardware Found" message. The following is the step-by-step installation guide. Step 1: Found new hardware wizard: Video controller (VGA Compatible) Click "Next" button to install the driver. (There is a driver CD disk that came with your graphics accelerator, please insert it now.
Insert the driver CD disk into your CD-ROM, and then you can see the AUTORUN window. If it does not show up, please run "D:\setup.exe". Step 1. When autorun window show up, click Install Display Drivers (Radeon X800 Series) item. Click "Install Display Driver" item. Step 2. Click "Next" button. Step 3. Click "Yes" button. Setp 4. Click "Express" or "Custom" icon. Step 5. Click "Finish" button to restart computer. Then the driver installation is completed. - 11 - Software Installation English B.
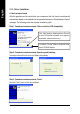
English 3.1.4. Utilities on Driver CD Insert the driver CD disk into your CD-ROM, and then you can see the AUTORUN window. If it does not show up, please run "D:\setup.exe". l Install V-Tuner2: Click "GIGABYTE Utility" item. Step 2. Click "Next" button. Step 3. Enter your name and company. Step 4. Click "Finish" button to restart computer. Then the V-Tuner2 installation is completed.
English l Install Hydravision : Click "Hydravision Install" item. Step 2. Click "Next" button. Step 3. Click "Yes" button. Step 4. Click "Next" button. Windows installings the components. Step 5. Click "Next" button. Step 6. Click "Finish" button to restart computer. Then the Hydravision Install is completed.
English 3.1.5. Taskbar Icon After installation of the display drivers, you will find an GBT icon on the taskbar's status area. Right-clicking this icon opens the GBT control panel, showing a menu composed of shortcute of the graphics card's enhanced and other functions. You may click the "Display Properties" item, and then click Settings. Click "Advanced" after clickng Settings. Click the appropriate tab to change your display settings. Right click the icon.
V-Tuner 2 lets you adjust the working frequency of the graphic engine and video memory (Core Clock and Memory Clock). Displays core clock status Displays memory clock status Core speed adjustment Enables auto adjustm ent of core/ memory cloc k settings set by user when running 3D applications.
English VGA Information VGA Info lists the relevant information about your card. Color Adjust Color Adjust allows you to make color adjustments, such as brightness, contrast and gamma values for each or all of RGB colors.
on the taskbar's status area. Clicking this icon open the ATi control panel. 1.Using Single Display HYDRAVISION™ HYDRAVISION™ and the Desktop Manager are activated whenever Windows® starts. Installing HYDRAVISION™ adds menu options to the ATI Icon. Click on the ATI icon to access the application's features and help, or to unload the HYDRAVISION™ Desktop Manager. 2.Hydravision HYDRAVISION™ is primarily software designed for multiple monitor settings.
English 3.1.6. Display Properties Pages The screen shows the information of display adapter, color, the range of display area and the refresh rate. Settings (Resolutions and Color depth for windows) The Setting properties page allows you to adjust the Direct 3D settings. You can move the slider to the change resolution. You can click the item to change the color depth. Click "Advanced" icon for adapter and setting.
n Version Information provides the Catalyst version number, 2D version number and the driver build information. n Details button access to the Details tab which lists the card's hardware details and driver information. n Re-activate all warning messages allows you to reactivate any disabled graphics warning messages. n Enable ATI taskbar icon application enables or disables the ATI taskbar icon. However, this feature must be enabled for ATI hotkey support.
English Overlay Properties: The Overlay Properties is used to adjust the Brightness / Contrast / Saturation / Hue / Gamma settings. Overlay properties allows for the viewing of full-motion video on your PC. However, there is only one video overlay, which is only available on the Primary display. The video overlay controls are automatically activated during playback of any video file type that supports overlay adjustments.
You can adjust Direct3D and OpenGL settings from 3D properties page. Direct3D Settings: n Use custom settings checkbox When Use sustom settings is checked, you can click "Custom" button to access Custom Settings. Using Custom Settings is recommended for advanced users only. n SMOOTHVISION 2.1 l Anti-Aliasing checkbox improves image quality by removing jagged edges from 3D images, resulting in smoother, more naturallooking objects.
English n Mipmap Detail Level slider This will allow you to choose the texture quality of the mipmaps the application will use. Mipmaps are a collection of different sized textures of the same image. As the user moves closer to a 3D object the image quality should increase, requiring a higher quality texture of the same image. The base mipmap is the highest quality texture, and all subsequent mipmaps are smaller sized textures of the same image.
n Use custom settings checkbox When Use custom settings is checked, you can click "Custom" button to access Custom Settings. Using Custom Settings is recommended for advanced users only. n SMOOTHVISION 2.1 l Anti-Aliasing checkbox improves image quality by removing jagged edges from 3D images, resulting in smoother, more naturallooking objects. Selecting Application Preference will result in high quality images, with negligible reduction in the application's performance.
English n Mipmap Detail Level slider This will allow you to choose the texture quality of the mipmaps the application will use. Mipmaps are a collection of different sized textures of the same image. As the user moves closer to a 3D object the image quality should increase, requiring a higher quality texture of the same image. The base mipmap is the highest quality texture, and all subsequent mipmaps are smaller sized textures of the same image.
The VPU Recover Properties allows the ATI display driver to reset the graphics accelerator when it stops responding to commands from the display driver. Using VPU Recover the display driver will, in most cases, be able to reset the graphics accelerator without requiring a system restart. VPU Recover Settings: n Enable VPU Recover n Prepare an error report if VPU Recover is activated, for submission to ATI Technologies.
English Display Properties: If your VGA card is equipped with a S-Video connector, you can use a second output device (e.q. a TV or a computer monitor) as part of your operating desktop extending your desktop to second device or copying your desktop on the second device. Select Display Type Enable / Disable "Extend my windows desktop onto this monitor" The Display tab provides the multi monitor features. Here you can enable/disable display devices and swap the assignment of Primary and Secondary displays.
The Color Properties is used to adjust the color settings. It also allows gamma control for video playing of the Video Overlay. The color settings affect all display devices mapped to the view.You can change red, green, and blue display colors. Set Desktop and Video Overlay brightness (gamma) levels can also be changed. n Desktop increases or decreases the color brightness of your desktop. The higher the gamma value, the higher the brightness and contrast of your display.
English 3.2. Win® 2000 Driver Installation With Windows running on your computer, you need to install the graphics card driver to take advantage of the higher performance, resolutions, and special graphics features of the graphics card. To ensure you install the latest driver, insert the Installation CD that shipped with your graphics card. To install the graphics card driver for Win® 2000, please insert the Installation CD. Then the AUTORUN window will show up.
The following troubleshooting tips may help if you experience problems. Contact your dealer or GBT for more advanced troubleshooting information. n Check that the card is seated properly in the PCI Express x 16 slot. n Ensure that the display cable is securely fastened to the card's display connector. n Make sure that the monitor and computer are plugged in and receiving power. n If necessary, disable any built-in graphics capabilities on your motherboard.
English 5. Appendix 5.1. How to reflash the BIOS? 1. Extract the downloaded Zip file to your hard disk (ex: drive C) or floppy disk. This procedure assumes drive C. 2. Restart the computer in MS-DOS mode by choosing "Restart in MS-DOS mode" in the Shut Down Windows dialog box.(This option is only available with Windows 98/98SE. For Windows 2000/ME/XP, you need a startup disk to restart the computer in MS-DOS mode.) 3. Change the command prompt to C:\>. 4.
English - 31 - Appendix
English GV-RX80T256V Graphics Accelerator - 32 -