
User Manual

PleasevisitGIGABYTE'swebsitefordetailsonconguringaRAIDarray.
Install the SATA RAID/AHCI driver and operating system
With the correct BIOS settings, you are ready to install the operating system.
Installing the Operating System
AssomeoperatingsystemsalreadyincludeRAID/AHCIdriver,youdonotneedtoinstallseparateRAID/AHCI
driver during the Windows installation process. After the operating system is installed, we recommend that you
installallrequireddriversfromthemotherboarddriverdiskusing"XpressInstall"toensuresystemperformance
andcompatibility.IftheoperatingsystemtobeinstalledrequiresthatyouprovideadditionalSATARAID/AHCI
driver during the OS installation process, please refer to the steps below:
1. Copy the Hw10 folder under the \Boot folder in the driver disk to your USB thumb drive.
2. Boot from the Windows setup disk and perform standard OS installation steps. When the screen requesting
you to load the driver appears, select Browse.
3. Insert the USB thumb drive and then browse to the location of the driver. The location of the drivers is as
follows:
\Hw10\RAID\x64
4. Select AMD-RAID Bottom DevicerstandclickNext to load the driver. Then select AMD-RAID Controller
and click Next to load the driver. Finally, continue the OS installation.
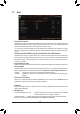
C.UEFIRAIDConguration
Steps:
1. In BIOS Setup, go to Boot and set CSM Support to Disabled. Save the changes and exit BIOS Setup.
2. After the system reboot, enter BIOS Setup again. Then enter the Settings\RAIDXpert2 Conguration
Utility sub-menu.
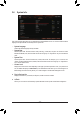
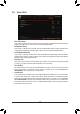
3. On the RAIDXpert2CongurationUtilityscreen,press<Enter>on Array Management to enter the Create
Arrayscreen.Then,selectaRAIDlevel.RAIDlevelssupportedincludeRAID0,RAID1,andRAID10(the
selectionsavailabledependonthenumberoftheharddrivesbeinginstalled).Next,press<Enter>onSelect
Physical Disks to enter the Select Physical Disks screen.
4. On the Select Physical Disksscreen,selecttheharddrivestobeincludedintheRAIDarrayandsetthem
to Enabled. Next, use the down arrow key to move to Apply Changesandpress<Enter>.Thenreturnto
the previous screen and set the Array Size, Array Size Unit, Read Cache Policy and Write Cache Policy.
5. After setting the capacity, move to Create Arrayandpress<Enter>tobegin.
6. After completing, you'll be brought back to the Array Management screen. Under Manage Array Properties
youcanseethenewRAIDvolumeandinformationonRAIDlevel,arrayname,arraycapacity,etc.
- 40 -