Unique Features (Z690 Series) BIOS Update Utilities..................................................................................................... 2 1-1 1-2 1-3 Updating the BIOS with the Q-Flash Utility................................................................2 Updating the BIOS with the @BIOS Utility................................................................5 Using Q-Flash Plus....................................................................................................
BIOS Update Utilities GIGABYTE motherboards provide two unique BIOS update tools, Q-Flash™ and @BIOS™. GIGABYTE Q-Flash and @BIOS are easy-to-use and allow you to update the BIOS without the need to enter MS-DOS mode. Additionally, this motherboard features the DualBIOS™ design and supports Q-Flash Plus, providing multiple protection for the safety and stability of your computer. What is DualBIOS™? Motherboards that support DualBIOS have two BIOS onboard, a main BIOS and a backup BIOS.
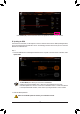
Click Q-Flash (F8) or select the Q-Flash item on the System Info menu to access Q-Flash. B. Updating the BIOS In the main menu of Q-Flash, use the keyboard or mouse to select an item to execute. When updating the BIOS, choose the location where the BIOS file is saved. The following procedure assumes that you have saved the BIOS file to a USB flash drive. Step 1: 1. Insert the USB flash drive containing the BIOS file into the computer. In the main screen of Q-Flash, select Update BIOS.
Step 2: The screen will show that the BIOS file is being read from your USB flash drive. Please select Fast or Intact to begin the BIOS update. The screen will then display the update process. •• To ensure the integrity of the BIOS update, the system will shut down and restart automatically. Then it will begin to flash the BIOS with Q-Flash. •• Do not turn off or restart the system when the system is reading/updating the BIOS.
1-2 Updating the BIOS with the @BIOS Utility A. Before You Begin 1. In Windows, close all applications and TSR (Terminate and Stay Resident) programs. This helps prevent unexpected failures when performing a BIOS update. 2. If the BIOS is being updated via the Internet, ensure the Internet connection is stable and do NOT interrupt the Internet connection (for example, avoid a power loss or switching off the Internet). Failure to do so may result in a corrupted BIOS or a system that is unable to start. 3.
1-3 Using Q-Flash Plus A. Before You Begin 1. From GIGABYTE's website, download the latest compressed BIOS update file that matches your motherboard model. 2. Uncompress the downloaded BIOS file, save it to your USB flash drive, and rename it to GIGABYTE.bin. (Note: The USB flash drive must use the FAT32 file system.) 3. Connect the power cables to the 12V power connector (connect either one if there are two) and main power connector. 4.
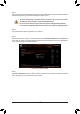
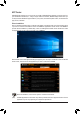
APP Center GIGABYTE App Center gives you easy access to a wealth of GIGABYTE apps that help you get the most from your GIGABYTE motherboard (Note). Using a simple, unified user interface, GIGABYTE App Center allows you to easily launch all GIGABYTE apps installed on your system, check related updates online, and download the apps, drivers, and BIOS.
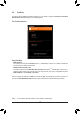
Running the APP Center In Desktop mode, click the App Center icon in the notification area to launch the App Center utility (Figure 1). On the main menu, you can select an app to run or click LiveUpdate to update an app online. Figure 1 If the App Center is closed, you can restart it by clicking Launch App Center on the Start menu (Figure 2).
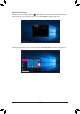
2-1 EasyTune GIGABYTE's EasyTune is a simple and easy-to-use interface that allows users to fine-tune their system settings or do overclock/overvoltage in Windows environment. The EasyTune Interface Tabs Information Tab Description The Smart Boost tab provides you with different levels of CPU frequency to choose to achieve desired system performance. After making changes, be sure to restart your system for these changes to take effect.
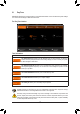
2-2 Fast Boot Through the simple GIGABYTE Fast Boot interface, you can enable or change the Fast Boot or Next Boot After AC Power Loss setting right in the operating system. The Fast Boot Interface Using Fast Boot •• BIOS Fast Boot: This option is the same as the Fast Boot option (Note) in BIOS Setup. It allows you to enable or disable the fast boot function to shorten OS boot time.
2-3 Game Boost This app allows you to flexibly manage your applications to optimize your gaming performance by freeing up system resources and memory usage. The Game Boost Interface Using Game Boost Select the application you want to suspend and then click Go to optimize your system for gaming. To revert the computer back to the state it was before, click Revert.
2-4 RGB Fusion This application allows you to enable or specify the lighting mode of the select device Windows environment. (Note 1) while in the The RGB Fusion Interface Using RGB Fusion •• The icon on the top right corner: Allows your computer to connect to the GIGABYTE RGB Fusion app installed on your handheld devices. (Note 2) •• Click the icon of the desired device and select the LED color/ lighting behaviour on the right section of the screen. Static All LEDs emit a single color.
•• Options for controlling the LEDs on the motherboard and digital LED strip. Click the motherboard icon for further settings. (Note) Select your desired area and select the LED color/ lighting behaviour on the right section of the screen. Static The selected region LEDs emit a single color. Pulse The selected region LEDs simultaneously fade in and fade out. Flash The selected region LEDs simultaneously flash on and off. Double Flash All LEDs flash in an interlaced pattern.
2-5 Smart Backup Smart Backup allows you to back up a partition as an image file every hour. You can use these images to restore your system or files when needed. The Smart Backup main menu: Button Description Allows you to select the source and destination Settings partition Start Allows you to create a rescue drive Backup Now Allows you to perform the backup immediately File Allows you to recover your files from the backup Recovery... image System Allows you to recover your system from the Recovery...
Recovering your system with Smart Backup: Steps: 1. Click the System Recovery button on the main menu. 2. Select the location where your backup is saved. 3. Use the time slider to select a time point. 4. Select a partition backup created on the selected time point and click Restore. 5. Confirm whether to restart your system to proceed with the restore immediately or later. Once you respond "Yes" the system will restart to the Windows recovery environment.
2-6 System Information Viewer GIGABYTE System Information Viewer allows you to monitor and adjust the fan speed in the operating system. You can also display the hardware monitor information on the desktop to view the system status at any time. The System Information Viewer Interface Tabs Information Tab Description The System Information tab provides information on the installed CPU, motherboard, and the BIOS version. The Smart Fan 6 Auto tab allows you to specify a Smart Fan mode.