
User manual
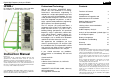


Digital High Frequency Analyser HF58B-r
© Gigahertz Solutions GmbH, 90579 Langenzenn, Germany Revision 4.5 (Febuary 2006) Page 3
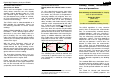
Long and short switches
Some of the switches are recessed in the
casing of the instrument to avoid uninten-
tional switching for rarely used functions
Contents of the package
Instrument
Attachable antenna
NiMH rechargeable Batteries
(inside the meter )
AC-Adaptor
Several Adaptor-connectors
Comprehensive instruction manual
Check the HF analyzer and its antenna by
following the instructions under “Getting
Started.“
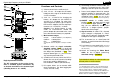
Getting Started
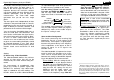
Connecting the Antenna
Screw the angle connector of the antenna
connection into the uppermost right socket
of the HF analyzer. It is sufficient to tighten
the connection with your fingers. (Do not use
a wrench or other tools because over tight-
ening may damage the threads.)
This SMA connector has gold-plated con-
tacts is the highest quality commercial HF
connector in that size.
Carefully check the tight fit of the connection
at the antenna tip. This connection, at the tip
of the antenna, must not be opened.
At the tip of the antenna, there are two LED’s
for monitoring the proper function of all con-
nections of the antenna and the cable during
operation. The red one checks the cable, the
green one the antenna itself.
Slide the antenna into the vertical / cross
shaped slot at the rounded top end of the HF
analyzer. Make sure the antenna cable has
no tension and lies below the instrument. It
may help to loosen the SMA-connector tem-
porarily to let the cable fall into a “relaxed”
position.
Do not bend, break or stretch
the antenna cable!
The antenna can be used by attaching it to
the top end of the HF analyzer or holding it in
your hand. When holding the antenna in your
hand, please ensure that your fingers do not
touch the first resonator or antenna conduc-
tors. Therefore it is recommended to hold it
at the opposite end. For a precision meas-
urement, the antenna should not be held with
your fingers, but be attached to the desig-
nated slot at the top end of the HF analyzer.
There are small ferrite-rolls fitted on the con-
nectors of the antenna cable. They serve the
purpose of fine-tuning
3
. Do not remove
them!
3
Should they loosen they can be glued again with any
household glue
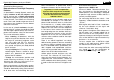
Checking Battery Status
When the “Low Batt“ indicator appears in the
center of the display, measurement values
are not reliable anymore. In this case the bat-
tery needs to be charged.
If there is nothing displayed at all upon
switching the analyzer on, check the connec-
tions of the rechargeable battery. If that does
not help try to insert a regular 9 Volt alkaline,
(non-rechargeable) battery. If a non-
rechargeable battery is used, do not con-
nect the Analyser to a charger / AC-
adaptor !
Insert fully charged batteries only.
Note
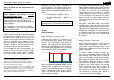
Each time you make a new selection (e.g.
switch to another measurement range) the
display will systematically overreact for a
moment and show higher values that droop
down within a couple of seconds.
The instrument is now ready for use.
In the next chapter you will find the basics
for true, accurate HF-measurement.