
User's Manual

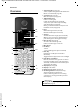

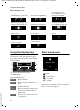


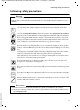
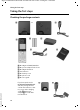
Table Of Contents
- Gigaset C300/C300A - your high-quality accessory
- Overview
- Understanding the display icons
- Using the display keys
- Main menu icons
- Base overview
- Contents
- Following safety precautions
- Taking the first steps
- Using the phone
- Menu overview
- Making calls
- Using the directory and lists
- Sending SMS (text messages)
- Operating the Gigaset C300A base answering machine
- Using the network mailbox
- ECO DECT
- Using the handset as an alarm clock
- Using multiple handsets
- Handset settings
- Base station settings
- Connecting the base to the PABX
- FCC / ACTA Information
- Service (Customer Care)
- Protecting our environment
- Appendix
- Accessories
- Mounting the base on the wall
- Mounting the charger on the wall
- Index

4
Using the display keys
Gigaset C300-C300A / Master EN / A31008-xxxx-xxxx-x-xxxx / overview.fm / 16.04.2010
Version 4, 16.09.2005
Other display icons:
Using the display keys
The functions of the display keys change
depending on the particular operating situ-
ation. Example:
Important display keys:
Open redial list.
Open a menu for further func-
tions.
Confirm selection.
Delete key: Delete character by
character/word by word from
right to left.
Go back one menu level or can-
cel operation.
Main menu icons
Information on using the menus ¢ page 21
Menu overview ¢ page 25
Information
Û
Query
Please wait...
À
Action failed
μ
Action complete
Ð
Establishing a connection
Ø
Ü
Ú
External call (¢ page 27)
Internal call (¢ page 49)
ØìÚ
Alarm call (¢ page 48)
z
Ø
þ
Ú
Answering machine
is recording (¢ page 41)
Connection established
W
Connection cannot
be established or con-
nection interrupted
X
Redial Menu
1
Current display key function
2
Display keys
1
2
1
2
Redial
Menu
OK
Delete
Back
Ë
SMS
ì
Alarm Clock
Ì
Voice Mail
Ï
Settings
t
ì
Alarm Clock
x
Back OK