
Installation Guide

TOOLS NEEDED (Sold Separately)
-Spray bottle (with pump or trigger spray)
-Glass cleaner (for cleaning the glass)
-Single edged razor blade (for cleaning the glass)
-Squeegee with flexible blade (or credit card
wrapped in paper towel)
-Scissors
-Low lint or lint free cloth
-Transparent tape
-Ballpoint pen
-Tape measure, ruler, or yardstick
-Liquid dish detergent (without lotions or
conditioners)
INTENDED USE
-Apply to the inside surface of smooth glass,
plastic, or Plexiglas windows
-Do not apply to motor vehicle windows
-Do not apply to frosted, etched, leaded, cracked,
holed, or deeply scratched glass, or any otherwise
flawed or defective glass or glass that is over 40
years old
PREPARATION
1. Clean the Glass
Clean the glass with the glass cleaner and the low
lint cloth. Use a razor blade to scrape any
remaining debris or paint chips from the glass.
Make sure the glass cleaner is dry before applying
the film.
2. Mix the Application Solution
Mix 1 quart of water and
tsp. of liquid dish
soap into the clean spray bottle. Place the water
in the bottle first to prevent excessive soap suds.
NOTE: DO NOT use this solution to install
other GILA products such as Heat Control, Glare
Control, or Privacy Window Films.
INSTALLATION
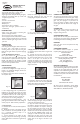
1. Create Your Template
a. Measure the sidelight left to right and top to
bottom. For full-length sidelights, measure the
length at multiple points.
b. Mark the outer points of the overall size on
the template sheet.
c. Use a straight edge (ruler or yardstick) and a
ballpoint pen to connect the points and create
cutting lines (HELPFUL HINT: Deduct and trim
an additional 1/8" from the overall length and
width of the template to ensure a proper fit).
d. Use scissors to trim along cutting lines.
e. After trimming is complete, hold the tem-
plate against the inside surface of the sidelight to
ensure proper fit. Make necessary adjustments.
2. Trim the Film
a. Unroll the film on a clean, flat surface (table or
countertop).
b. Identify the portion of
the design that you
want to include in the final application on glass
(i.e. a particular geometric shape or an
arrangement of flowers).
c. Lay the template on (or under) the film,
covering up the portion of the design previously
chosen. Make sure to center left to right and top
to bottom.
d. Tape the outside edges of the template to the
film using transparent tape, with the tape
overlapping the template onto the film.
e. Use a pair of scissors to trim the film along
the outside edges of the template.
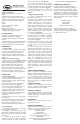
3. Apply the Film to the Glass
a. Lightly spray the inside surface of glass with
the Solution.
b. Separate the clear liner from the film by
attaching two 3"-4" pieces of transparent tape to
the front and back surfaces of a corner so that
about 1" of the tape is on the film, the rest
centered and hanging over the pointed corner.
Press
the two pieces of tape firmly together, then
quickly pull apart to begin separating the liner
away from the film.
c. Continue to peel the two strips of tape apart
to separate the liner from the film. (HELPFUL
HINT: Have a helper hold the film while you peel
the clear liner away from the film.)
d. Hold film so the smooth side is facing the
window and apply to the glass. Use your hands to
smooth out and position the film.
e. Spray the surface of the film facing you with
the Solution. Squeegee the centerline of the film
from top to bottom to set in place. Starting at
the top, squeegee from the center to the right
side and work downward to remove remaining
Solution from under the film. Repeat this process
for the left side (HELPFUL HINT: Wrap your
squeegee or credit card with paper towels. The
added layer will help remove all water from
underneath the textured film and
will also absorb
excess water at the edges of the film as you
squeegee.)
CORRECTING MISTAKES
You may notice imperfections such as air bubbles
or debris between the film and the glass. Simply
peel the affected area of the film away from the
glass. Use your squeegee or tip of scissors to
remove any debris or bubble. Respray the film
and the glass with the Solution and re-apply to
the glass.
CURING TIME
The film fully "cures" over the next week to 10
days. Any remaining small bubbles should
disappear during this time.
CLEANING AND CARE
Always clean the film with paper towels and the
same Solution you used to apply it. DO NOT USE
household glass cleaners containing ammonia.
REMOVAL
Start in an upper corner and pull the film away
from the glass.
CONSUMER SUPPORT
For additional technical support or
product
inquiries, please write, call, or go on-line:
GILA Film Products
P.O. Box 5068
Martinsville,VA 24115 USA
Consumer Service Hotline, 1-800-528-4481
Monday-Friday, 8am-5pm EST.
web: www.gilafilms.com
e-mail: gilahelp@cpfilms.com
PRODUCT WARRANTY
At any time, GILA will gladly replace any product
with a manufacturing defect upon receipt from the
consumer of the original dated sales receipt, an
explanation of the manufactu
ring defect, a 4” x 4”
sample of the defective film, and the product label
and UPC from top back of the box. Claims should
be addressed to:
GILA Film Products
Dept. DIY/WAR
P.O. Box 5068
Martinsville,VA 24115 USA
All claims must be submitted in writing. Please
allow 3-4 weeks for claims processing. Copyright
2015 CPFilms Inc., Martinsville,VA USA.
Sidelight Solutions
WINDOW FILM
Application Instructions
Fig. 1-b
Fig. 2-c
Fig. 2-d
Fig. 3-a
Fig. 3-b
Fig. 3-c
Fig. 3-e
50175935
(11/2015)