
User Manual


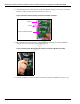

Table Of Contents
- Manual Cover.pdf
- MDE-4939 Preliminary 050511.pdf
- FlexPay™ Contactless Module Installation and Service Manual
- Introduction
- Important Safety Information
- Mounting the FlexPay Contactless Module on Encore S Enhanced Dispenser Equipped with SPOT EMV CRIND
- Mounting the FlexPay Contactless Module on The Advantage Series Dispensers
- Mounting the FlexPay Contactless Module on Encore 300 and Encore 500 Dispensers
- Mounting the Contactless OTI Module on Encore 300 (Pre-EMV) Dispensers
- Mounting the FlexPay Contactless Module on Encore 500 S Dispensers
- Mounting the FlexPay Contactless Module on Eclipse Dispensers
- Mounting the FlexPay Contactless Module on FlexPay OPT Dispensers
- Installing the Contactless Interface Board on SCR 2
- Configuring SPOT EMV CRIND for FlexPay Contactless Module
- Verifying Functionality of FlexPay Contactless Module Through CRIND Diagnostics (Generic CRIND)
- Affixing FlexPay Contactless FCC Label
- FlexPay™ Contactless Module Installation and Service Manual

Mounting the FlexPay Contactless Module on Encore S Enhanced Dispenser Equipped with SPOT EMV CRIND
P
re
l
im
i
na
ry
Page 8 MDE-4939 FlexPay™ Contactless Module Installation and Service Manual · May 2011
4 Assemble the Bracket and the FlexPay Contactless Module using the four screws, four Nylon
Washers, and the four nuts provided in the kit (see
Figure 3).
Figure 3: Bracket and the FlexPay Contactless Module Assembly
Bracket
Screws
FlexPay Contactless Module
5 Mount the Bracket and the FlexPay Contactless Module Assembly onto the E-CIM Bezel
using the four screws provided in the kit (see
Figure 4).
Figure 4: Mounting the Bracket and the FlexPay Contactless Module Assembly
6 Connect the SPOT Contactless Cable to the FlexPay Contactless Module [see Figure 5 (i)].