
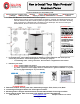
Installation Instructions


(800) 348
-
0746
www.gilpininc.com
sales@gilpininc.com
2
©Gilpin Products LLC
201
8
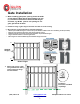
Fence Attached to Walls or Pillars
Determine corner locations for fence and drive stakes to
mark positions. Run string or chalk line between corner
stakes. Stakes should be tall enough so that line does not
touch ground.
If distance is less than 6’, order one set of Fixed
Attachment Fittings. Cut fence to fit exactly. Cut
from both ends to maintain spindle spacing.
If distance is greater than 6’, order one set of Fixed
Attachment Fittings, two fence sections and two line
posts. Cut one section to fit opposite ends as shown.
Before cement hardens, level
fence sections. Also, height
above ground must be plumb
.
While cement sets, assemble next
section to its post. Set in place,
cement and level as before.
Continue installing one post and
one section at a time, setting
each post and section as you go.
8. Install Gate(s)
In Accordance with separate gate
instructions
Set post in hole. Add shovel
of gravel to each corner of hole
for good drainage.
Pour concrete around post.
Tamp around each post until
concrete is approximately 2"
below ground level.
After setting corner post., dig
hole approximately 12"
below frost line.
Slide a fence section into pre
punched hole in post. Fasten
using self-drilling screws
(
provided
).