
Installation Instructions

(800) 348-0746 www.gilpininc.com ©Gilpin Inc. 2011
sales@gilpininc.com
Install Your Steel Fence from Gilpin
Triton™ Deco™, Oasis™
Tools you may need
Level Tape Measure Drill Hacksaw 3/8” Box or Socket
Flat Screwdriver Center Punch Hammer Scriber or Pencil
1. Install posts.
a. Location of posts determines placement and location of fence panels.
b. In-ground posts should have at least 24” buried.
c. If attaching to concrete, follow directions provided with masonry anchors. To guard
against breaking or chipping, install flanges 3”- 4” from edge.
d. Posts must be plumb and aligned. (If surface mount posts are not plumb, use shims as
needed.)
2. If necessary, cut fence to fit between posts. Insure equal space between post and first picket at
either end of panel.
3. Attach fence panels to posts using P/N 865 Adjustable Fittings.
a. Drill ¼” diameter holes approximately 7/8” from each end of both top and bottom fence
rails. Mark location using template provided with fitting set.
b. Drill 3/16” pilot holes in newel post for self-tapping screws. Use fence to determine
location.
c. Four inch (4”) space under bottom of pickets is recommended for best appearance.
d. Attach L-shaped bracket to fence panel with nuts and bolts provided.
e. Attach fence to post using self-tapping screws provided.
4. Tighten all connections.
5. Fence has baked on finish. Touch up hardware, scratches and cuts with rust resistant (not
latex) paint.
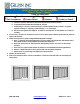
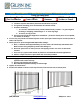
OASIS
DECO
TRITON