
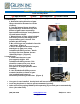
Installation Instructions

(800) 348-0746 www.gilpininc.com ©Gilpin Inc. 2011
sales@gilpininc.com
Install Your Steel Gate from Gilpin
Tools You May Need
Tape Measure Drill Screwdriver Center Punch
1. Install posts with opening approximately two inches (2”) wider than gate.
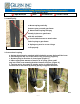
2. Install Hinge
a. Determine swing direction of gate.
Hinges should be mounted on inside
of swing.
b. Top and bottom hinges should be
approximately 3 inches from top and
bottom of gate frame respectively.
Space additional hinges evenly between
top and bottom hinges.
c. Mount hinges to gate, using included
self-drilling screws, with hinge barrel
exposed when gate is closed. This
permits gate full swing.
d. Be sure hinges are installed in line with
gate frame. (Figure 1)
e. Once all hinges are mounted on gate,
attach gate to gate post, using
included self-drilling screws. Attach
top hinge first then bottom. Secure
remaining hinges. (Figure 2)
3. Install Latch
a. Install latch keeper to gate
post opposite hinges. Use
included self-drilling screws. This
should be centered on post, about
five or six inches from top. Be
sure latch is in proper position when
installing.
b. Use included self-drilling screws
to attach latch bar to frame of gate.
Use installed latch keeper to
determine positioning of latch bar. (Figure 3)
Your gate is now installed. Gravity latch will secure latch post when closed.
Lock may be placed on latch to prevent unwanted opening.
Order self-closing spring P/N991 (sold separately) if you wish gate to automatically
close. (See other side)
Figure 1
Figure 2
Figure 3
LATCH BAR
KEEPER