
Installation Guide
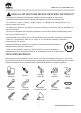
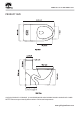
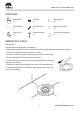
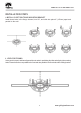
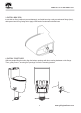
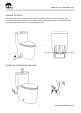
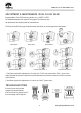
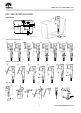
Table Of Contents
- Contact our Customer Care Center for Help:
- ·w
- READ ALL INSTRUCTIONS BEFORE UNPACKING THE PRODUC
- TOOLS AND MATERIALS
- PRODUCT SIZE
- PARTS LIST
- REMOVE OLD TOILET
- INSTALLATION STEPS
- ADJUSTMENT & MAINTENANCE (DUAL FLUSH VALVE)
- TROUBLESHOOTING
- FILL VALVE INSTALLATION
- MAINTENANCE & CARE
- FILL/FLUSH VALVES MAINTENANCE & CARE
- ONE-YEAR LIMITED WARRANTY

COMFORT IS A NATURAL GIFT
www.givingtreehome.com
3
PARTS LIST
Bowl with lid
x1
Wax Ring
x1
Plastic washer
x2
Toilet Seat Set
x1
Mounting Screw
x2
Bolt Cap Decoration
x2
Plastic Piece
x2
Expansion screw
x2
T-Bolt Nuts and Washers
x2
REMOVE OLD TOILET
IMPORTANT!
Shut off main water supply prior to installation!
1. Shut off water supply line. If you do not have shut-off valve near the toilet shut off main water supply line.
2. Flush the old toilet and make sure that tank is empty.
3. Disconnect and remove water supply line connected to the toilet's tank.
4. Remove old toilet, bolts, nuts from the closet flange.
5. Clean closet flange area from old wax ring and putty sealant using putty
knife from the base area.
6. Clean any remaining debris and wipe any water at the installation area
7. Temporarily plug flange on a floor with a flange plug or towel to prevent
gasses from escaping.