
Installation Guide
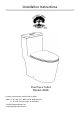
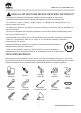
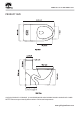
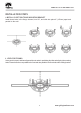
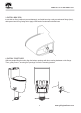
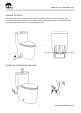
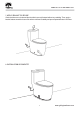
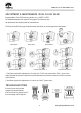
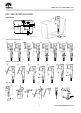
Table Of Contents
- Contact our Customer Care Center for Help:
- ·w
- READ ALL INSTRUCTIONS BEFORE UNPACKING THE PRODUC
- TOOLS AND MATERIALS
- PRODUCT SIZE
- PARTS LIST
- REMOVE OLD TOILET
- INSTALLATION STEPS
- ADJUSTMENT & MAINTENANCE (DUAL FLUSH VALVE)
- TROUBLESHOOTING
- FILL VALVE INSTALLATION
- MAINTENANCE & CARE
- FILL/FLUSH VALVES MAINTENANCE & CARE
- ONE-YEAR LIMITED WARRANTY

COMFORT IS A NATURAL GIFT
www.givingtreehome.com
4
INSTALLATION STEPS
1.
INSTALL CLOSET BOLTS AND MOUNTING BRACKET
Install closet bolts in the flange channel, turn 90°, and slide into place 6" (152mm) apart and
parallel to the wall.
step 1
step 4
step 2
step 5
step 3
step 6
2.
LEVEL POSITIONING
Use a pencil or tape to add two alignment lines to assist in positioning the toilet and aligning the mounting
holes. Ensure these lines are parallel to the front and also parallel to the floor bolts and mounting bracket.