Hot & Cold Hidden Bottle Water Cooler Model # 8LIECH-SC-SSF-SSS-NP USER MANUAL TO REDUCE THE RISK OF INJURY AND PROPERTY DAMAGE, USER MUST READ THIS MANUAL BEFORE ASSEMBLING, INSTALLING & OPERATING DISPENSER. SAVE THIS MANUAL FOR FUTURE USE IMPORTANT: If you have a question or problem, please contact info@eastwestintl.com for assistance. © 2012Electrotemp Technologies Inc.
SAFETY PRECAUTIONS To reduce risk of injury and property damage, user must read this entire manual before assembling, installing & operating dispenser. Failure to execute the instructions in this manual can cause personal injury or property damage. This product dispenses water at very high temperatures. Failure to use properly can cause personal injury.
SAFETY PRECAUTIONS - Electrical Requirements Electrical Shock Hazard Plug into a grounded 3 prong outlet. Do not remove ground prong. Do not use an adapter. Do not use an extension cord. Failure to follow these instructions can result in death, fire, or electrical shock. A 120 volt, 60 Hz., AC only, 15- amp, fused electrical supply is required. A time-delay fuse or circuit breaker is recommended. Do not overload the ciruit, provide separate circuit, if required, to serve only this appliance.
TABLE OF CONTENTS Safety Precautions 2 Safety Precautions - Electrical Requirements 3 4 . Key Information for Future Use 5 Specifications 5 .. Parts & Features Assembly 6 Cleaning Prior to Initial Use .. .. 6 Installation . 7 Operation .. 8 Proper Care & Cleaning . 12 Troubleshooting 15 Limited Warranty 16 KEY INFORMATION FOR FUTURE USE Please register your dispenser immediately at www.electrotemp.
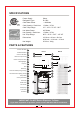
SPECIFICATIONS Power Supply Refrigerant Type 5Amp. Cold Water Power <100Watts Cold Capacity / Peak Hour 1 Gallon / 3.79 L Cold Temp Range 3°C - 10°C / 37.4°F - 50°F Hot Water Power Hot Capacity / Peak Hour 425 Watts Hot Temp Range 80°C - 92°C / 176°F - 197.6°F Dimensions 102.8 cm x 32 cm x 38.2 cm R-134A 1 Gallon / 3.79 L 40.8 inch × 12.6 inch × 15 inch Net Weight 35.
ASSEMBLY Keep plastic bags away from children. 1. Remove dispenser from packaging. 2. Unpack drip tray and insert into dispenser. 3. Remove protective packaging from around probe. 4. Properly dispose all of packaging. CLEANING PRIOR TO INITIAL USE To remove any odors or dust that may collect during shipment, you must clean dispenser prior to first use. Move dispenser away from wall and turn it 90° in either direction. 2. Turn power switches to OFF. 3. Unplug power cord from wall outlet. 4.
11. Place a 2 gallon or larger bucket under the drain plug in the rear of the dispenser. HOT WATER Remove drain cap and silicon plug. Cool water will immediately flow into the bucket. Several seconds later hot water will dispense. Be mindful to avoid injury. 12. Once the unit has drained, replace the silicon plug and drain cap. 13. Remove the remaining water from the reservoirs by dispensing from the cold tap into a pitcher. Rinsing 14. Repeat steps 2 to 13, but this time using clean tap water.
OPERATION This dispenser is intended for water dispensing only. Do NOT use other liquids. Do NOT use for other purposes. Warranty is void if used for any other liquids including coffee, tea, juices, beer or wine. This dispenser has been designed to use water bottles with a 3, 5 or 5.2 gallon capacity. Do NOT use alternative bottles. 2. This model uses an pump to force water from the bottle to the reservoirs: a. Please do the following: i. Clean bottle cap and neck. iv.
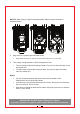
NOTICE: When using a 5 gallon rectangular bottle, slide into place as shown in illustration below. 2. Plug cord into a properly grounded wall outlet. • 3. Water will be pumped into the hot and cold water reservoirs from the bottle. Turn energy saving switches on back of dispenser to ON. • The red switch controls the heating of water. If you do not want hot water, leave this switch OFF • The blue switch controls the cooling of water. If you do not want cold water, leave this switch OFF.
Initial Rinsing of Water Lines This unit has been tested and sanitized prior to packing and shipping. During transit dust and odors can accumulate in the tank and lines. You must dispense and dispose at least one quart of water prior to drinking any water. Dispense Cold Water Note: After setup, it will take 1 hour to get water to maximum cold temperature. During this time the compressor may run continuously. This is normal. 1. Position bottle, glass, pitcher or cooking pot securely below cold water tap.
Replace an Empty Bottle Notice: When your bottle is empty the dispenser will beep intermittently and the LED nightlights will blink until a fresh bottle is connected. You may also hear a sucking sound when the bottle empties. This is normal and is another way to be alerted that your bottle is empty. Replace empty bottle as soon as you notice it is empty. If unavailable, leave door ajar or unplug cooler to stop beeping noise and flashing lights. There may be a small amount of water left in the bottle.
PROPER CARE & CLEANING General Cleaning Perform: As needed Time Required: 5 minutes. Note: Do NOT use abrasive materials or chemical cleaners. 1. Clean cabinet surfaces with a soft cloth and warm soapy water. 2. Wipe dust from back of dispenser to improve efficiency. 3. Remove drip tray assembly by sliding it forward. Remove cover. Place tray and cover in dishwasher or wipe parts clean with a soft cloth and warm soapy water. Sanitizing Perform: Every 3 months or whenever an off-taste occurs.
8. Remove remaining water from reservoir by dispensing from the cold tap into a pitcher. Step B: Sanitize Probe and Taps 1. In a clean bucket, make a sanitizing solution of 1.5 gallons of tap water and 3 tablespoons of unscented household bleach. 2. Wipe probe and area around all taps with a soft cloth moistened with the sanitizing solution. Step C: Sanitize Reservoirs 1. Remove the cap from a spare empty 5 gallon bottle. 2. Fill the bottle with the water and bleach mixture. 3.
7. Allow the water to fill the empty reservoirs. 8. Wait 10 minutes then turn energy saving switches OFF and unplug the power cord. 9. Place a 2 gallon or larger bucket under the drain plug in the rear of the dispenser. HOT WATER 10. Remove drain cap and silicon plug. Cold water will immediately flow into the bucket. Several seconds later hot water will dispense. Reminder - Place drain cap and silicon plug in a safe location so they are not lost. 11.
TROUBLESHOOTING Dispenser does not operate. Make sure the power cord is properly connected to a working outlet. • Water is leaking. • Bottle may have a leak. Remove bottle and replace with new bottle. • If leak remains, remove probe from bottle and call 888-828-1426 for assistance. Push buttons are stuck and/or faucets are leaking. • Apply mineral oil (baby oil) to button slides to reduce friction. No water is coming from the taps. • Make sure the bottle is not empty. If so, replace it.
LIMITED WARRANTY Electrotemp Technologies Inc., (“Vendor”) warrants to the original purchaser of this dispenser, and to no other person, that if this dispenser is assembled and operated in accordance with the printed instructions accompanying it, then for a period of one (1) year from the date of purchase, all parts in such dispenser shall be free from defects in material and workmanship. Vendor may require reasonable proof of your date of purchase from an authorized retailer or distributor.
名称:网销说明书8LIECH-SC-SSF-SSS-NP(GLACIAL)-English 图号:5M009423X1 技术要求: 1、尺寸:143×210mm 2、单色印刷 3、产品符合Rosh要求 4、批量生产前一定要样品确认, 不得擅自更改图纸 设计: 审核: 批准: